NOTE *This article was originally published January 2015 for Foundations Revealed. The link can be found here.
This article is the second part of a 2 part series dedicated to a patent by B Baldwin of 1884. First part found here.
INSPIRATIONS
I spent quite a while deciding on what material choice I would make for the corset. One of my favourite corsets is by R & W.H Symington of Market Harborough, a red and black sateen corset dated around 1900. Now although this would have come after the patent I love the colour play and decided to colour block the panels so the gore detail could be seen as well as the curved line from the back to the front an integral feature of the patent that represented Hogarth’s line of beauty.
If this patent was manufactured It would probably have be constructed using a single layer of coutil. I decided that this corset would be made with a fashion layer backed with coutil and then lined so all the inside is neatly finished
The start of the article will look at the text provided with the patent which gives a small insight into its construction. For reference I decided to scale up the drawing and highlight the bone pockets that featured on the outside of the corset. The illustration made it clear where they should be placed and how many.
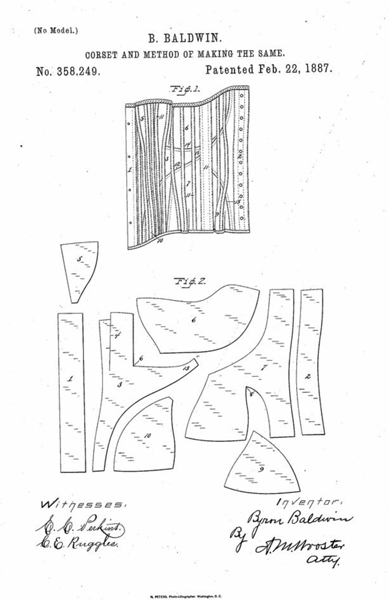
• “11 denotes the bone pockets which are formed in the usual manner in this class of corsets- that is, by stitching independent strips outside of the sections of the corset during the process of manufacture”
• The bust gore seaming is hidden by the bone casing.
“It will be seen in Fig 1 that the seams joining the bust gore and the front body section, the seam joining the front of the underarm section to the front body section and the seam joining the front of the back hip gore to the back body section are wholly conceauled”
It can be seen in the illustration the double dotted line representing the visible curved line. It gave indication of the order which pieces joined together. I actually thought the double line of stitching g was a nice decorative feature too.
• “12 denotes a curved and recurved seam (Hogarth’s line of beauty,) which extends from the top of the corset at the back, following naturally the curves of the body from between the shoulder blades down across the waist and over the hip at the front.
• “Commencing at the bottom, this seam first joins the back edge of the front body section and the front edge of the front hip gore. After passing off from the rearwardly extending tongue 13 of the front body section, and joins that to the front of the back body section. It then passes off from tongue 13 and joins the back of the underarm section to the front of the back body section”
PRE CONSTRUCTION
Prior to commencing construction there were a few preparation stages I had to make which I haven’t included photographs off but are as following beginning with the fabric cutting.
• cut a single layer of coutil for Front, back, bust gore, back bust gore, front hip gore back hip gore
• Cut a double layer of coutil for the centre front, centre back
• Cut a single layer of silk for the front, back, front and back hip gores and front and back bust gores . I decided I wanted to show off the curve so cut the front and back in black and the gores in aubergine
• Cut a single layer of cotton liner for the front, back, and bust and hip gores
• All the silk pieces were fused with a medium weight woven fusing
• I prepared all the bone casings. I Fused the slate silk and the cut strips of approx 27mm wide (following the selvedge) I Used a tape maker to make 12mm bone casings. I also cut 2 strips of 5mm silk and made bone pockets with a 25mm tape maker. These would be for the sides.
CONSTRUCTION
Following the advice from some of the other articles on Foundations Revealed I pin rolled the silk pieces to the coutil layer so they could be treated as one. In the past I have basted the layers together with a long running stitch around the edges but in many occasions still have the annoying rolls and creases appear.

Demonstrating pin rolling to the back hip gores
1. Inserting the front bust gore into the front panel
To insert the bust gore I needed to spread open the slit in the front pattern. This would be hardest part of the makeup as it would be required that I stitch the straight edge to 2 convex edges whilst maintaining the sharp point at the bottom of the gore.
As the point was very tight I wouldn’t be able to manoeuvre the needle and foot and turn the work whilst stitching the panels right side together (I tried with little success in the toile).
I decided to overlap the seams and stitch directly on the top on the outside layer. I firstly drew on the seam allowance on the gore 10mm around the point. The front was slightly different. I used 10mm at the top of the split (upper edge) and tapered it down to 5mm to the point. I pressed back the seam allowance on the front panel and slit around the edge making sure I slashed down to the apex of the gore.
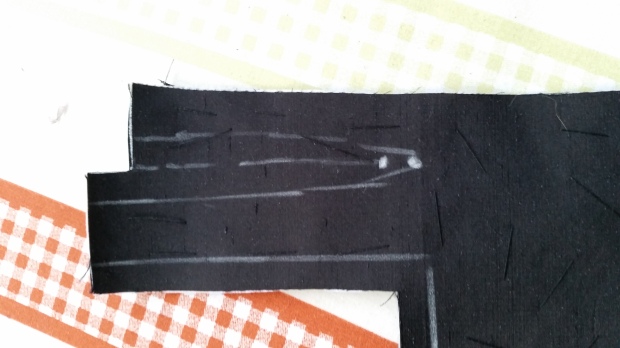
The seam allowance drawn on for the front bust gore
I then placed the front panel over the gore and top stitched around. The slashes enabled me to easily work the slit open and around the gore.

The front bust gore inserted
2. Inserting the back hip gore into the back panel.
The same method of application would be applied inserting the back hip gore into the back as the front bust gore above. This was slightly easier as the corner was at more of a right angle so easier to manuveor the needle as opposed to the slit in the front panel I had to spread open. A second row of stitching was also applied to the curved edge going back toward the CB.
3. Joining the back panel to the front hip gore.
Next I joined the front edge of the back panel to the front hip gore. I overlapped the seam so that the double row of top stitching was made on the back panel.
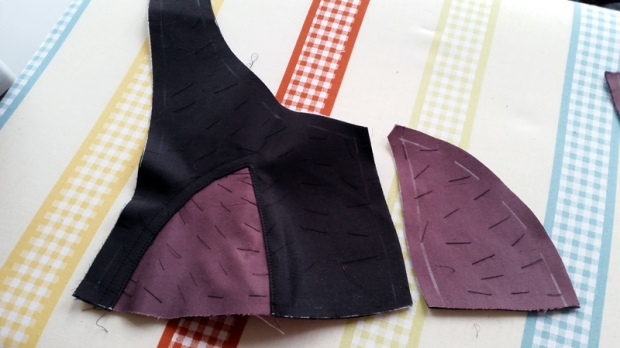
The back panel and front hip gore
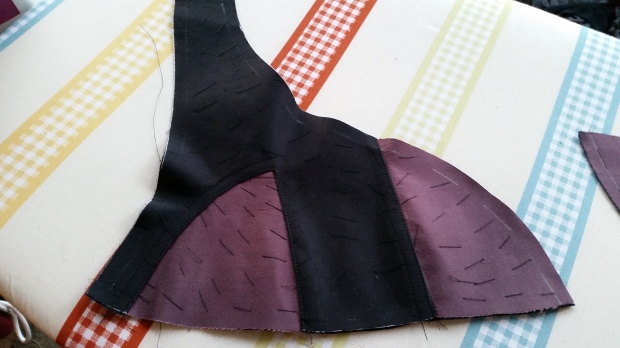
The back panel and front hip gore sewn together
4. Inserting the back bust gore into the front panel
The pieces were joined using the overlapping seam technique as applied to the other gore panels. It was important that the drill hole on the front tongue and the notches were carried over to the pieces to allow for the pattern to align correctly. A second row of stitching was applied to the lower edge.
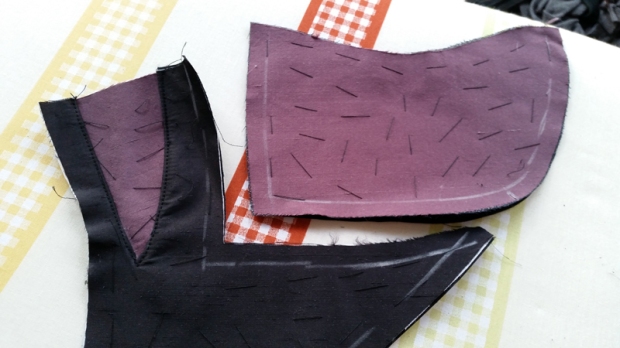
The back bust gore and the front panel

The front panel with the back bust gore inserted
5. Joining the front and back sections and adding a double row of stitching going down.
Working with opposing seams it was important to add plenty of notches particularly where the front met the hipgore/back panel seam and the intersection of the back bust gore/back panel. At this point I really loved how playing around with colour for the panels drew attention to the panels and just how interesting this patent was.
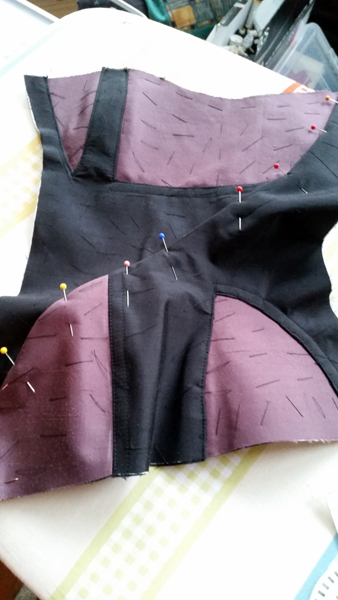
The front and back panels pinned together and ready for sewing
6. Make up the centre back strip right sides together, seam the CB and topstitch.
Join to the back panel sticking only the top silk/coutil layers. The under layer would join to the liner.
7. Inserting the busk
8. Joining the front to the centre front outer
When joining the centre front panel I stitched only the top layer of silk/coutil. The under layer would join to the liner. I top stitched the centre front layer.
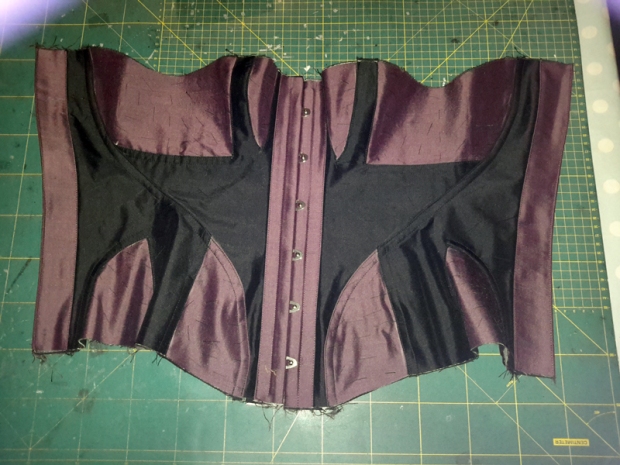
9. Further Construction
Using the edge of the foot stitched channel in the CB for the eyelets and bones either side. And also a channel in the centre front for an additional flat steel.
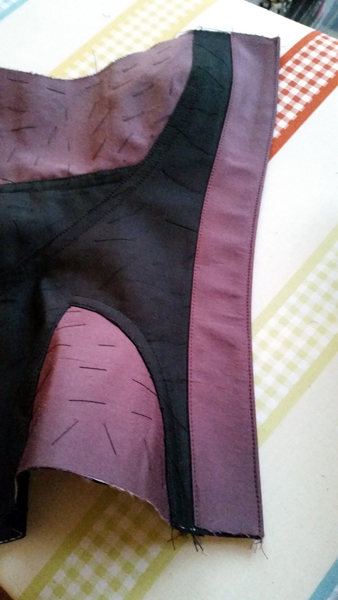
The lacing panel
10. Applying the bone casings
The corset patent demonstrated there were external bone pockets with the majority focused on the front. Counting the bones that appeared around the front I realised that due to my small frame I wouldn’t be able to squeeze in as many as the patent illustrated. My large print out of the patent came came in handy where I highlighted the casings to make easier to see.
There were 11 12mm bone casings in total shown plus the larger side pocket that would 2
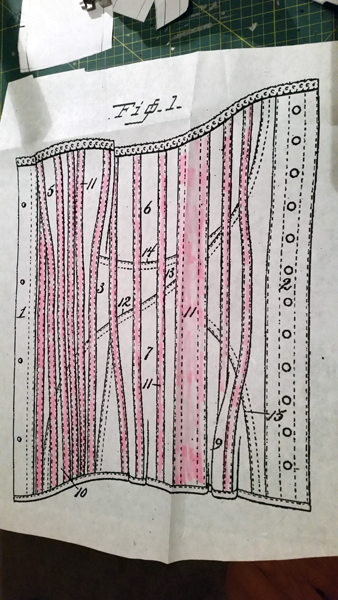
Original boning channel diagram
I started from the side where the wider bone pocket was placed. This bone pockets were positioned relatively straight up and down the corset. The side bone pocket was positioned half over the front seam of the back hip gore. I then worked my way from the front around to the side pinning the bone pockets into place. The front bust gore seams were hidden and a bone pocket also went thought the centre of the gore. A casing also covered the front seam of the back bust gore.
The front bones pockets tapered down to side by side at the waist position and then spaced out evenly as I worked my way to the back. As I was pinning them on I began to feel that I was losing the colours covering with external casings and I wouldn’t be able to appreciate the panels of the finished corset. I Added an addition casing at the back (not featured on the patent) as aesthetically I felt the gap was a little out of proportion in comparison to the others. Presumably if I had a bigger frame all the other casings would be a little more evened out.
11. Make up lining layer.
Fabric seamed together right sides. The gores were inserted exactly the same as the outer layer, although I left out the double row of stitching. Attached right sides together to the facing of centre front and centre back. The corset could then be turned through.
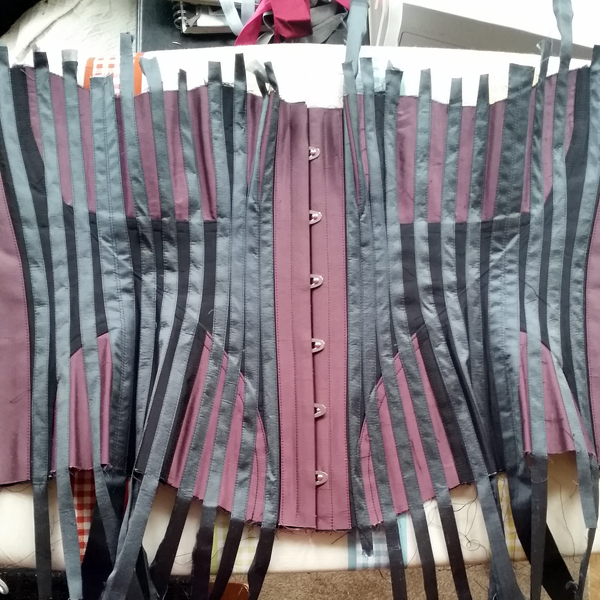
All the bone channels sewn down
12 . Boning
Spiral steel bones cut and tipped to length s were inserted into all the seam pockets. Flat steels were used in the back. I was uncertain at first due to the curvature on the pattern and whether this would affect the choice of bone into the seam. I wondered whether the flat steel would fit the seam allowance or whether it would tear under pressure.
13. Binding
I must admit I cheated with the binding. Usually I would make it as I did the casings but I had some black Cotton pre made to hand. I first machine stitched it to the underside and then flipping it over and hand stitching.
14. Decoration
Like many of the corsets of the patents time I decided to decorate with a deep embellished lace trim hand stitching the lace to the upper edge. Being as this corset would be worn as a fashion outerwear garment as opposed to lingerie I chose to place the lace scallop over the edge for a little style detail.
15. Finally the last stage was to apply the eyelets.
THE FINISHED CORSET
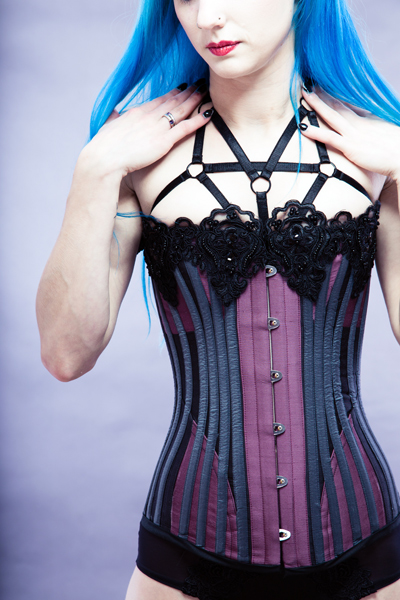
PHOTOGRAPHY: VAPOUR TRAIL PHOTOGRAPHY

MODEL: BEX FISHER, PHOTOGRAPHY: MONIAPHOTO
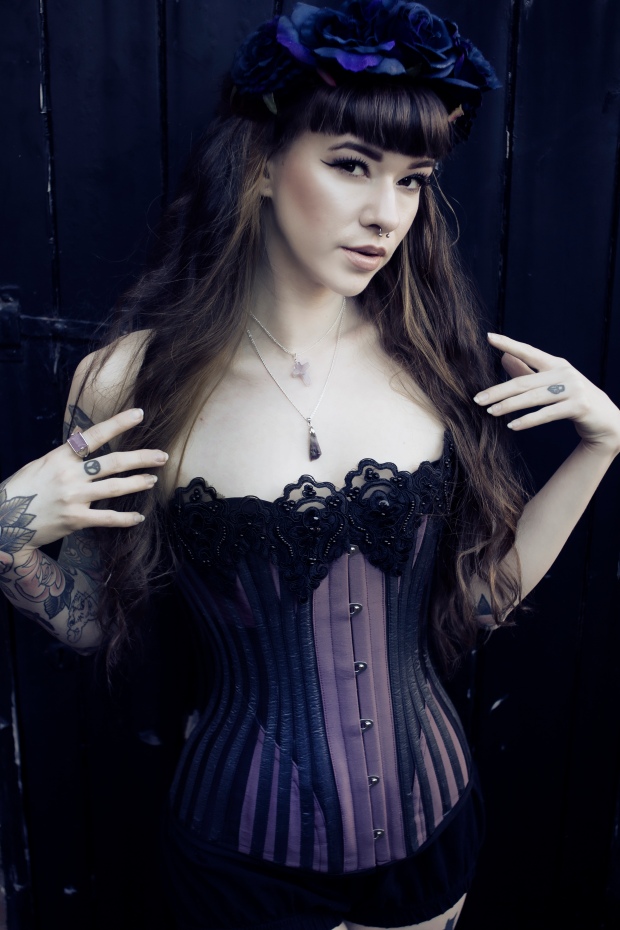
MODEL: BEX FISHER, PHOTOGRAPHY: MONIAPHOTO
CONCLUSION
Overall I love the finished corset, the colours and the applied lace finishing. I really enjoyed this challenge using gores as a way of adding capacity. I tried to be true to the patent sketch and for this corset did not adapt it too much. Obviously as this pattern was fitted for my small frame I feel it is a little swamped in casings to the outside. I think I’ll play around with this pattern and use a combination of casings applied to the external and internal of the garment so more of the colour blocking and gores can be seen. I really do like how effective using the coloured silks for the gores and casings were and placing emphasis on the different shaped pieces.
Fit
- I found the corset to be fairly comfy to wear and wasn’t too restrictive so the patent worked to Baldwin’s intentions.
- I was really pleased with the fit of the corset. I was slightly surprised that the gores did in fact work with my frame and I feel confident in using them again in future designs regardless of size. I really loved the curves the gores created probably helped with the choice of restriction applied to the waist being greater than that of the hip. I actually like a little bit more waist reduction so maybe this is something I can also adapt the pattern to later on.
- I think being as this is a fashion style corset I would also raise the centre front creating more of a sweetheart shape neckline and adding into the depth of the bust gore for a little more coverage.
Things I’ve learnt
- PIN ROLLING… I think from now on every corset I make ill be applying this technique. So pleased with how effective (and surprisingly not very time consuming) this preparatory technique is in the overall finish.
- INSERTING GORES…Now I have mastered the technique of inserting gores I am fairly confident that they will feature in many more of my own patterns in the future.
I really hope you’ve enjoyed these articles as I have found the journey of making a corset from a patent. Feel free to ask any questions with regard my techniques or processes.
<ahref=”http://www.bloglovin.com/blog/14331383/?claim=qjpg88ctuex”>Follow my blog with Bloglovin</a>


