NOTE *This article was originally published January 2017 for Foundations Revealed. The link can be found here.
This is the first part in a two part series discussing ‘The Athletic Corset’ pattern as featured in ‘A practical guide to corset cutting and making’ compiled by William D.F. Vincent. (More about this book here.) This article will discuss the pattern and how I have interpreted it whereas the second will focus on recreating the corset and my methods used in its construction.
As someone active in various sports I was intrigued by the corset and its fit considering its purpose. Perhaps I could test it out to see how viable it is to wear as a functioning garment whilst playing sports?
I haven’t used elastic/ stretch fabrics before in ‘true’ corsetry (excluding contemporary lingerie/basque making) so it would be interesting to see if there were any benefits to the fabric properties, and whether this would enhance freedom of movement during sporting activities.
The Pattern and Observations
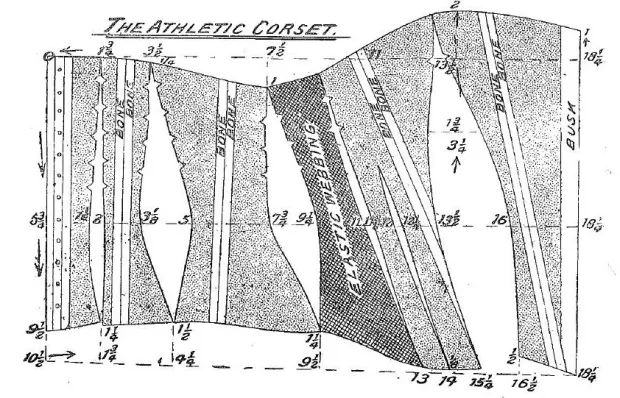
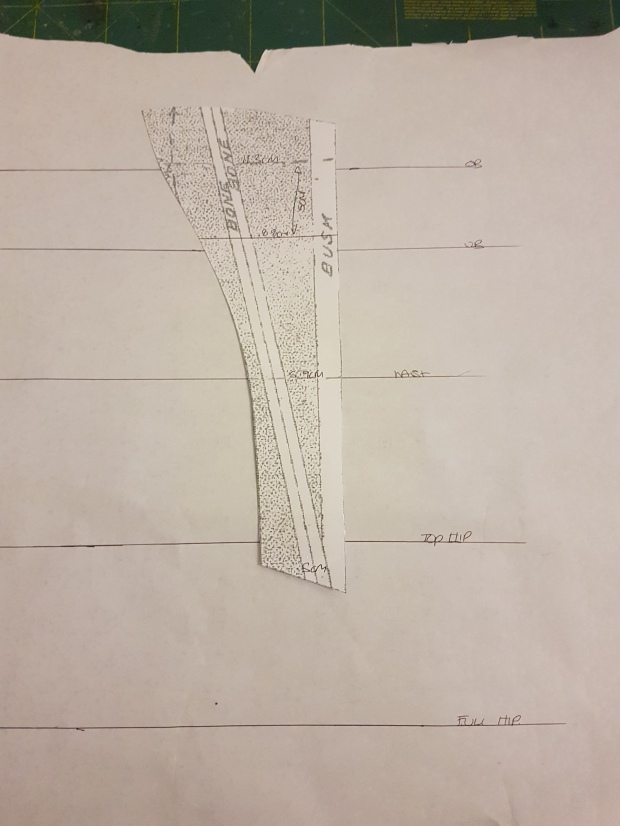
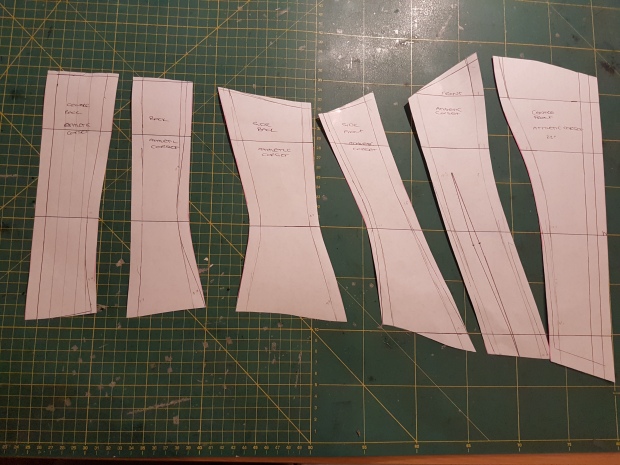
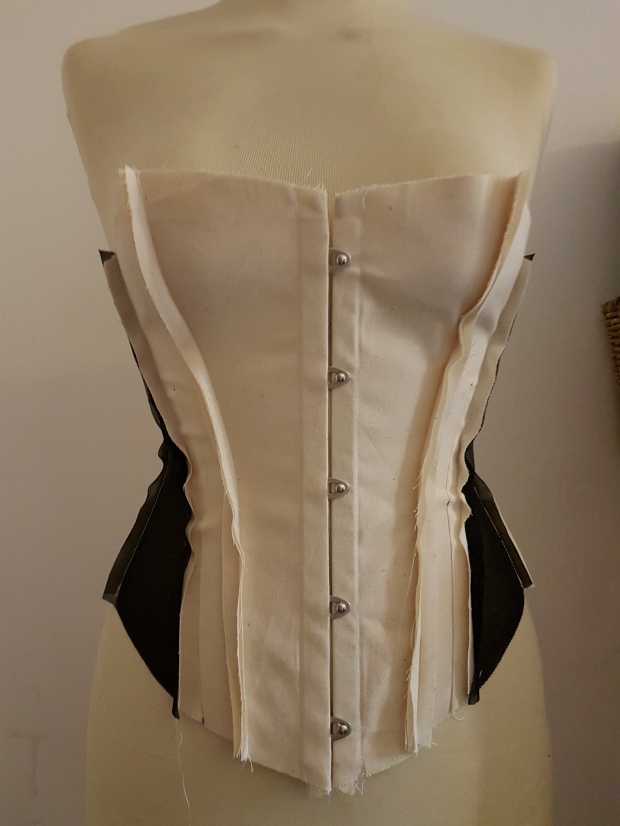
- The pattern was constructed in 12 pieces, 6 panels per side. I will rename as follows for the remainder of the article: Working right to left, Centre Front, Front, Side Front, Side Back, Back, Centre Back.
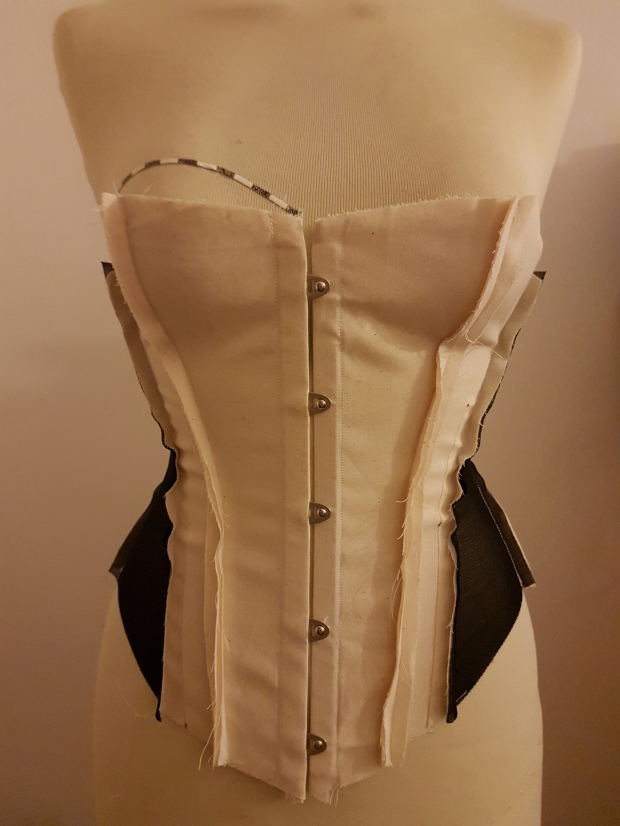
- Centre Front – features a 2 part opening straight busk. According to the measurements on the scaled pattern the centre front should measure roughly 10.5 inches (27cm). A double bone is positioned in the centre of the piece. (A wide single casing is used, but stitched to create two channels.)
- Front – Double bone running into the CF/F seam. Small shaped dart extending from the hem for additional shaping to the front panel.
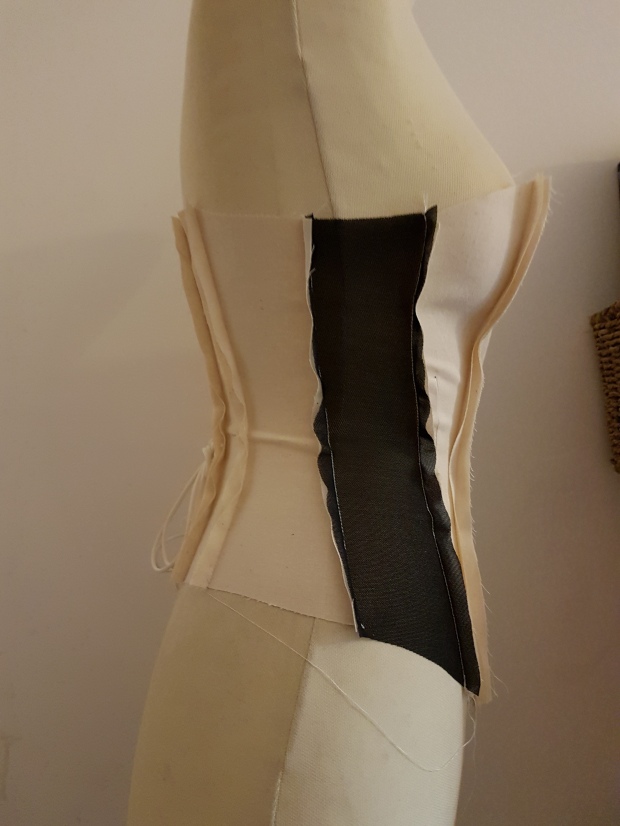
- Side Front (Elastic Webbing) – runs the length of the garment. Used to promote ‘freedom of movement’.
- Side Back – wide panel with a double bone positioned in the centre of the panel. Quite a lot of shaping shown for the hip.
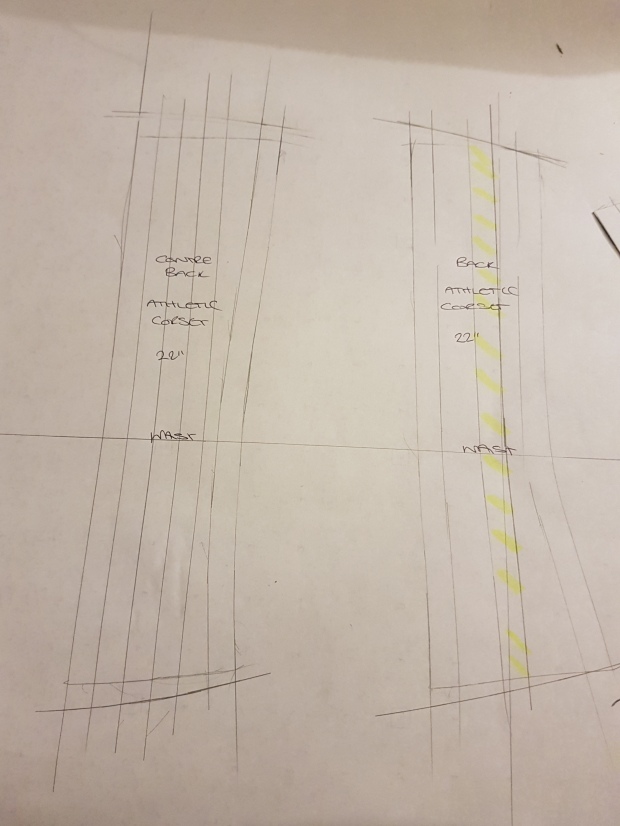
- Back – features a double bone positioned in the centre of the panel. No indication of being on the inside or the outside of the garment.
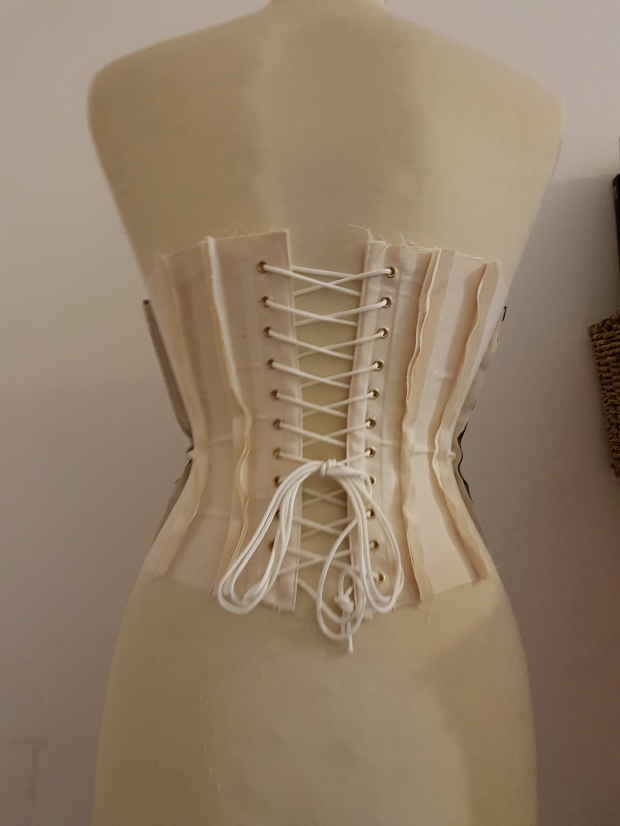
- Centre Back – Has twelve pairs of eyelets at the back for lacing, with a bone on ether side.
Looking at the pattern, it can be noted that there is only a small reduction to the waist area overall, presumably to allow the wearer some freedom of movement during wear. Although there is shaping over the bust and hip area, the seams are relatively flat in comparison to other corset styles that would create a fashionable, narrow-waisted silhouette when worn. Even with the additional bone channels, the garment is only lightly structured considering the small number of panels on each side. There is no indication of the construction methods used, but I am going to assume that bone channels were created in the seams joining the panels for extra bones. Whilst making the corset I will decide whether the additional bone channels were placed internally or applied to the exterior of the corset.
Having only the diagram of the pattern to refer to, I knew little else about the corset, particularly the date. The book in which it appears could have been compiled as late as the 1920’s, and features styles typical of times significantly before its publication. Although I could guess, I preferred to do some further research into sports corsetry, looking at advertisements and publications to try to anchor this style to a rough date.
History
The reinvention of the ancient Olympic games in Athens in 1896 had a huge affect on how society viewed physical activity and the impact it had on dress and fashion. Sports provided an opportunity for the sexes to interact, and generated the beginnings of competitiveness amongst men and women. “Women were now participating in various games, tennis, cycling, skiing skating and soon began to eliminate pieces of their clothing that for daytime wear made their daily lives more efficient” (Doyle). Whilst corsets were still an integral part of women’s dress, they were being manufactured with a lighter, less structured mindset and with less coverage of the body to promote freedom of movement for sporting activities. For the first time, fashion books and magazines promoted diet, exercise and proper foundations. Corset companies advertised the sports corset and its benefits to the weathy lady of leisure.
Corsets were adapted, many featuring bust sections that were cut low under the arm, allowing the wearer full ease of movement over the upper body. Riding styles were cut high on the hip to provide comfort when in the saddle. Invented in 1820, elastic panels (trademarked ‘Lastex’ in 1931 for strips of rubber covered with silk, cotton, wool or rayon to form a yarn) wasn’t favoured in corsetry until the 1890s, when it was introduced into the popular new riding and sports corsets styles.
As women entered the work force during the First World War, factories and workplaces imposed strict regulations governing dress while working. The traditional rigid boned corset was slowly disappearing in favour of lighter support and freedom of movement. Most women from the 1920’s still wore some kind of corset, corselette or girdle (Steele), often utilising the elastic panel webbing for support and control.
Ferris Bros. Corsets, New York
Sherwood B Ferris and his brother Murray Whiting Ferris established the Ferris Bros. Company in 1878. Known best as the manufacturers behind the ‘Ferris Good Sense corset’, theirs were considered healthier than the traditional corset for girls and young women who were not cinching the waistline too tightly.
The Good Sense range also advertised bicycle and athletic corsets for the eager sporting woman. These corsets supposedly gave the body ‘healthful and graceful full support’. Advertisements published by Ferris Bros. give us a really clear insight into the corsets’ intended purpose, being especially designed for women who enjoy healthful exercise. ‘An indispensable garment for the woman who rides a wheel, plays golf or tennis, rows a boat or climbs a mountain’. From looking at these advertisements I decided to date the corset pattern somewhere between the latter part of the 1890’s and the early 1900’s. Although I looked at many, these two seem to reflect our pattern the most closely.
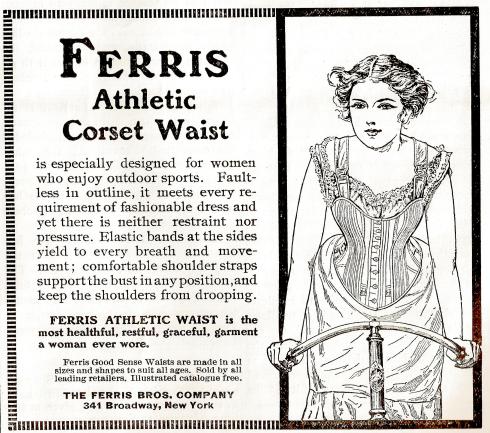
“Ferris Athletic Corset Waist is especially designed for women who enjoy outdoor sports. Faultless in outline, it meets every requirement of fashionable dress and yet there is neither restraint nor pressure. Elastic bands at the sides yield to every breath and movement; comfortable shoulder straps support the bust in any position and keep the shoulders from drooping.
FERRIS ATHLETIC WAIST is the most healthful, restful, graceful, garment a woman ever wore.”
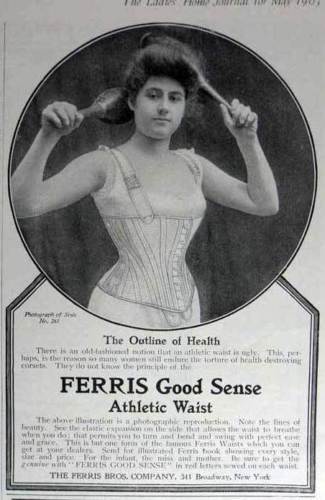
“The Outline of Health – There is an old fashioned notion that an athletic waist is ugly. This perhaps is the reason so many woman still embrace the torture of health destroying corsets. They do not know the principles of the FERRIS GOOD SENSE ATHLETIC WAIST.
The above illustration is a photographic reproduction. Note the lines of beauty. See the elastic expansion on the side that allows the waist to breathe when you do, that permits you to turn and bend and swing with perfect ease and grace.”
Pattern Planning Stages
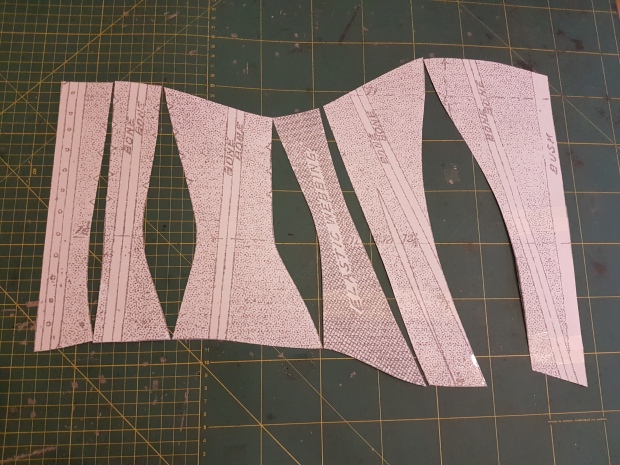
My initial approach to the corset draft was to scale up the pattern to life size and use it as a block, amending as necessary to my own measurements. Looking at the centre back depth from my printout, I used my home printer to scale the pattern up by 170% as a rough starting point. Ten minutes and some cutting and sticking later, I had my basic block to work from.
Measurements
- Overbust: 76cm
- Underbust: 67cm
- Waist: 62cm
- Top hip: 71cm
- Full hip: 84 cm
- Over bust to underbust: 5.5cm
- Overbust to waist: 14cm
- Point of bust (POB to POB) 19cm
- Waist to top hip: 10cm
- Waist to full hip: 20cm
I then made a table to work out my corseted measurements. I decided to work with with a 3″ reduction throughout the corset pattern. (2″ for the lacing gap and the then a further 1″ to provide minimal cinching to the waist. Referring to the corset pattern sketch showed quite minimal shaping.
| Natural | Reduction | Corseted | |
| Bust | 76cm | 7.5cm | 68.5cm |
| Underbust | 67cm | 7.5cm | 59.5cm |
| Waist | 62cm | 7.5cm | 54.5cm |
| Top Hip | 71cm | 7.5cm | 63.5cm |
| Full Hip | 84cm | 7.5cm | 76.5cm |
I would now work with the block as a net pattern (no seam allowances.) Comparing my measurements to the block’s overbust to waist depth measurements, I found that I wouldn’t need to reduce or lengthen the corset in this area. I made a table to compare my own measurements to those of the block to see the differences and identify where the pattern would be amended.
| Block | 1/2 my desired measurements |
Difference | |
| Bust | 44cm | 34.25cm | -9.75cm |
| Underbust | 37.9cm | 29.75cm | -8.15cm |
| Waist | 30.9cm | 27.1cm | -3.80cm |
| Top Hip | 40.75cm | 31.75cm | -9cm |
| Full Hip | N/A | N/A | N/A |
- I would take a lot from the bust and hip measurements in comparison to the waist.
- I would take more from the front overbust area than the back, reducing the bust capacity, as I have a a petite frame and this area will gape.
- I would take out though the side back panel as this was the widest panel for the hip measurement, reducing capacity.
- I did not want to take out much from the side front panel, which would be cut in the elastic webbing.
Drafting the Pattern
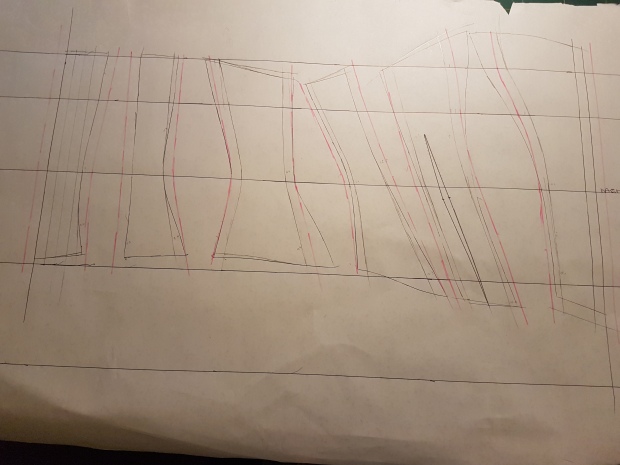
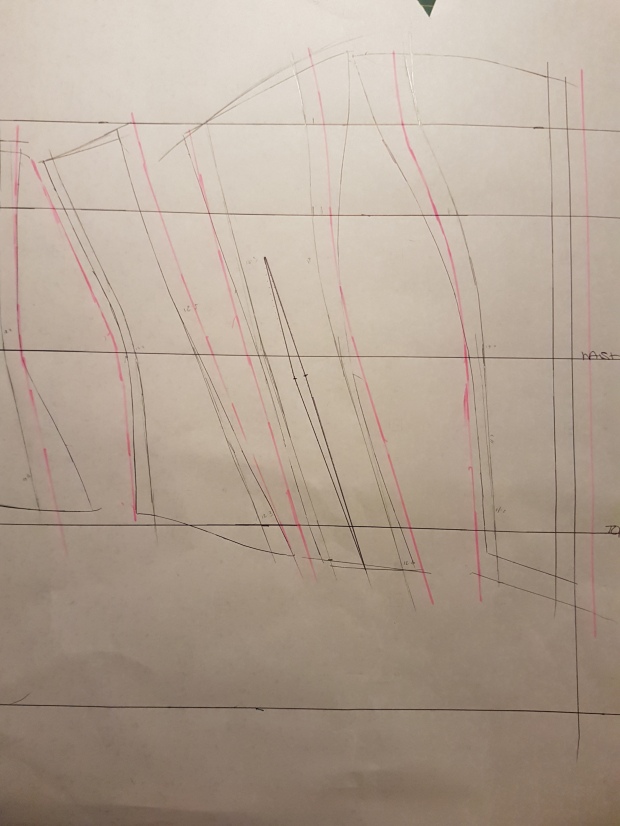
Initial stages
- Vertical lines to represent the centre front and centre back
- Horizontal line to represent the bust
- Horizontal line 5.5cm down to represent the underbust
- A horizontal line 14cm down from the overbust line to represent the waistline
- A horizontal line 10cm from the waist to represent the top hip
- A horizontal line 20cm line down from the waist to represent the full hip.
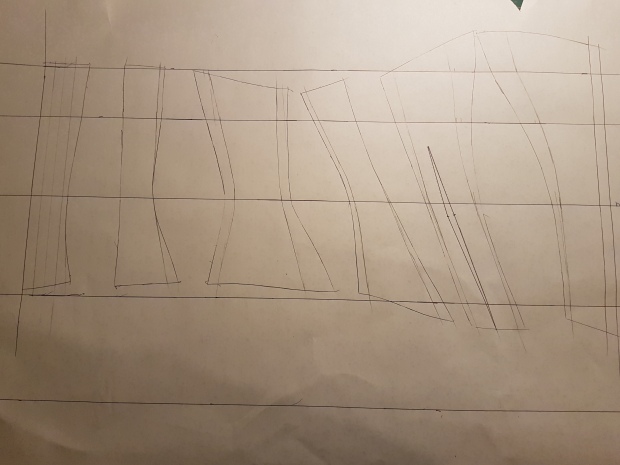
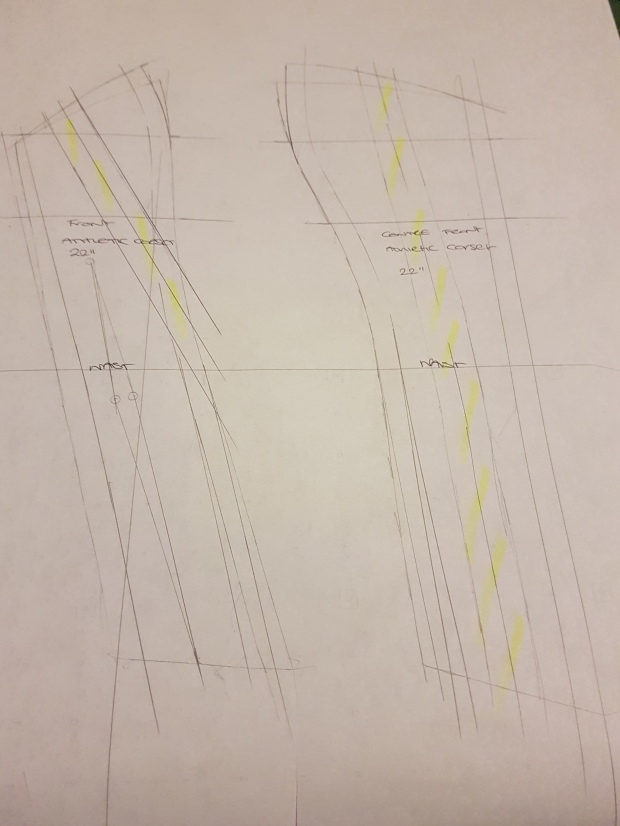
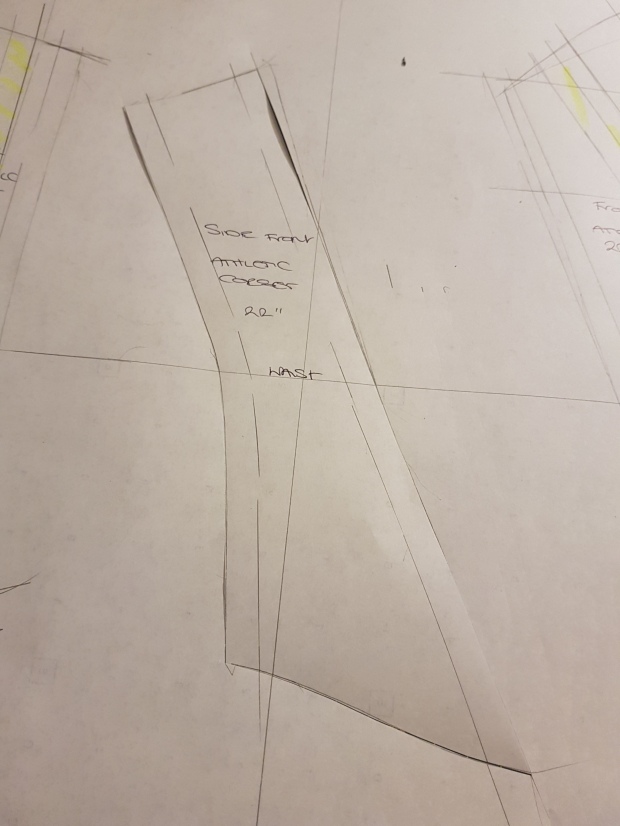
I then drew around the pieces, matching up the waist and overbust lines, lining up the centre front to the vertical line for the front.
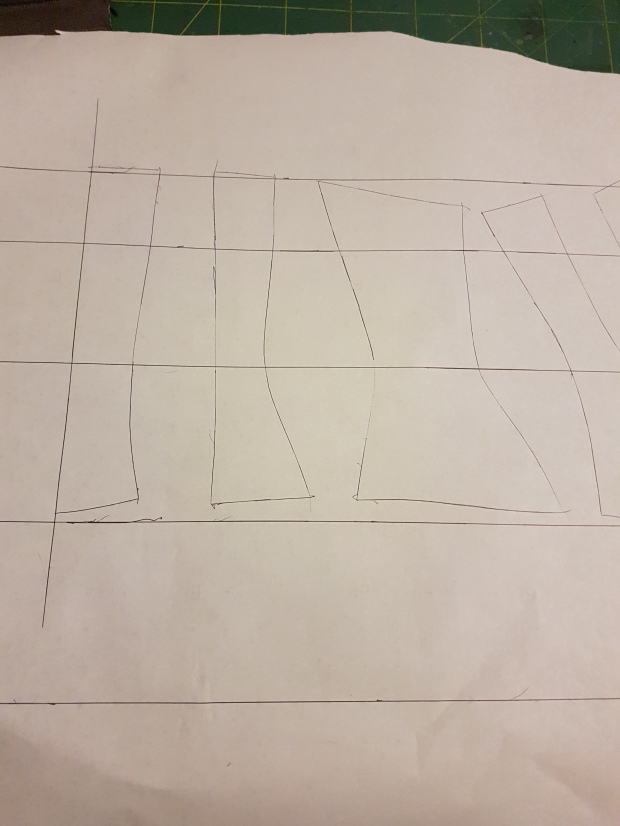

I drew in a line to represent where the busk would sit at the centre front, and also the small waist dart in the front panel. I reduced the overbust measurement first, taking most out from the centre front/front seam and spreading the remaining amount among the other pieces.
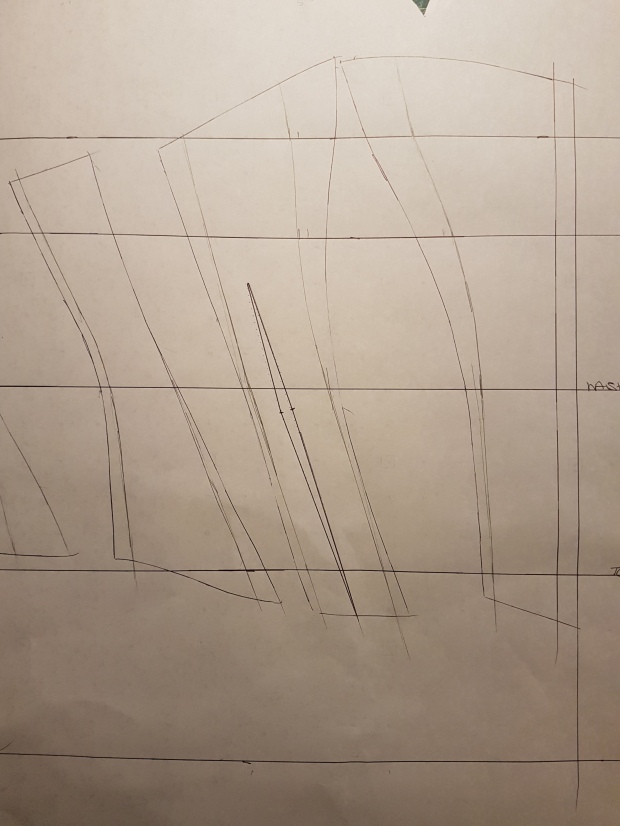
I then reworked the waist, top hip and underbust, taking out the necessary amounts. A lot of the hip adjustments were made at the side back panel. The inner lines would would be my new seam lines. I drew in lines that would form the channels in the centre back piece for the eyelets and bones, making minimal amendments to this piece. I trued the seams (checking that the seam lengths were equal) and amended them where necessary. Finally, I added the seam allowance to my finished pieces (highlighted in pink).
Toile
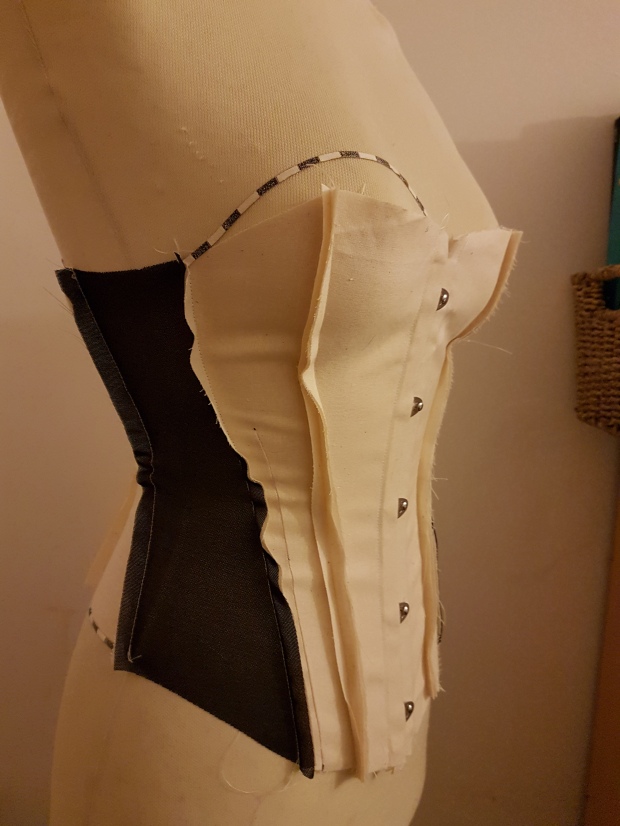
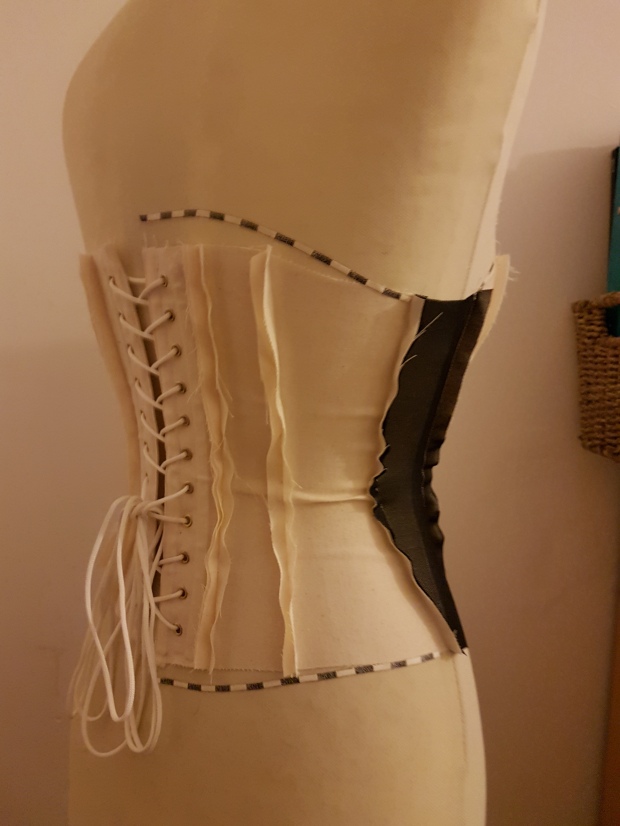
I made a simple toile of calico to test the pattern. In place of the pattern’s “elastic webbing” I used a strong powernet, which was likely to be my final fabric choice. It seemed quite a difficult fabric to source in small quantities. For the purpose of the project, powernet would have to do.
I used a very simple construction, including just the busk and the boning either side of the lacing eyelets.
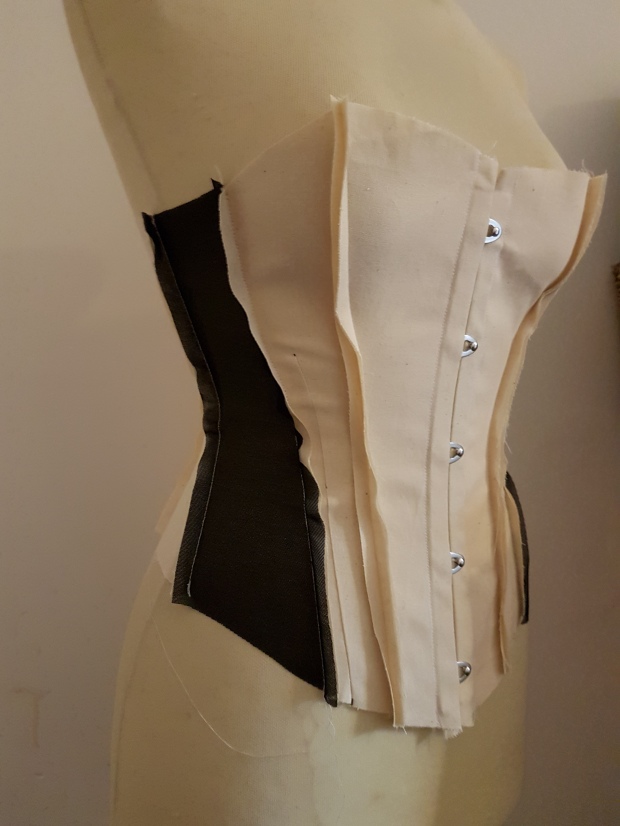
I checked the fit the corset on me before putting it on the mannequin. I was pleased with the toile, I would only have to make a few adjustments. My measurements are virtually the same as my mannequin, so for ease I marked up some of the style adjustments using fashion tape.
Although the style was low under the arm for ease of movement, I decided to add a little height to the front of the corset to give a little more coverage/modesty for the wearer. The corset did come high to the top hip and the back and the centre back depth was short. I decided to add a little to the height and drop the lower centre back, rounding the hem for a smooth curve. The elastic side panel does look a little distorted with with some with some slight pulling on the seam. This should be corrected once boning is applied in the final corset.
Pattern Amendments
Center Front
- Raise centre front/front upper seam by 1.5cm, curving to nothing at the center front.
- Pinch 0.5cm from overbust seam to overbust point.
- Pinch from waist to low hem by 0.5 cm, as it stands away from body.
Front
- Raise front seam/centre front seam by 1.5cm.
- Take out side front/front seam by 0.5cm, blending to 0cm at waist, as side front upper is distorting slightly at the seam.
- Pinch from waist to low hem 0.5cm to bring it back toward the body.
Side Front (Powernet panel)
- Reduce side front/front seam by 0.5cm, diminishing to 0cm at waist.
Side Back
- Raise side back/back seam by 0.5cm
- Lower side back/back seam
- Lower hem by 0.5cm
Back
- Raise back/centre back by 1.5cm
- Lower back/centre back seam lower hem by 1cm
- Reshape for smooth curve
In the next article, I will use the amended pattern to construct the corset and discuss the seam methods used to piece it together.
Bibliography
Doyle, Robert. Waisted Efforts: An Illustrated Guide to Corset Making. Halifax, N.S: Sartorial Press Publications, 1997.

One comment