Victorian

C1890-1900 THE ATHLETIC CORSET: PART 2

NOTE  *This article was originally published January 2017 for Foundations Revealed. The link can be found here.

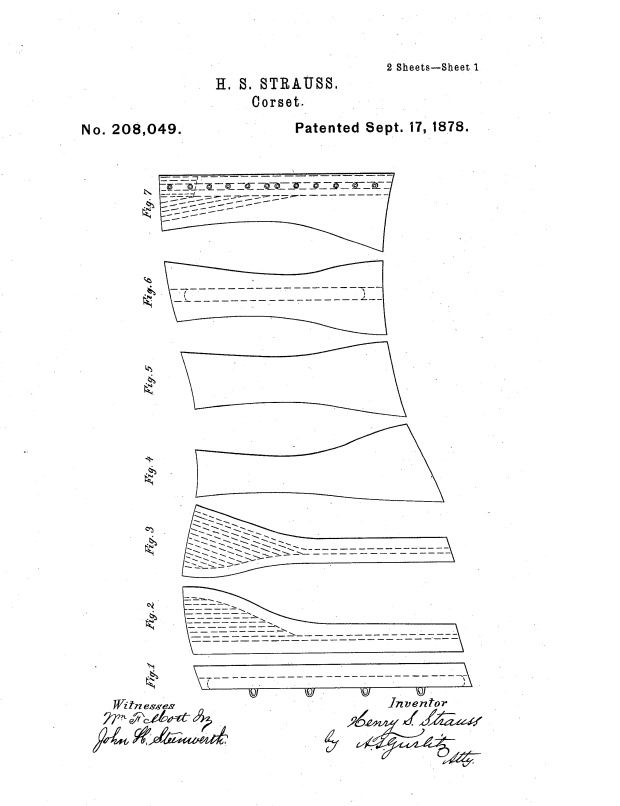
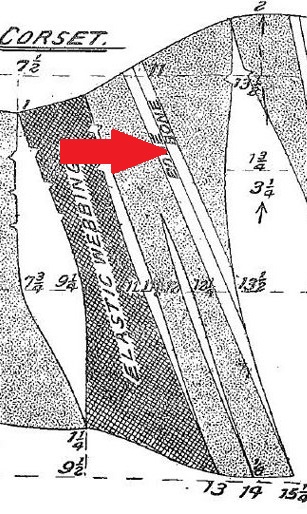
In part 1 I worked with a pattern developed from ‘The Athletic Corset’ as featured in ‘A practical guide to corset cutting and making’ by William D.F. Vincent.

Now I’ll go on to create my own corset.

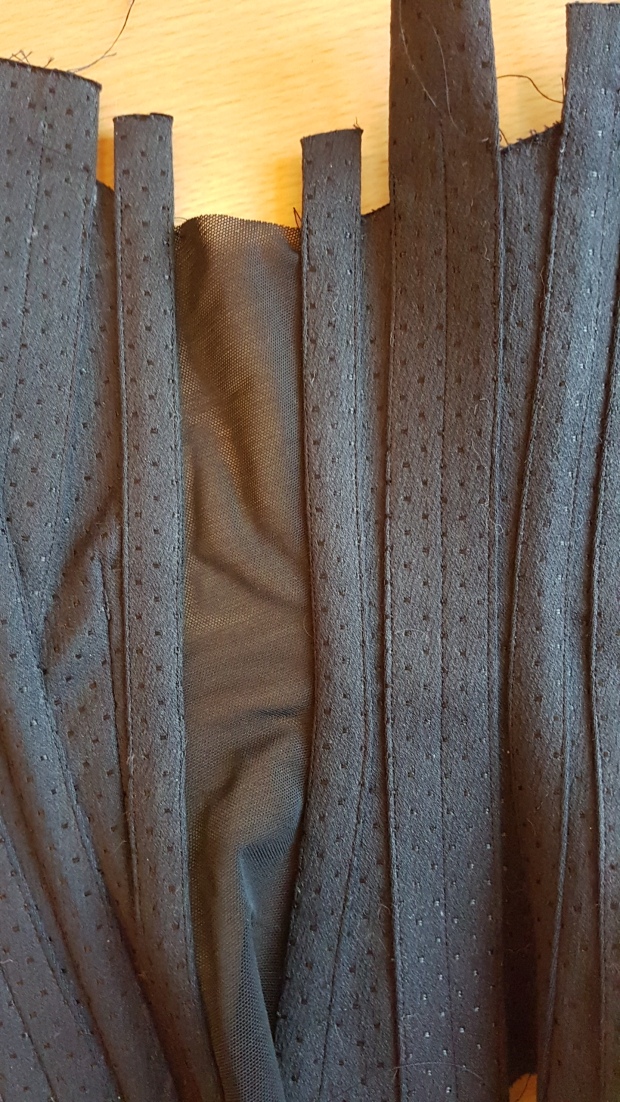
Given both its likely date and its function-over-fashion design, this corset could have been constructed using a single layer of coutil, keeping it lightweight but durable for wear during sporting activities. For this reason I chose a black broche (a heavyweight coutil with a subtle dot pattern) and a strong powernet (in place of the elastic webbing)

The Athletic Corset pattern

1

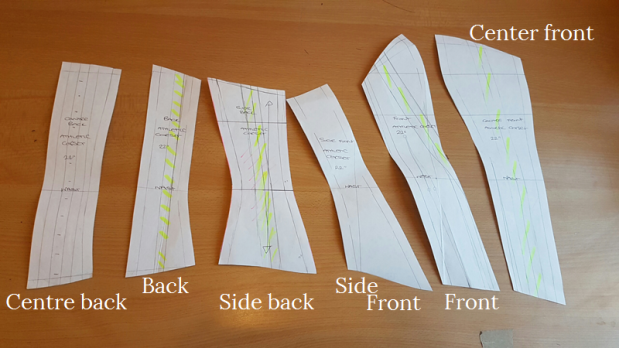
The corset was cut as follows:

  • 2 layers of broche to sandwich the busk: CUT 2 PAIRS CENTRE FRONT
  • 2 layers of broche for centre back eyelet panel: CUT 2 PAIRS CENTRE BACK
  • Single layer of broche for the rest of the plain pieces: CUT 1 PAIR FRONT, SIDE BACK, BACK
  • Single layer of powernet used in place of the woven elastic panels: CUT 1 PAIR SIDE FRONT


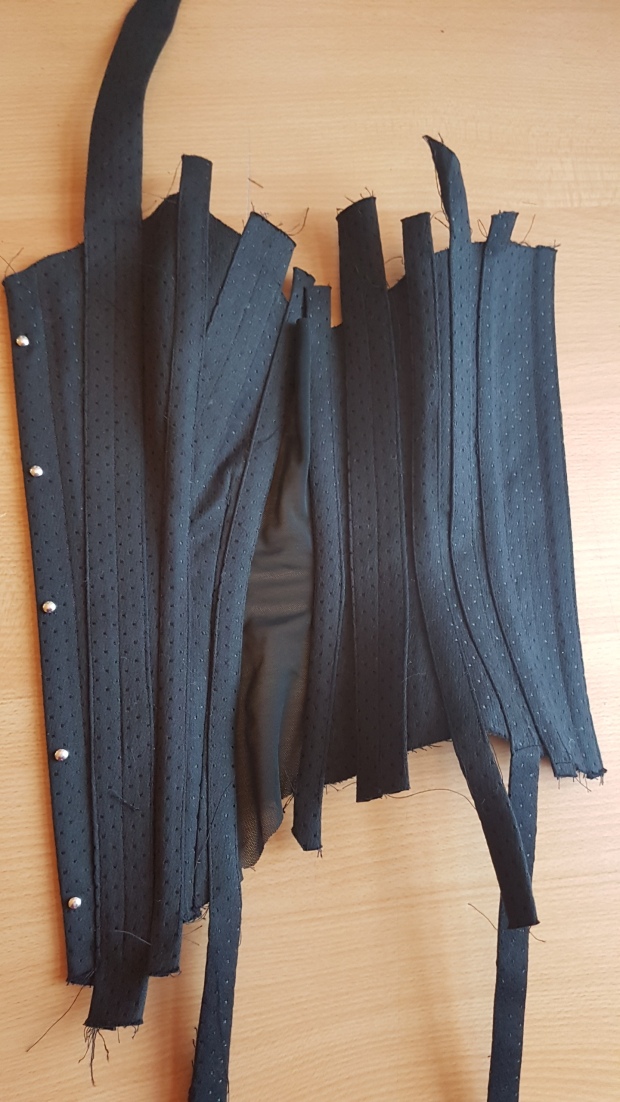
Preparing the Boning Channels

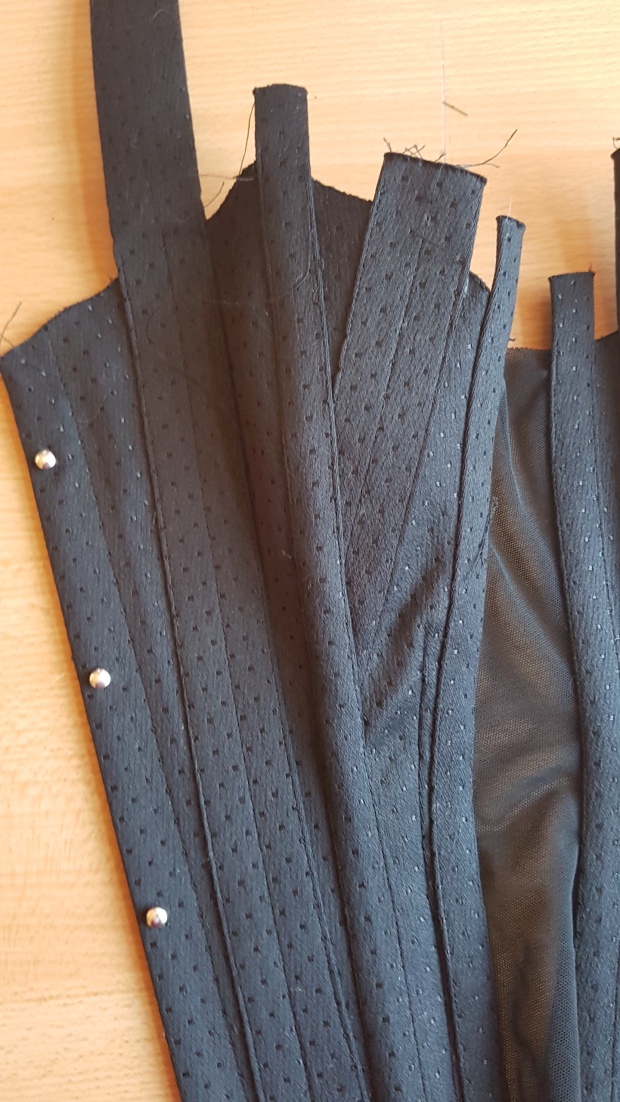
I decided to sew the corset seams wrong sides together, using external bone casings to cover the seam allowances. The pattern also indicated the placement of additional exterior channels, most of them down the centres of the panels.

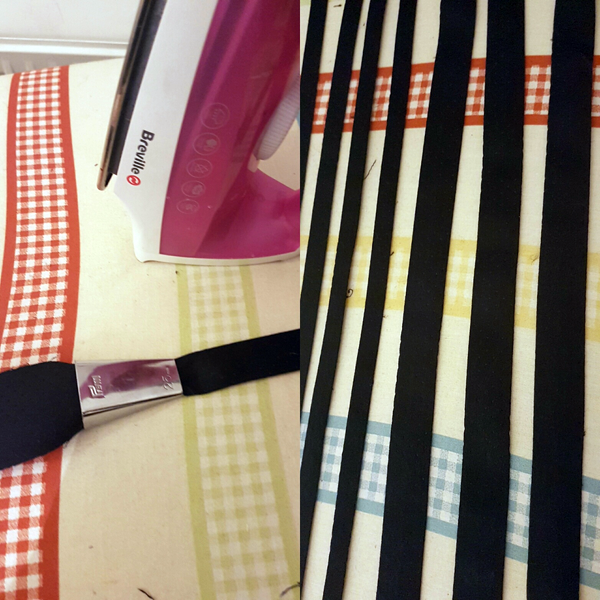
I began with 27mm wide strips of broche, cut parallel to the selvedge, and used a 12mm bias tape maker to create  single bone casings for the channels covering the seams.

For the other channels I wanted double bone casings, so I cut those channels 52mm wide and used a 25mm tape maker for those. When applying them, I stitched close to the edge either side, and then added the dividing line of stitching down the centre to create the twin channel.

2

Inserting the busk

The pattern used a simple flat steel busk. The two CENTRE FRONT pieces were placed right sides together and stitched in order to insert the busk in the usual way.


Preparing the FRONT panel

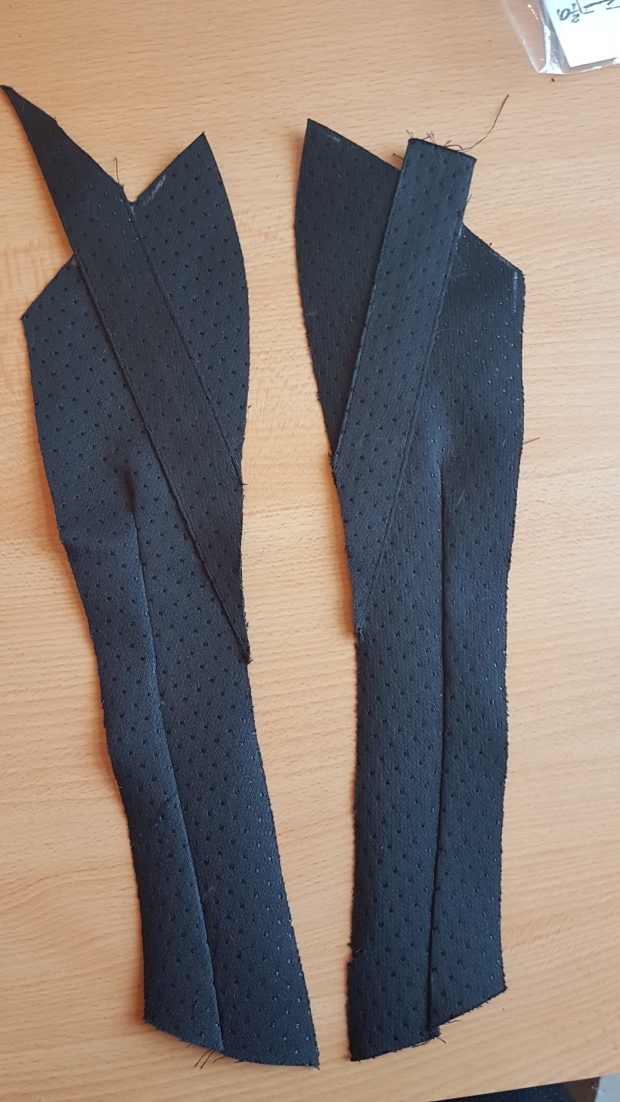
Following the marking on the pattern, the shaped dart in the FRONT panel was stitched closed before joining to either the centre front or side front pieces.


6


A double bone channel was also needed on this panel. This will be the only one applied before the main construction, since it seems to disappear into the FRONT/CENTRE FRONT seam.

frontpanelpatternbone

The angled placing made positioning tricky as I tried to make the sides symmetrical. I was concerned about whether making the channel end in the seam would create awkward bulk, and whether I would be able to stitch down another channel to overlap the seam.

8

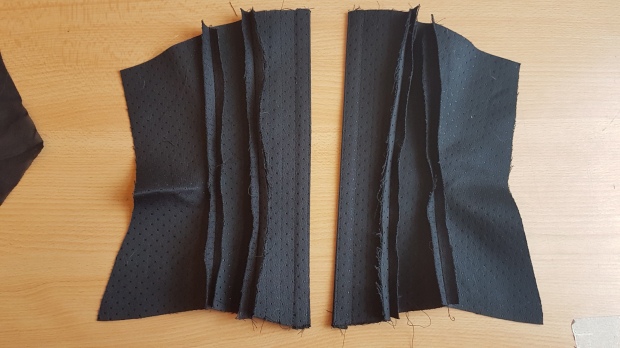
Assembling the front section

I stitched the FRONT/CENTRE FRONT seams wrong sides together, and then the FRONT/SIDE FRONT seams in the same way. This was the seam where the broche met the powernet, so I used a secure stitch on either end of the seam to control the powernet whilst stitching, and stop it from slipping.

9

CENTER BACK panel: Boning channels

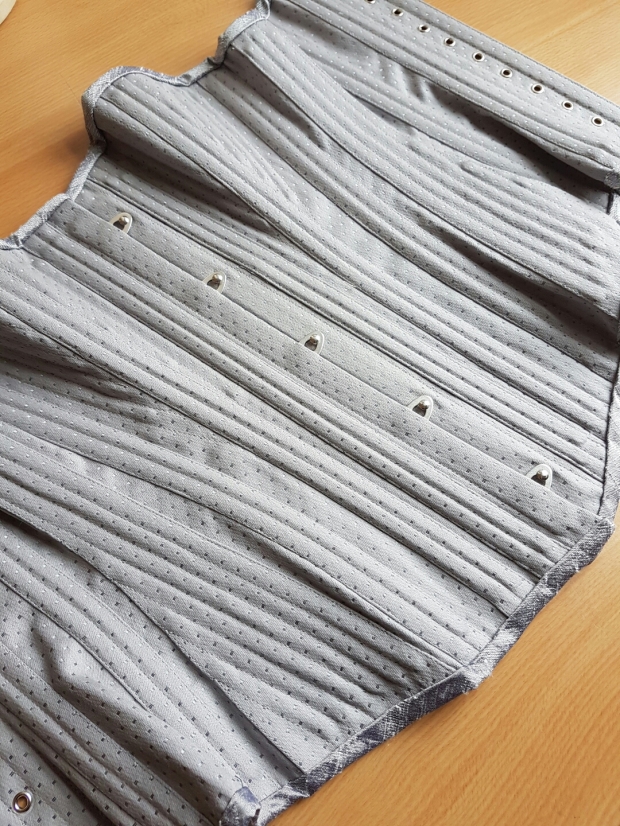
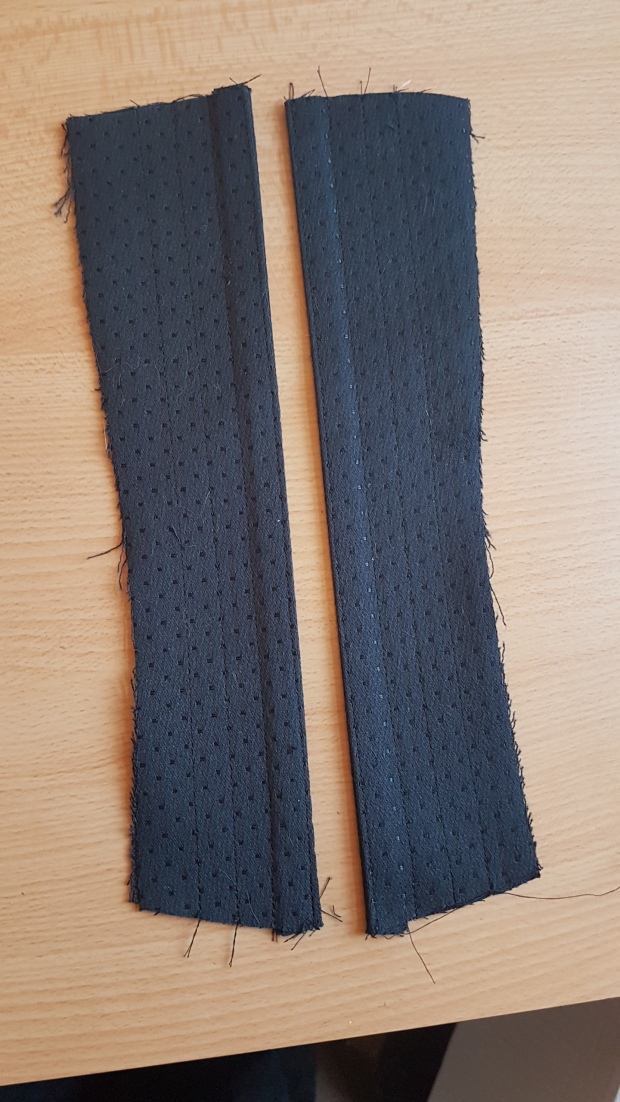
I created the centre back edge by stitching CENTER BACK broche sections right sides together, then turning to the right side and pressing. I used the side of my sewing machine foot as a guide to create three equal channels for the eyelets and flat steels.

10

Assembling the back section

I stitched the BACK/CENTRE BACK seams wrong sides together, and then the BACK/SIDE BACK seams in the same way.

11

Joining front and back sections and applying bone casings

The front and back sections were joined wrong sides together. Again, secure stitches were used on each end to help control the powernet.


Applying the bone casings

I trimmed the seam allowances and pressed them down. (I turned the seam allowances in the powernet back onto the broche reasoning that stitching the boning casings onto the power net might cause the seam to crack under pressure). Then I applied the single bone casings over them, on the outside of the corset.

Then I applied the wider double bone channels to the centre front panel and side back panel. I should have used a double channel for the back according to hte pattern, but I found that the panel wasn’t wide enough, so a single casing had to make do instead.

141516

Boning

I used spiral steel boning throughout most of the corset, with flat steels either side of the eyelet channel in the centre back.

Binding

I wanted to use the broche for binding, but found that it would cause difficulty when sewing, especially at the ends. Instead I chose a satin finish pre-folded bias binding. I first machine stitched it to the right side and then flipped it over and top stitched in place.
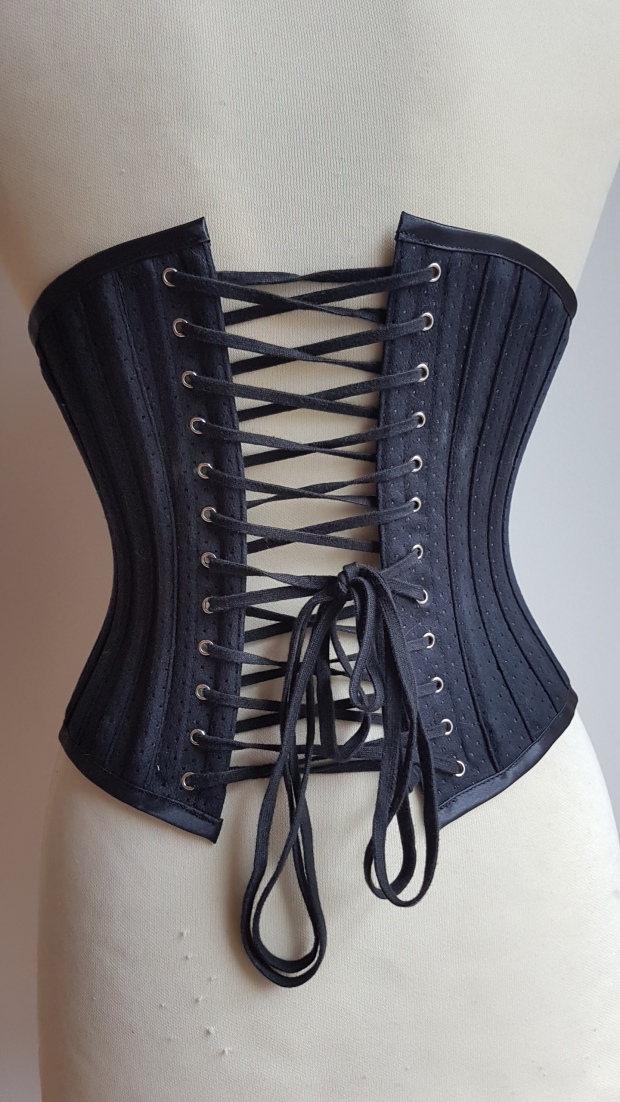
1718

Eyelets

Finally I inserted twelve pairs of eyelets, as marked on the pattern.
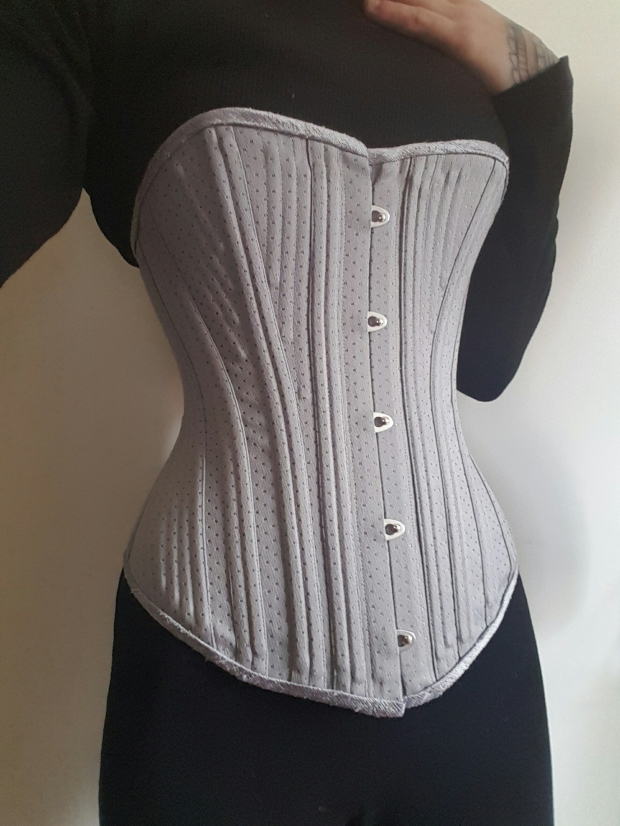
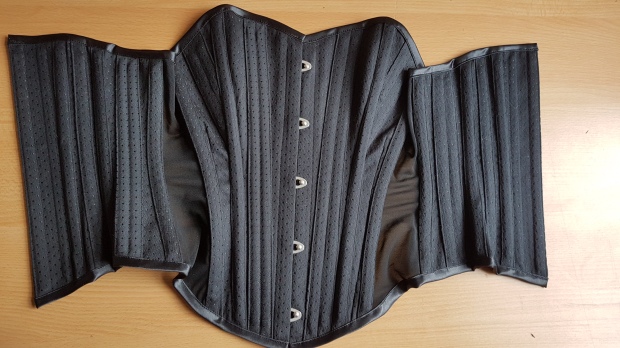
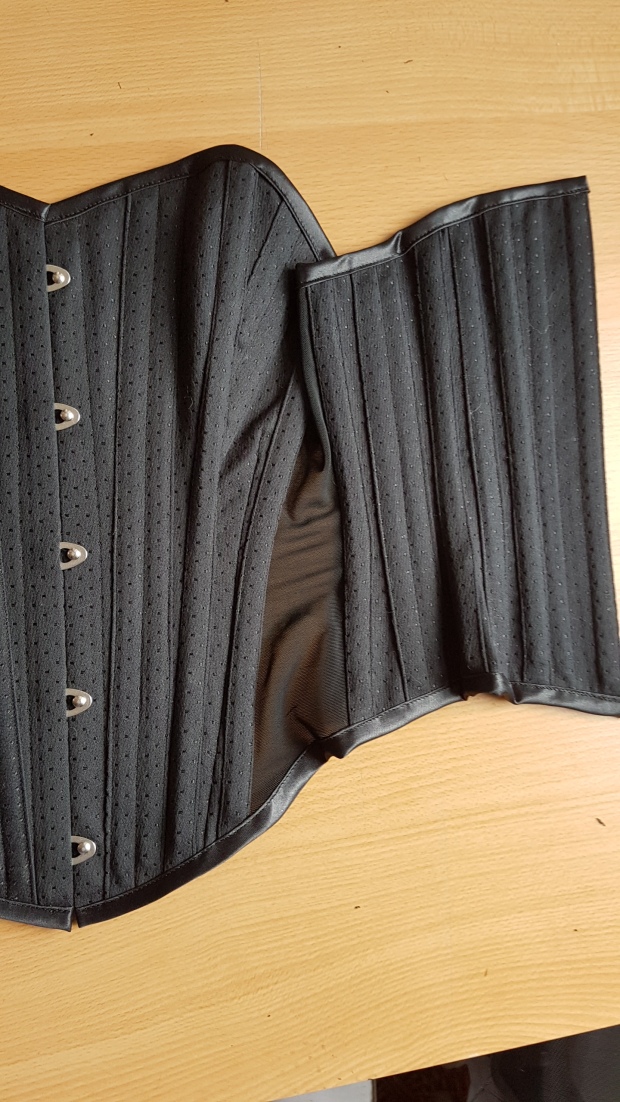
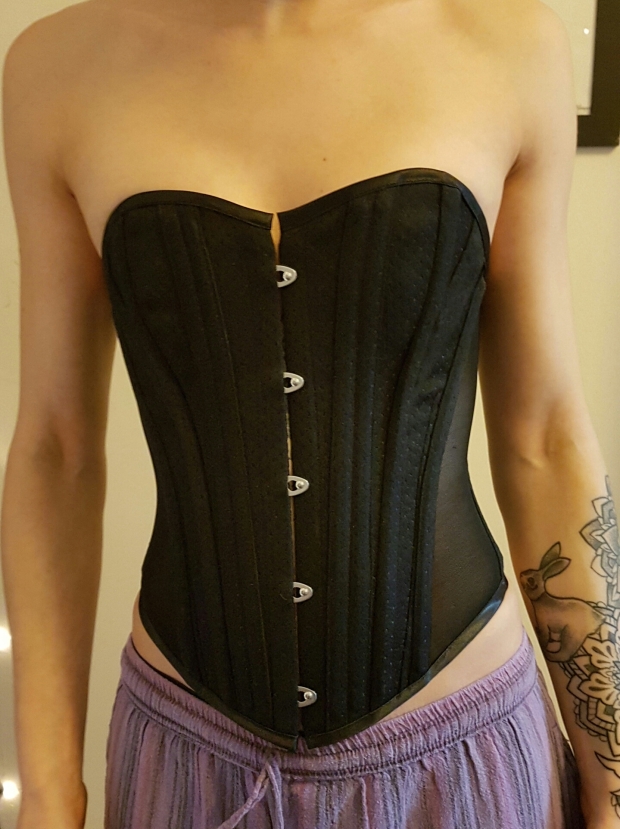
19

The Finished Corset

I was pleased with the finished corset. I love the textural contrast of the mesh to the broche fabric. My choice of a sheer mesh allows the undergarment or skin to show through, adding interest to an otherwise fairly plain design.

Having worn and tested the corset with lots of bending and stretching, I felt that it was supportive, yet the stretch mesh panel provided me with some freedom of movement. The corset could be laced closed, reducing the waist but not being too restrictive.

20a21222324

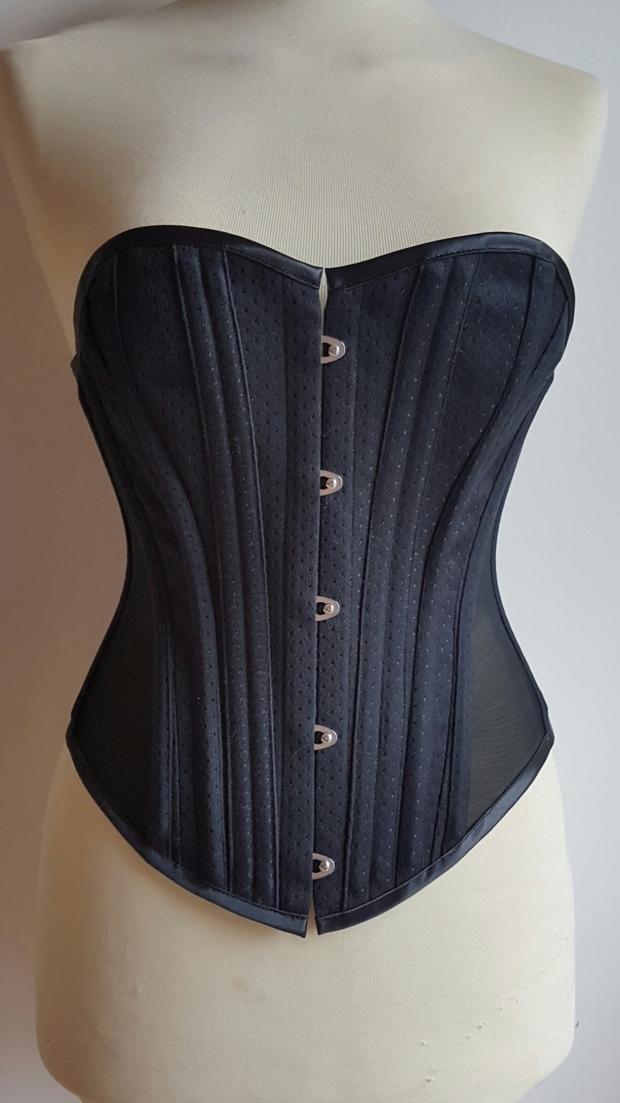
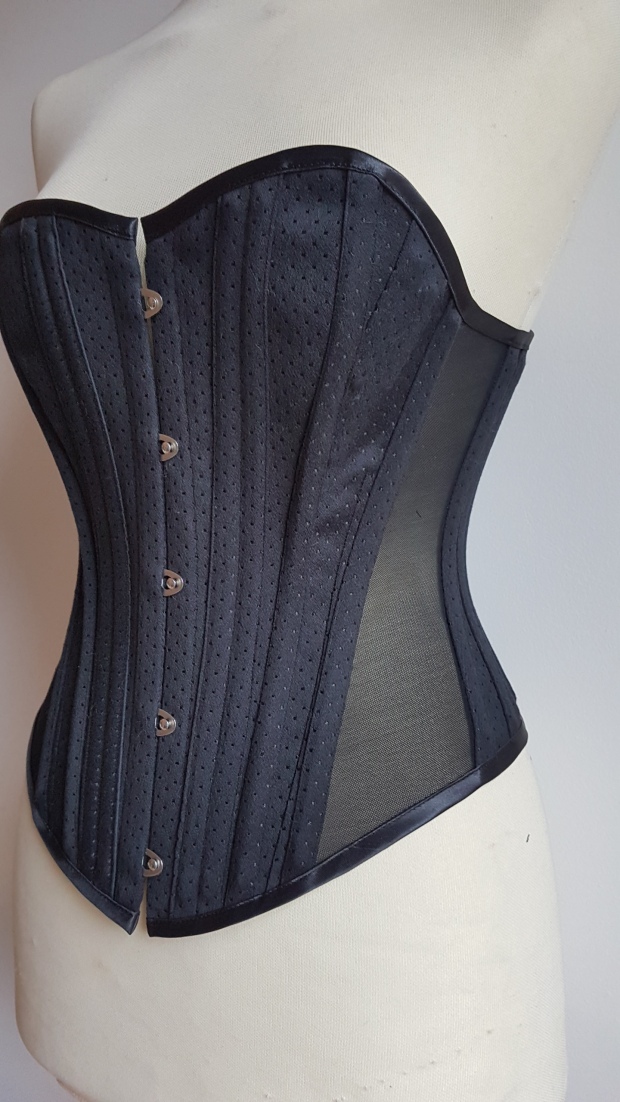
I was pleased with the cut of the corset around the cup shape and under the arm. It was cut low, allowing full movement of the arm, yet still had good coverage of the breasts. The pattern could easily be adapted for use as a fashion corset.

25262728

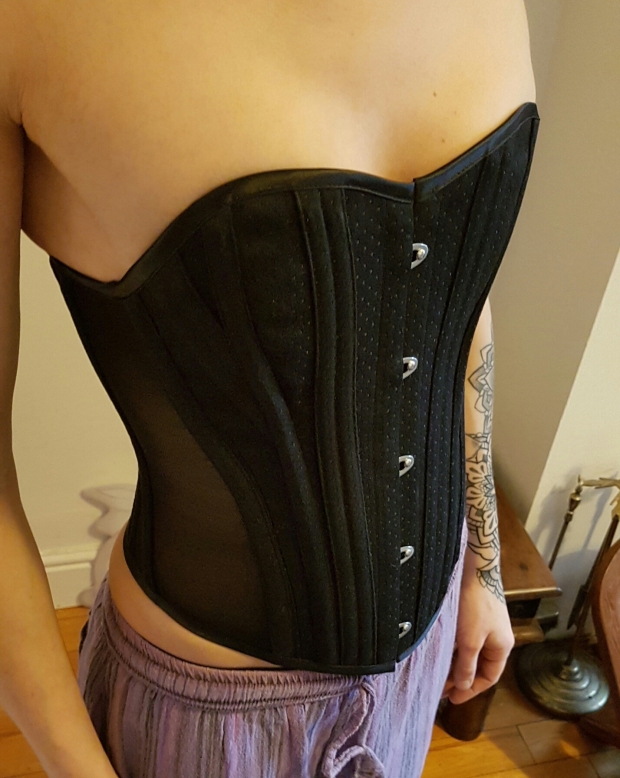
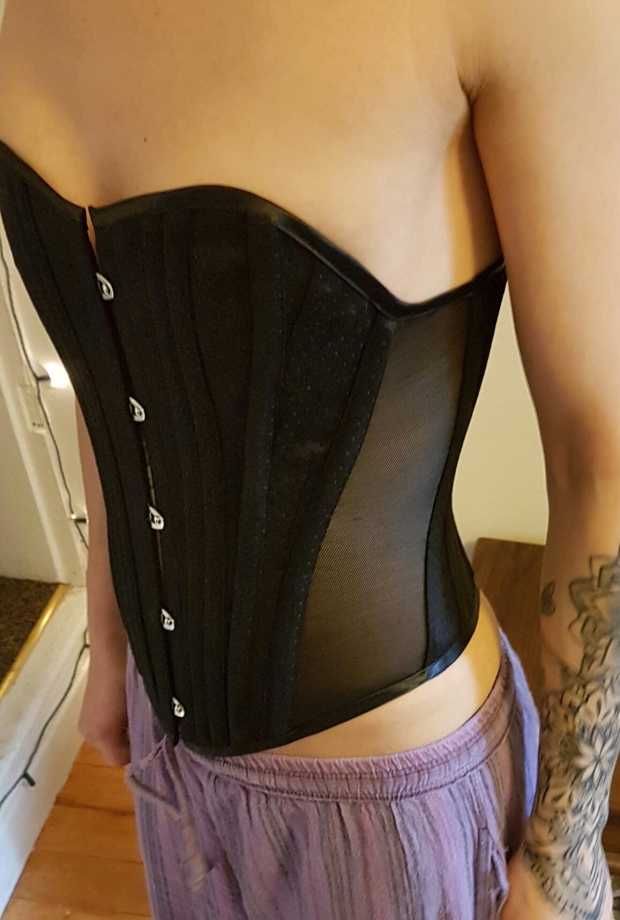
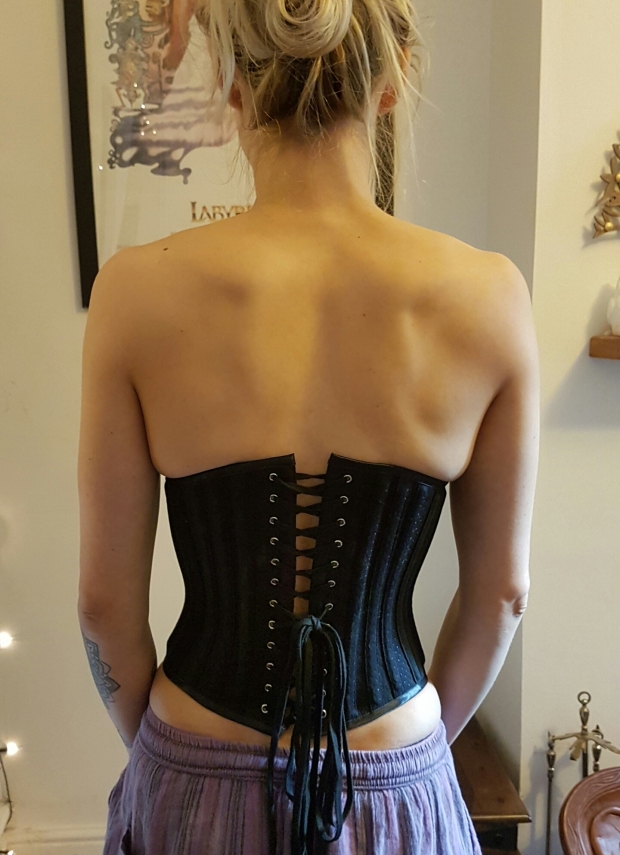
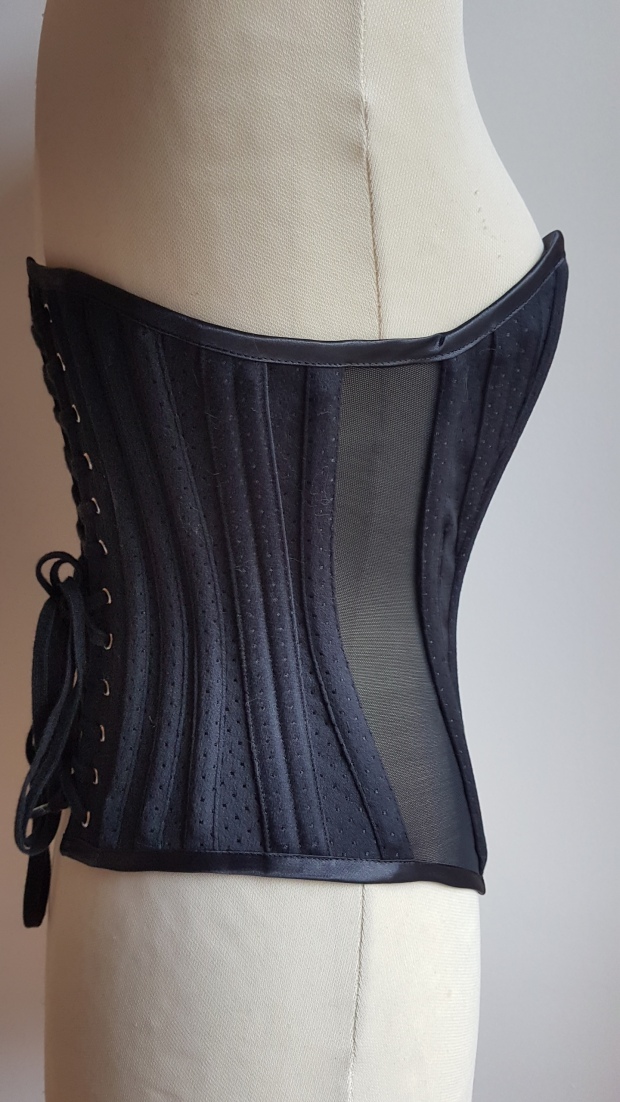
The corset is cut short at the back, allowing the wearer to bend and sit comfortably.

I liked the idea of the double bone casing, providing both additional support and an eye-catching feature.  A contrast colour could be used to make them stand out.

I would probably remove the dart from the pattern for future use, and instead take the fullness out of the front panels from the sides. It could be tapered a little more at the centre front/front seam, bringing the corset closer to the body.

Vincent’s Athletic Corset does perform as advertised. It’s a comfortable, everyday corset, providing control and shape for the wearer whilst allowing considerable freedom of movement.


This sample is available to buy from my ETSY store.

1878 H.S. STRAUSS PATENT 208049

Initially when I came across this patent found here, I liked the simplicity of the pattern pieces with the multiple rows of stitching and bone channels used in the bust area. I was most intrigued however by the unique shaped bone pocket (seen in figure  9) that would be applied to the exterior of the garment.

us208049-0us208049-1

PATENT OBSERVATIONS

PART 2: THE LETTERS

  • In the drawings, Figures 1, 2, 3, 4, 5, 6, 7 represent the several patterns of which the base of each half of the corset is composed. Fig. 8 represents one-half of the corset expanded, but without perspective shading, the dotted lines indicating the seams. Fig. 9 represents the hip-piece cl enlarged, and also a portion of the piece (1 broken away, showing the bones and the under seam.

CUTTING INSTRUCTIONS

  • Each half of the body of the corset is composed, first, of seven patterns, as shown in the drawings, numbered 1 2 3 4 5 6 7. In cutting these patterns, Nos. 1 and 7 may be doubled by folding the material on their outer straight edges. Nos. 2, 3, and 6 consist of two pieces each, cut to the same pattern, while No. 208,049, dated September 17, 1878 application filed June 26, 1878.
  • N 0s. 4 and 5 may be single or double, as de sired. The pattern Fig. lhas the usual hooks, and the pattern Fig. 7 has the usual eyelets.

CONSTRUCTION NOTES

  • When the pockets are formed in the several patterns 1 2 3 6 7 all the several patterns are sewedtogether. The best way of sewing them together is as follows: The edge of Fig. 2 (shown inthe drawingnearest to Fig.1) is sewed to Fig. 1 on the edge nearest to it. These pieces Figs. 1 and 2 are laid together sothatthe sides of said pieces which are on the inside of the corset when the corset is finished will face each other, and the edges of the parts are thus on the outside of the corset when the parts are expanded, and the inside of the corsetis smooth, the seams being what are called hidden seams. All the patterns are thus sewed together, the edge of the piece of each higher number (shown in the drawing nearest the lower number) being sewed to the edge of the lower number nearest to it. When all the The pockets formed in the 5 seven patterns Figs. 1, 2, 3, 4, 5, 6, and 7 have been thus sewed together, the shape of the whole forms one-half of a corset so shaped as to make the form desired.
  • The hip-piece d, Fig. 9, is a narrow strip, with its sides parallel about one-half its greatest length, with a gore-shaped or flaring lower part, having pockets for bones of decreasing length, as shown in Figs. 8 and 9. This piece at is sewed over the outer side of the corset, so that the seam connecting patterns Figs. 4 and 5 comes under it at or about the heavy dotted line shown in Figs. 8 and 9 by the letters 0 o. This piece, while giving shape to that portion of the corset, also serves as a protection or shield for the hips, upon which the outer garments may lie.

HISTORY

CORSETS OF 1878

1887

American corset found at the Metropolitan Musuem (USA) is dated at around 1878. The upper edge is cut flat across the bust and the front lower finishes over the hips slanting to a deep V shape. The corset similarly to the patent appears to feature multiple boning by rows of parallel stitching creating the channels. Bust gores give this corset extra shape.The decorative stitches (flossing) at the lower edge prevent the boning from forcing its way out of the channels. The corset is finished with a deep lace along the upper edge.

light blue silk corset with flossing 1870-1885

American corset dated 1870-1885 found at the Museum of Fine Arts, Boston USA (Accession number 201:616). Constructed from light blue silk the corset features a straight busk front with double gusset at the breast. Heavily boned all the way around the corset has multiple rows of stitching sandwiching whalebone between the layers of fabric. The gussets also appear to be corded providing additional shaping and support to the bust area.  Decorative flossing is used in white contrast thread to hold the bones at both upper and lower edges.

Pattern Draft:

My  first pattern draft based on my measurements. I enlarged the pattern pieces of the patent as a rough base for the piece shapes amending each piece accordingly. I renamed this pieces as follows from left to right CENTRE FRONT, FRONT, SIDE FRONT, SIDE, SIDE BACK, BACK, CENTRE BACK

I realised when I made up a toile of the pattern I needed to increase the body length of the entire corset pattern from the over bust to waist by 2cm. I extended the pattern from the waist and reshaped the pieces.

PRE CONSTRUCTION
Prior to commencing construction there were a few preparation stages (not photographed) beginning with the fabric cutting. I chose a dove grey spot broche coutil. I liked the sturdiness of the fabric which would be suitable for the single layed panels.

  • Cut a double layer of coutil for the CENTRE FRONT/ FRONT/ SIDE FRONT/CENTRE BACK  (2 pairs)
  • Cut a single layer of coutil for the SIDE/ SIDE BACK/ BACK (1 pair)
  • CUT a single layer of coutil for the additional bone pocket (1 pair)
  • I prepared all the bone casings. I cut strips of the coutil of approx 36mm wide (following the selvedge) I Used a tape maker to make 18mm bone casings. 5mm spiral steel boning would be used in the double channels

CONSTRUCTION

Inserting the busk: I decided to add a modesty panel behind the busk to stop any flesh showing through the gap of the fastenings. This was created by using a panel of folded coutil and inserting it into the studded side busk seam.

The seams were then joined wrong sides together of the CENTRE FRONT and FRONT panels (double layer together)  The seam was covered externally by the bone channels.  These were positioned centrally over the seam. I edge stitched on either side before using the edge of the foot as a guide to stitch down the centre of the casing to create a double channel.

I then machine stitched rows of channels approx 8mm wide as indicated on the pattern pieces.

The panels were joined in the following order. All the seams joined wrong sides together so seams appear on the garment outer

  • FRONT/SIDE FRONT (double layer of coutil). More rows of stitching creating bones channels following the pattern.
  • SIDE FRONT/SIDE
  • SIDE/SIDE BACK
  • SIDE BACK/BACK
  • BACK/CENTRE BACK

Close up where you can just see the rows of stitching for the bone channels in the front and side front pieces


Creating the bone pocket: The bone pocket (figure 9 in the patent) was an additional panel that would be placed over the top of the seam between the SIDE and SIDE back panels. This would strengthen the corset whilst maintaining lightness- using just the single layer of fabric for the SIDE/SIDE BACK/BACK pieces. I developed the pattern by drawing the shape on my initial toile, cutting and retracing  to get the shape.

Toile of the bone pocket. Channels stitched to figure out the number of bones to go in the pocket.

The seams were pressed under on either side before the panel was top stitched into place. Rows of stitching creating channels were made following the front of the pocket.

Rows of stitches were created in the pocket for the boning channels using the machine foot as a guide parallel to the front of the piece.

Boning: Spiral steel bones were cut to length and tipped before being inserted into all the channels. Flat steel bones were used either side of the eyelet channel to provide stability.

There are a total of 50 bones in this corset. A combination of spiral steel and flat steels at the centre back. Over 8 Metres of boning is used.

One half of the corset. A close up showing the boning inserted into the channels.

FINAL CONSTRUCTION STAGES

Binding: I chose a silver raw silk slub fabric binding for the upper and lower edges. The binding was made cutting the fabric on the bias grain and pressed using a 18mm tape maker.

Eyelets: Finally the corset was eyeletted using silver metal eyelets to match the busk. 12 pairs of eyelets were used in keeping with the patent illustration.

THE FINISHED CORSET 

wp-image-693320875jpg.jpgwp-image-1524345232jpg.jpg

wp-image-1216454230jpg.jpgwp-image-1036267013jpg.jpg

C1880- 1885 CHILD’S STAY BAND: SYMINGTON CORSET COLLECTION: COLLECTION RESOURCES CENTRE (BARROW-ON-SOAR, UK)

Record Number

Summary

Dated: C1880-1885

Child’s stay band from the Symington collection of corsetry.  Constructed from red sateen with hessian interlining and cotton twill lining. The stay band has an adjustable wraparound strap and fastens using hooks and eyes. The front and back of the garment are corded for support as well as providing additional warmth for the infants body.

Stay bands would have been worn by both sexes from babyhood through early development. They were flat panels of cloth that wrapped around the body and fastened with straps that passed through slots at the front. They were typically made from cotton and interlined with hessian and corded or quilted at the front and back. Whilst there was no shaping or restriction to the stay band, the garment supported the body and believed  to prevent deformity of the spine.  Children wore stay bands until around the age of eight when boys were breeched and girls would begin to wear specifically designed corsets. Almost all children’s corsets had adjustable features to allow for growth of the body.

1

Front view shows vertical cording either side of the centre

3

Opened stay band shows further sections of cording around the garment in vertical strips

4

UNDRESSED EXHIBITION: A BRIEF HISTORY OF UNDERWEAR: V&A MUSEUM: LONDON, UK 

COTTON COUTIL CORSET 

Record Number: V&A: T.90δA- 1984 – Given by the family of Mayer Yanovsky

Summary: 

Dated: C.1890

The corset is made of two parts from a single layer of light brown cotton coutil with single external bone casings in contrasting dark brown coutil. The corset is reinforced by an extra panel of the dark brown coutil that wraps around the waist designed to reduce the risk of the whalebone breaking.

The front panels feature sections of horizontal cording around the bust providing support and strength to the corset. The corset is finished with flossing- a decorative embroidery technique used to hold the bones preventing them from working their way out of  the casings.

The corset is bound by a twill weave tape at decorated around the upper edge with machine made cotton lace.

S-Bend corset (From the Hopkins Collection)

Summary: 

Dated: C.1902-1909 (probably British)

Corset made from cotton, silk, whalebone (baleen), metal busk  and machine made lace trimmed with replacement ribbon

The S bend corset was cut low freeing the breasts but pushed the stomach and pelvis in, hips and buttocks back and shoulders and bossom forward.

WHITE COTTON CORSET WITH TRAPUNTO WORK

Record Number: V&A: T.57-1945

Summary: 

Dated: C.1825-35 (Britain)

Constructed from corded and quilted  cotton, silk thread and whalebone. The corset features both bust and hip gussets. 

Trapunto derived from the Italian “to quilt” is a method of quilting that utilises two layers of fabric, the underside of which is slit and padded to produce a raised surface.

The corset features a wide concealed busk to the centre front which seperates the breasts and helps flatten the stomach.

WHITE RIBBON CORSET

Record Number: V&A: T.18-1958

Summary: 

Dated: C.1900 (possibly British)

With the reinvention of the ancient Olympic games in 1896, women began taking part in various physical activities and games including tennis, cycling, skiing and skating. Although corsets were still an integral part of women’s clothing, styles were being manufactured lighter and less structured.

The upper edge of this corset finishes under the breast. The ventilated style corsets were becoming more popular for the sporting woman allowing freedom of movement and healthy respiration for the wearer.

The sides are boned providing support and allowing for some waist constriction.

COTTON NET CORSET

Record Number: V&A: T.92&A-1984

Summary: 

Dated: C.1900 (BRITAIN /GERMANY)

Made in two parts which which fasten together at the front with a straight metal busk, This corset is made of cotton net allowing air to pass through the garment which helped keep the skin cool during summertime. The corset is reinforced with a white cotton diamond shaped waist band and single external bone casings that sit over the top.

The corset reaches from just over the bust to the curve of the hips slanting down to a point at the front.

GERMAN ERSATZ (AUSTERITY) CORSET

Record Number: V&A: T.44-2015

Summary: 

Dated: C.1917-1918 (GERMANY OR AUSTRIA)

Made from canvas weave paper twine, this corset is an example of the ersatz (substitute) clothing produced in Germany or Austria in response to the severe textile shortages during the First World War.  ‘Maintaining a supply of underwear was important to civilian moral. corsets were particularly important. without them most women felt undressed’

The corset features metal boning finishing part way down within the channels to allow for freedom of movement around the hip. The corset is trimmed with woven silk and linen ribbon.

GIRDLE LITTLE X: SILHOUETTE [SALOP] LTD

Record Number: V&A: T.291-1993

Summary: 

Dated: Early 1960’s (BRITAIN)

LYCRA, Nylon, lurex trim with metal suspender clips

Designed by Anne- Marie Lobbenberg for Silhouette in 1958 proved very popular with young women. The all elastic girdle provided light control and two way stretch

Advertisements focused on its functionality and the freedom of movement it allowed, promising that it ‘wont wrinkle, roll over or ride up’

The corset incorporates Lycra the brand name for elastane [spandex] a synthetic stretch fibre produced from polyurethane in 1959.

BUST EXTENDER: SPIRELLA CORSET COMPANY

Record Number: V&A T.348-1996

Summary:

Dated: 1910-1914

“The Spirella corset company marketed this style in its 1913 mail-order catalogue as a ‘bust extender… for the person who is too thin or scant in chest development”

The bust extender is constructed from a cotton covered frame of spiral steel boning designed to emphasise the ‘monobosom’ that was fashionable at the time. ‘The monobosom was the result of the S-bend corset that left breasts unsupported, and was exaggerated to create an unnatural ‘pouter pigeon’ chest that puffed out over the comparatively tiny waistline’.

The bust extender would have been worn over the top of the corset and inside the bodice of the dress

Trimmed around the neckline and arm holes with a cotton lace trim.

CORSET WITH SHOULDER STRAPS (UNKNOWN)

References
Ehrman, E (2015) Undressed. V&A Publishing. London