Construction

C1941/1942 AVRO LACED BACK CORSET WITH BELT (UTILITY) PART 2

This is the second part to a two part series for C1941/1942 Avro laced back corset  with belt (utility) focusing on the pattern and construction. The first article can be found here.

The garment was traced off the original garment before being digitised into CAD software. This will be the first pattern available for digital download from my new Etsy store. I made two versions of this corset. The first to replicate the outer part of the pattern using the same construction techniques as the original vintage garment. This would be my test run of the pattern pieces. The second version I would adapt to my own measurements and use it for my design brand Twilight Siren.

IMG_20170519_081405


VERSION 1: This version is made following the same construction as the outer part of the corset. Two part corset comprising of 5 panels either side in a single layer of coutil. It has a split front busk and lacing at the centre back supported each side with two bones of flat steel. The centre front and centre back panels are faced. Seams are backed with single casings of herringbone weave tape encasing the boning. The top and lower edges are bound in a ribbon tape.

The centre front/ side front and side front/side panel seams are constructed using the felled seam method to encase the seam allowance. Bone casings are positioned more vertically up and down the corset rather than following the seam line. This sample can be purchased through my Etsy store here.

Measurements as Follows: Waist 26″ Hip 32″

20180422_11242820180422_11234820180423_125735

VERSION 2 (OSTARA) I adapted the pattern to my own measurements

The corset is constructed from a silk taffeta backed with coutil (pin rolled pieces). Centre front and centre back casings also made with silk backed with coutil. I adapted the makeup slightly from the original garment (joining all the seams right sides together and placing the bone channel to the inside of the garment enclosing 2 bones). I also chose a longer length busk to go the full length of the garment

For this sample I omitted the underbelt seen on the original 1940’s garment focusing on cut and shape over making a historically accurate reproduction.

The corset is finished with gold hardware including the busk and eyelets contrasting nicely with the silk- a little out of my comfort zone as I don’t tend to work with gold.

The corset is decorated with gold tone hand cut lace applique and finished with bead and sequin embellishment.

OSTARA - purple silk & lace longline girdle front - Twilight SirenOSTARA - purple silk & lace longline corset girdle back - TWILIGHT SIREN

The Sample can be purchased through my own shop TWILIGHT SIREN here

THE PDF PATTERN CAN BE PURCHASED HERE

DOWNLOADABLE FILES:
PATTERN PIECES
GARMENT INFORMATION PACK: INCLUDING LOTS OF PHOTOS OF THE ORIGINAL GARMENT (12 PAGE PDF)
CONSTRUCTION NOTES: STEP BY STEP GUIDE ON MAKING UP THE GARMENT, NOTIONS (3 PAGE PDF)

LACED:UNLACED- HISTORICAL CORSET PATTERNS- SHOP OPEN

I am so pleased to announce the launch of my online Etsy store earlier this week LACED UNLACED PATTERNS for historical corset patterns.

The first pattern available is the C1941-42 AVRO LACED BACK CORSET WITH UNDERBELT here

wordswag_1520349986706.png


C1941-1942 AVRO Laced back corset with BeltC1941-1942 AVRO Laced back corset with Belt20180421_232314C1941-1942 AVRO Laced back corset with Belt20180424_134733

This is a 10 pattern piece corset pattern taken from a 1940’s corset girdle from my personal collection of vintage garments. It features an inner support belt which you can choose to include in making up. Original Article here

The pattern comes in the original vintage garment size ONLY.

WAIST 26″
HIP 32″

DOWNLOADABLE FILES:
PATTERN PIECES
GARMENT INFORMATION PACK: INCLUDING LOTS OF PHOTOS OF THE ORIGINAL GARMENT (12 PAGE PDF)
CONSTRUCTION NOTES: STEP BY STEP GUIDE ON MAKING UP THE GARMENT, NOTIONS (3 PAGE PDF)

SKILL LEVEL: INTERMEDIATE

The pattern is provided in PDF format ready to be printed on A3 paper. You will need to print the pattern to the actual size. A scale is included. This pattern could be printed on A4 and stuck together carefully.

The pattern does include seam allowances. The pattern and construction guide advises on the seam allowance but do not feel you have to follow it strictly if you have your own preferred method of make.

A Toile could be made to check the fit of the pattern. The pattern can be used as a basic block to amend to your own size requirements. Check the length of the Pattern. It can be lengthened or shortened at the waist line if required.

The pattern can be drafted to your measurements for an additional fee if you do not feel confident in drafting your own pattern.

Patterns are for personal use and may not be copied, published, resold or distributed in any form.

NOTE: This listing is for the pattern only and does not include the physical garment.

C1890-1900 THE ATHLETIC CORSET: PART 2

NOTE  *This article was originally published January 2017 for Foundations Revealed. The link can be found here.

In part 1 I worked with a pattern developed from ‘The Athletic Corset’ as featured in ‘A practical guide to corset cutting and making’ by William D.F. Vincent.

Now I’ll go on to create my own corset.

Given both its likely date and its function-over-fashion design, this corset could have been constructed using a single layer of coutil, keeping it lightweight but durable for wear during sporting activities. For this reason I chose a black broche (a heavyweight coutil with a subtle dot pattern) and a strong powernet (in place of the elastic webbing)

The Athletic Corset pattern

1

The corset was cut as follows:

  • 2 layers of broche to sandwich the busk: CUT 2 PAIRS CENTRE FRONT
  • 2 layers of broche for centre back eyelet panel: CUT 2 PAIRS CENTRE BACK
  • Single layer of broche for the rest of the plain pieces: CUT 1 PAIR FRONT, SIDE BACK, BACK
  • Single layer of powernet used in place of the woven elastic panels: CUT 1 PAIR SIDE FRONT


Preparing the Boning Channels

I decided to sew the corset seams wrong sides together, using external bone casings to cover the seam allowances. The pattern also indicated the placement of additional exterior channels, most of them down the centres of the panels.

I began with 27mm wide strips of broche, cut parallel to the selvedge, and used a 12mm bias tape maker to create  single bone casings for the channels covering the seams.

For the other channels I wanted double bone casings, so I cut those channels 52mm wide and used a 25mm tape maker for those. When applying them, I stitched close to the edge either side, and then added the dividing line of stitching down the centre to create the twin channel.

2

Inserting the busk

The pattern used a simple flat steel busk. The two CENTRE FRONT pieces were placed right sides together and stitched in order to insert the busk in the usual way.


Preparing the FRONT panel

Following the marking on the pattern, the shaped dart in the FRONT panel was stitched closed before joining to either the centre front or side front pieces.


6


A double bone channel was also needed on this panel. This will be the only one applied before the main construction, since it seems to disappear into the FRONT/CENTRE FRONT seam.

frontpanelpatternbone

The angled placing made positioning tricky as I tried to make the sides symmetrical. I was concerned about whether making the channel end in the seam would create awkward bulk, and whether I would be able to stitch down another channel to overlap the seam.

8

Assembling the front section

I stitched the FRONT/CENTRE FRONT seams wrong sides together, and then the FRONT/SIDE FRONT seams in the same way. This was the seam where the broche met the powernet, so I used a secure stitch on either end of the seam to control the powernet whilst stitching, and stop it from slipping.

9

CENTER BACK panel: Boning channels

I created the centre back edge by stitching CENTER BACK broche sections right sides together, then turning to the right side and pressing. I used the side of my sewing machine foot as a guide to create three equal channels for the eyelets and flat steels.

10

Assembling the back section

I stitched the BACK/CENTRE BACK seams wrong sides together, and then the BACK/SIDE BACK seams in the same way.

11

Joining front and back sections and applying bone casings

The front and back sections were joined wrong sides together. Again, secure stitches were used on each end to help control the powernet.


Applying the bone casings

I trimmed the seam allowances and pressed them down. (I turned the seam allowances in the powernet back onto the broche reasoning that stitching the boning casings onto the power net might cause the seam to crack under pressure). Then I applied the single bone casings over them, on the outside of the corset.

Then I applied the wider double bone channels to the centre front panel and side back panel. I should have used a double channel for the back according to hte pattern, but I found that the panel wasn’t wide enough, so a single casing had to make do instead.

141516

Boning

I used spiral steel boning throughout most of the corset, with flat steels either side of the eyelet channel in the centre back.

Binding

I wanted to use the broche for binding, but found that it would cause difficulty when sewing, especially at the ends. Instead I chose a satin finish pre-folded bias binding. I first machine stitched it to the right side and then flipped it over and top stitched in place.

1718

Eyelets

Finally I inserted twelve pairs of eyelets, as marked on the pattern.

19

The Finished Corset

I was pleased with the finished corset. I love the textural contrast of the mesh to the broche fabric. My choice of a sheer mesh allows the undergarment or skin to show through, adding interest to an otherwise fairly plain design.

Having worn and tested the corset with lots of bending and stretching, I felt that it was supportive, yet the stretch mesh panel provided me with some freedom of movement. The corset could be laced closed, reducing the waist but not being too restrictive.

20a21222324

I was pleased with the cut of the corset around the cup shape and under the arm. It was cut low, allowing full movement of the arm, yet still had good coverage of the breasts. The pattern could easily be adapted for use as a fashion corset.

25262728

The corset is cut short at the back, allowing the wearer to bend and sit comfortably.

I liked the idea of the double bone casing, providing both additional support and an eye-catching feature.  A contrast colour could be used to make them stand out.

I would probably remove the dart from the pattern for future use, and instead take the fullness out of the front panels from the sides. It could be tapered a little more at the centre front/front seam, bringing the corset closer to the body.

Vincent’s Athletic Corset does perform as advertised. It’s a comfortable, everyday corset, providing control and shape for the wearer whilst allowing considerable freedom of movement.


This sample is available to buy from my ETSY store.

1878 H.S. STRAUSS PATENT 208049

Initially when I came across this patent found here, I liked the simplicity of the pattern pieces with the multiple rows of stitching and bone channels used in the bust area. I was most intrigued however by the unique shaped bone pocket (seen in figure  9) that would be applied to the exterior of the garment.

us208049-0us208049-1

PATENT OBSERVATIONS

PART 2: THE LETTERS

  • In the drawings, Figures 1, 2, 3, 4, 5, 6, 7 represent the several patterns of which the base of each half of the corset is composed. Fig. 8 represents one-half of the corset expanded, but without perspective shading, the dotted lines indicating the seams. Fig. 9 represents the hip-piece cl enlarged, and also a portion of the piece (1 broken away, showing the bones and the under seam.

CUTTING INSTRUCTIONS

  • Each half of the body of the corset is composed, first, of seven patterns, as shown in the drawings, numbered 1 2 3 4 5 6 7. In cutting these patterns, Nos. 1 and 7 may be doubled by folding the material on their outer straight edges. Nos. 2, 3, and 6 consist of two pieces each, cut to the same pattern, while No. 208,049, dated September 17, 1878 application filed June 26, 1878.
  • N 0s. 4 and 5 may be single or double, as de sired. The pattern Fig. lhas the usual hooks, and the pattern Fig. 7 has the usual eyelets.

CONSTRUCTION NOTES

  • When the pockets are formed in the several patterns 1 2 3 6 7 all the several patterns are sewedtogether. The best way of sewing them together is as follows: The edge of Fig. 2 (shown inthe drawingnearest to Fig.1) is sewed to Fig. 1 on the edge nearest to it. These pieces Figs. 1 and 2 are laid together sothatthe sides of said pieces which are on the inside of the corset when the corset is finished will face each other, and the edges of the parts are thus on the outside of the corset when the parts are expanded, and the inside of the corsetis smooth, the seams being what are called hidden seams. All the patterns are thus sewed together, the edge of the piece of each higher number (shown in the drawing nearest the lower number) being sewed to the edge of the lower number nearest to it. When all the The pockets formed in the 5 seven patterns Figs. 1, 2, 3, 4, 5, 6, and 7 have been thus sewed together, the shape of the whole forms one-half of a corset so shaped as to make the form desired.
  • The hip-piece d, Fig. 9, is a narrow strip, with its sides parallel about one-half its greatest length, with a gore-shaped or flaring lower part, having pockets for bones of decreasing length, as shown in Figs. 8 and 9. This piece at is sewed over the outer side of the corset, so that the seam connecting patterns Figs. 4 and 5 comes under it at or about the heavy dotted line shown in Figs. 8 and 9 by the letters 0 o. This piece, while giving shape to that portion of the corset, also serves as a protection or shield for the hips, upon which the outer garments may lie.

HISTORY

CORSETS OF 1878

1887

American corset found at the Metropolitan Musuem (USA) is dated at around 1878. The upper edge is cut flat across the bust and the front lower finishes over the hips slanting to a deep V shape. The corset similarly to the patent appears to feature multiple boning by rows of parallel stitching creating the channels. Bust gores give this corset extra shape.The decorative stitches (flossing) at the lower edge prevent the boning from forcing its way out of the channels. The corset is finished with a deep lace along the upper edge.

light blue silk corset with flossing 1870-1885

American corset dated 1870-1885 found at the Museum of Fine Arts, Boston USA (Accession number 201:616). Constructed from light blue silk the corset features a straight busk front with double gusset at the breast. Heavily boned all the way around the corset has multiple rows of stitching sandwiching whalebone between the layers of fabric. The gussets also appear to be corded providing additional shaping and support to the bust area.  Decorative flossing is used in white contrast thread to hold the bones at both upper and lower edges.

Pattern Draft:

My  first pattern draft based on my measurements. I enlarged the pattern pieces of the patent as a rough base for the piece shapes amending each piece accordingly. I renamed this pieces as follows from left to right CENTRE FRONT, FRONT, SIDE FRONT, SIDE, SIDE BACK, BACK, CENTRE BACK

I realised when I made up a toile of the pattern I needed to increase the body length of the entire corset pattern from the over bust to waist by 2cm. I extended the pattern from the waist and reshaped the pieces.

PRE CONSTRUCTION
Prior to commencing construction there were a few preparation stages (not photographed) beginning with the fabric cutting. I chose a dove grey spot broche coutil. I liked the sturdiness of the fabric which would be suitable for the single layed panels.

  • Cut a double layer of coutil for the CENTRE FRONT/ FRONT/ SIDE FRONT/CENTRE BACK  (2 pairs)
  • Cut a single layer of coutil for the SIDE/ SIDE BACK/ BACK (1 pair)
  • CUT a single layer of coutil for the additional bone pocket (1 pair)
  • I prepared all the bone casings. I cut strips of the coutil of approx 36mm wide (following the selvedge) I Used a tape maker to make 18mm bone casings. 5mm spiral steel boning would be used in the double channels

CONSTRUCTION

Inserting the busk: I decided to add a modesty panel behind the busk to stop any flesh showing through the gap of the fastenings. This was created by using a panel of folded coutil and inserting it into the studded side busk seam.

The seams were then joined wrong sides together of the CENTRE FRONT and FRONT panels (double layer together)  The seam was covered externally by the bone channels.  These were positioned centrally over the seam. I edge stitched on either side before using the edge of the foot as a guide to stitch down the centre of the casing to create a double channel.

I then machine stitched rows of channels approx 8mm wide as indicated on the pattern pieces.

The panels were joined in the following order. All the seams joined wrong sides together so seams appear on the garment outer

  • FRONT/SIDE FRONT (double layer of coutil). More rows of stitching creating bones channels following the pattern.
  • SIDE FRONT/SIDE
  • SIDE/SIDE BACK
  • SIDE BACK/BACK
  • BACK/CENTRE BACK

Close up where you can just see the rows of stitching for the bone channels in the front and side front pieces


Creating the bone pocket: The bone pocket (figure 9 in the patent) was an additional panel that would be placed over the top of the seam between the SIDE and SIDE back panels. This would strengthen the corset whilst maintaining lightness- using just the single layer of fabric for the SIDE/SIDE BACK/BACK pieces. I developed the pattern by drawing the shape on my initial toile, cutting and retracing  to get the shape.

Toile of the bone pocket. Channels stitched to figure out the number of bones to go in the pocket.

The seams were pressed under on either side before the panel was top stitched into place. Rows of stitching creating channels were made following the front of the pocket.

Rows of stitches were created in the pocket for the boning channels using the machine foot as a guide parallel to the front of the piece.

Boning: Spiral steel bones were cut to length and tipped before being inserted into all the channels. Flat steel bones were used either side of the eyelet channel to provide stability.

There are a total of 50 bones in this corset. A combination of spiral steel and flat steels at the centre back. Over 8 Metres of boning is used.

One half of the corset. A close up showing the boning inserted into the channels.

FINAL CONSTRUCTION STAGES

Binding: I chose a silver raw silk slub fabric binding for the upper and lower edges. The binding was made cutting the fabric on the bias grain and pressed using a 18mm tape maker.

Eyelets: Finally the corset was eyeletted using silver metal eyelets to match the busk. 12 pairs of eyelets were used in keeping with the patent illustration.

THE FINISHED CORSET 

wp-image-693320875jpg.jpgwp-image-1524345232jpg.jpg

wp-image-1216454230jpg.jpgwp-image-1036267013jpg.jpg

1887 B BALDWIN PATENT 358249: PART 2

NOTE *This article was originally published January 2015 for Foundations Revealed. The link can be found here.

This article is the second part of a 2 part series dedicated to a patent by B Baldwin of 1884. First part found here.

INSPIRATIONS
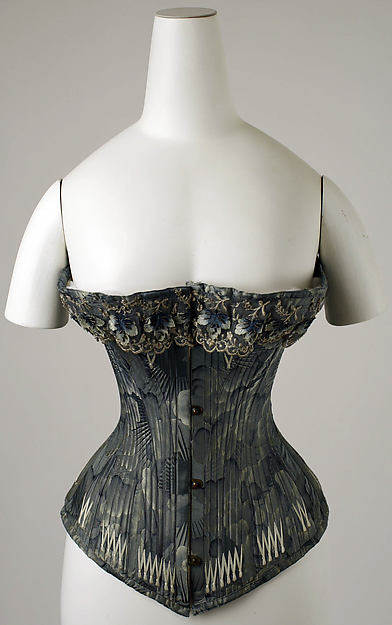
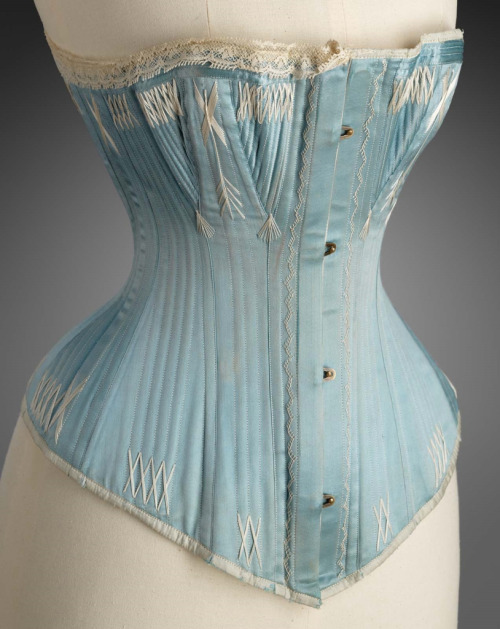
I spent quite a while deciding on what material choice I would make for the corset. One of my favourite corsets is by  R & W.H Symington of Market Harborough, a red and black sateen corset dated around 1900. Now although this would have come after the patent I love the colour play and decided to colour block the panels so the gore detail could be seen as well as the curved line from the back to the front an integral feature of the patent that represented Hogarth’s line of beauty.

If this patent was manufactured It would probably have be constructed using a single layer of coutil.  I decided that this corset would be made with a fashion layer backed with coutil and then lined so all the inside is neatly finished

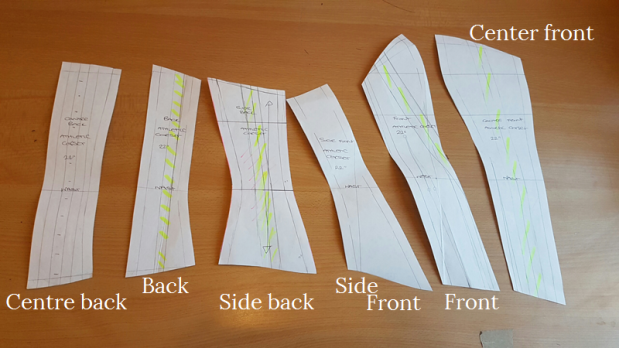
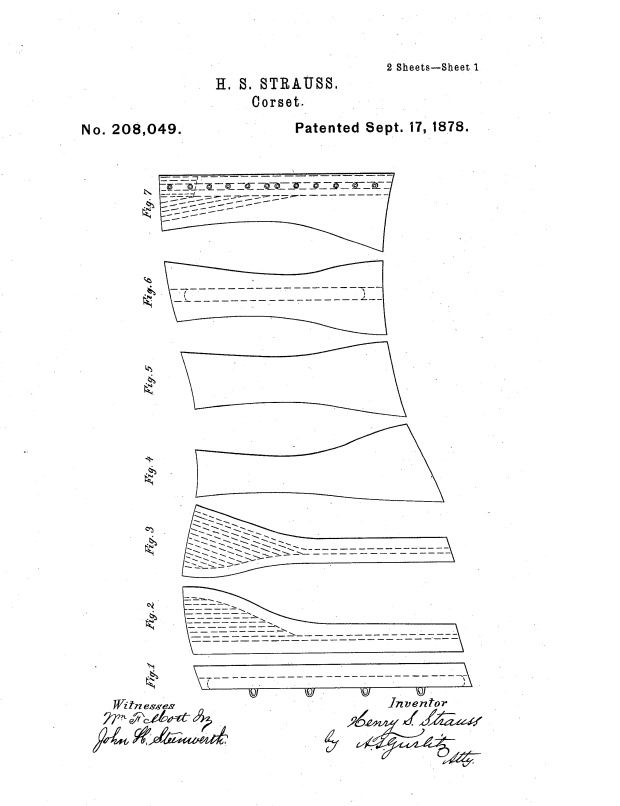
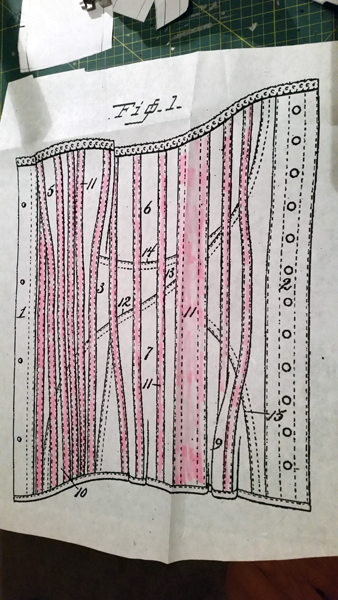
The start of the article will look at the text provided with the patent which gives a small insight into its construction. For reference I decided to scale up the drawing and highlight the bone pockets that featured on the outside of the corset. The illustration made it clear where they should be placed  and how many.

2

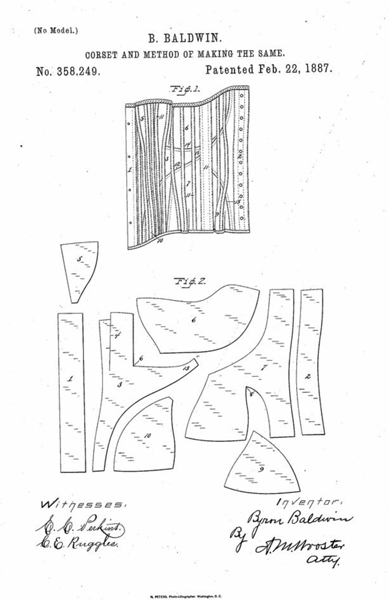
• “11 denotes the bone pockets which are formed in the usual manner in this class of corsets- that is, by stitching independent strips outside of the sections of the corset during the process of manufacture”

• The bust gore seaming is hidden by the bone casing.
“It will be seen in Fig 1 that the seams joining the bust gore and the front body section, the seam joining the front of the underarm section to the front body section and the seam joining the front of the back hip gore to the back body section are wholly conceauled”
It can be seen in the illustration the double dotted line representing the visible curved line. It gave indication of the order which pieces joined together. I actually thought the double line of stitching g was a nice decorative feature too.

• “12 denotes a curved and recurved seam (Hogarth’s line of beauty,) which extends from the top of the corset at the back, following naturally the curves of the body from between the shoulder blades down across the waist and over the hip at the front.
• “Commencing at the bottom, this seam first joins the back edge of the front body section and the front edge of the front hip gore. After passing off from the rearwardly extending tongue 13 of the front body section, and joins that to the front of the back body section. It then passes off from tongue 13 and joins the back of the underarm section to the front of the back body section”

PRE CONSTRUCTION
Prior to commencing construction there were a few preparation stages I had to make which I haven’t included photographs off but are as following beginning with the fabric cutting.
• cut a single layer of coutil for Front, back, bust gore, back bust gore, front hip gore back hip gore
• Cut a double layer of coutil for the centre front, centre back
• Cut a single layer of silk for the front, back,  front and back hip gores and front and back bust gores . I decided I wanted to show off the curve so cut the front and back in black and the gores in aubergine
• Cut a single layer of cotton liner for the front, back,  and bust and hip gores
• All the silk pieces were fused with a medium weight woven fusing
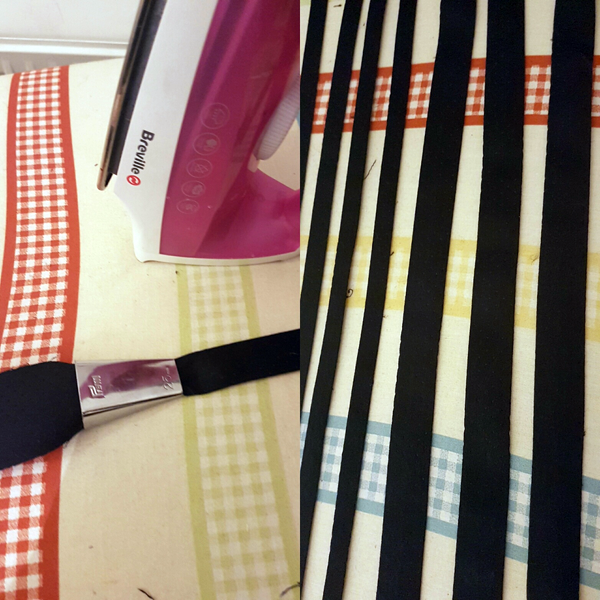
• I prepared all the bone casings. I Fused the slate silk and the cut strips of approx 27mm wide (following the selvedge) I Used a tape maker to make 12mm bone casings. I also cut 2 strips of 5mm silk and made bone pockets with a 25mm tape maker. These would be for the sides.

CONSTRUCTION
Following the advice from some of the other articles on Foundations Revealed I pin rolled the silk pieces to the coutil layer so they could be treated as one.  In the past I have basted the layers together with a long running stitch around the edges but in many occasions still have the annoying rolls and creases appear.

20141122_121205

Demonstrating pin rolling to the back hip gores

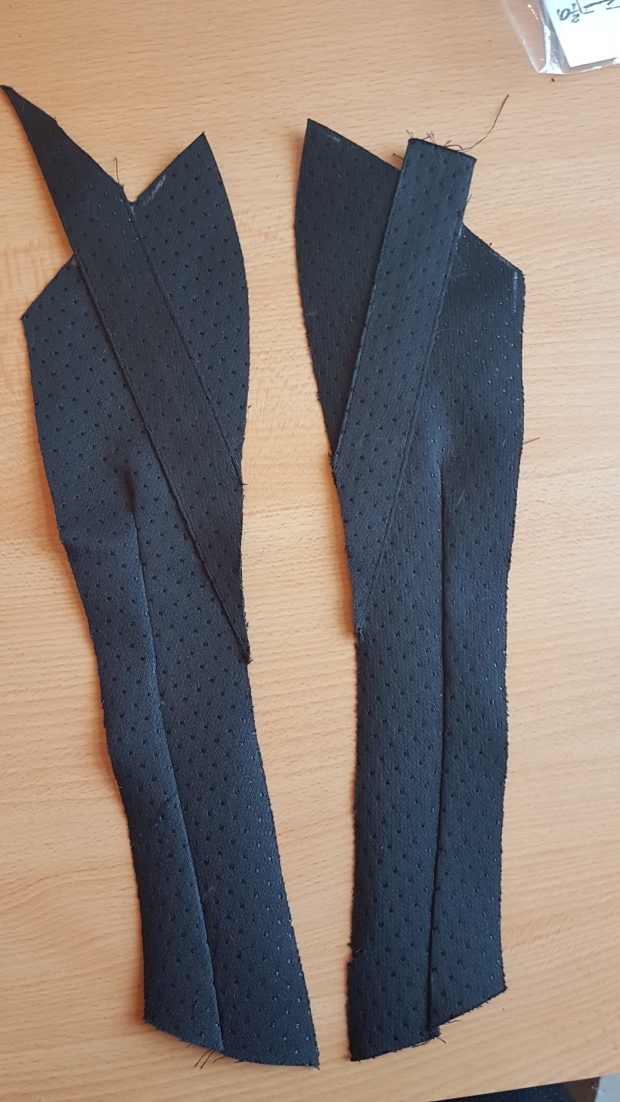
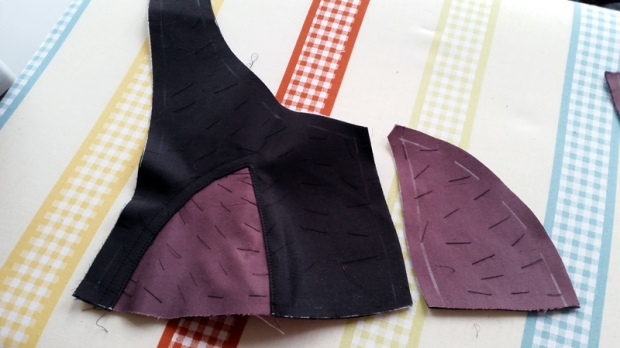
1. Inserting the front bust gore into the front panel
To insert the bust gore I needed to spread open the slit in the front pattern. This would be hardest part of the makeup as it would be required that I stitch the straight edge to 2 convex edges whilst maintaining the sharp point at the bottom of the gore.
As the point was very tight I wouldn’t be able to manoeuvre the needle and foot and turn the work whilst stitching the panels right side together (I tried with little success in the toile).
I decided to overlap the seams and stitch directly on the top on the outside layer. I firstly drew on the seam allowance on the gore 10mm  around the point. The front was slightly different. I used 10mm at the top of the split (upper edge) and tapered it down to 5mm to the point. I pressed back the seam allowance on the front panel and slit around the edge making sure I slashed down to the apex of the gore.

20141122_132901

The seam allowance drawn on for the front bust gore

I then placed the front panel over the gore and top stitched around. The slashes enabled me to easily work the slit open and around the gore.

2014-11-22 13.27.23

The front bust gore inserted

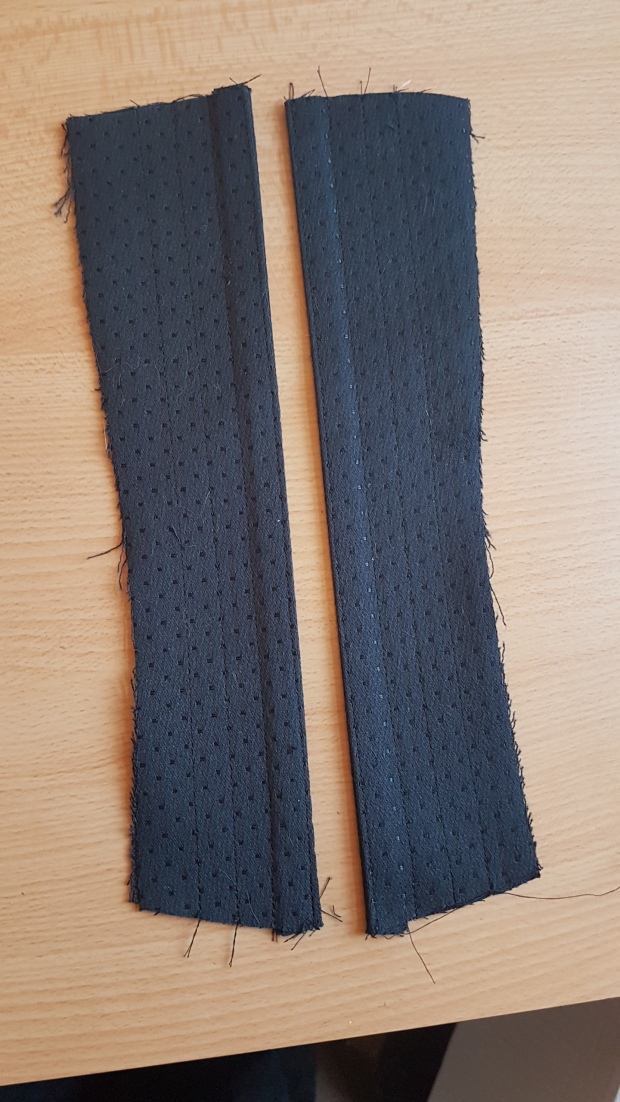
2. Inserting the back hip gore into the back panel.
The same method of application would be applied inserting the back hip gore into the back as the front bust gore above. This was slightly easier as the corner was at more of a right angle so easier to manuveor the needle as opposed to the slit in the front panel I had to spread open. A second row of stitching was also applied to the curved  edge going back toward the CB.

3. Joining the back panel to the front hip gore.

Next I joined the front edge of the back panel to the front hip gore. I overlapped the seam so that the double row of top stitching was made on the back panel.

9

The back panel and front hip gore

20141122_131416

The back panel and front hip gore sewn together

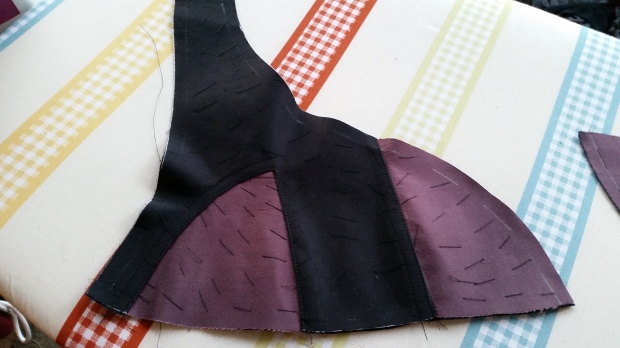
4. Inserting the back bust gore into the front panel
The pieces were joined using the overlapping seam technique as applied to the other gore panels. It was important that the drill hole on the front tongue and the notches were carried over to the pieces to allow for the pattern to align correctly. A second row of stitching was applied to the lower edge.

11

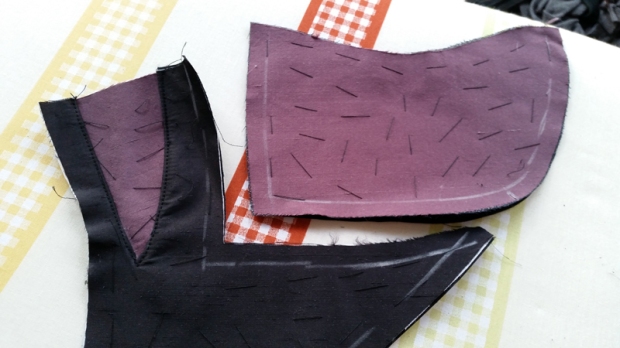
The back bust gore and the front panel

12

The front panel with the back bust gore inserted

5. Joining the front and back sections and adding a double row of stitching going down.

Working with opposing seams it was important to add plenty of notches particularly where the front met the hipgore/back panel seam and the intersection of the back bust gore/back panel. At this point I really loved how playing around with colour for the panels drew attention to the panels and just how interesting this patent was.

13

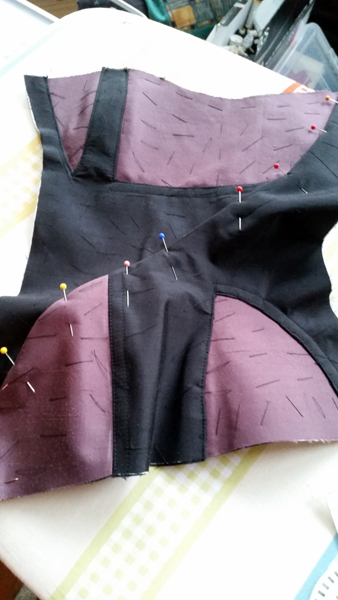
The front and back panels pinned together and ready for sewing

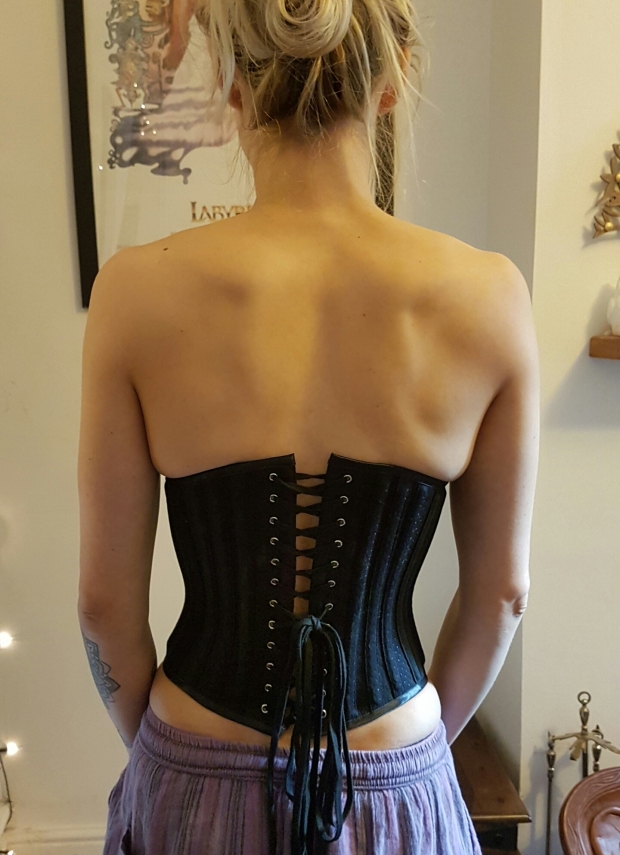
6. Make up the centre back strip right sides together, seam the CB and topstitch.

Join to the back panel sticking only the top silk/coutil layers. The under layer would join to the liner.

7. Inserting the busk

8. Joining the front to the centre front outer
When joining the centre front panel I stitched only the top layer of silk/coutil. The under layer would join to the liner. I top stitched the centre front layer.

16

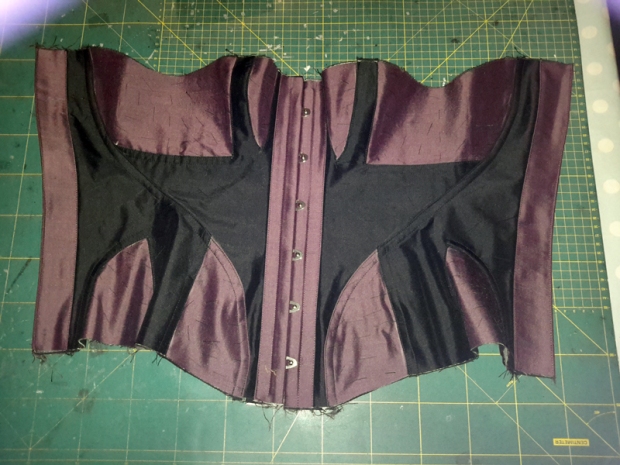
9. Further Construction
Using the edge of the foot stitched channel in the CB for the eyelets and bones either side. And also a channel in the centre front for an additional flat steel.

17

The lacing panel

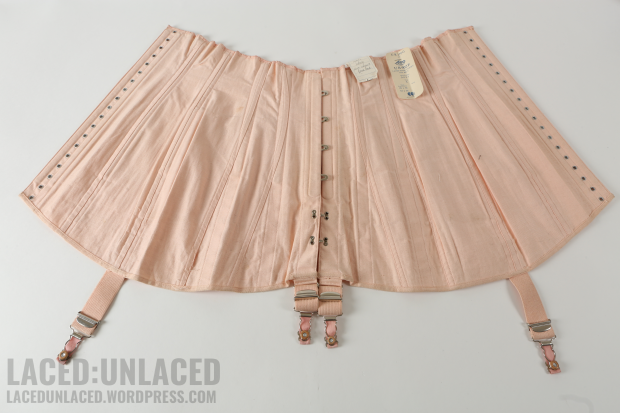
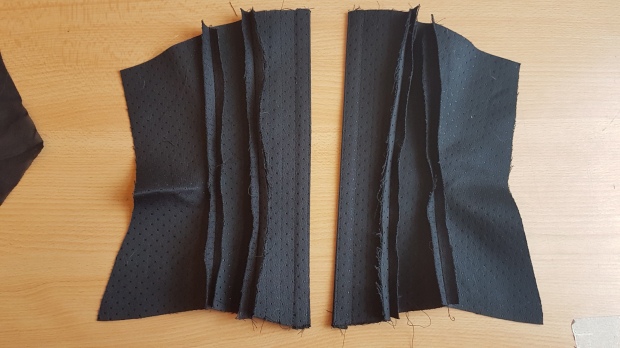
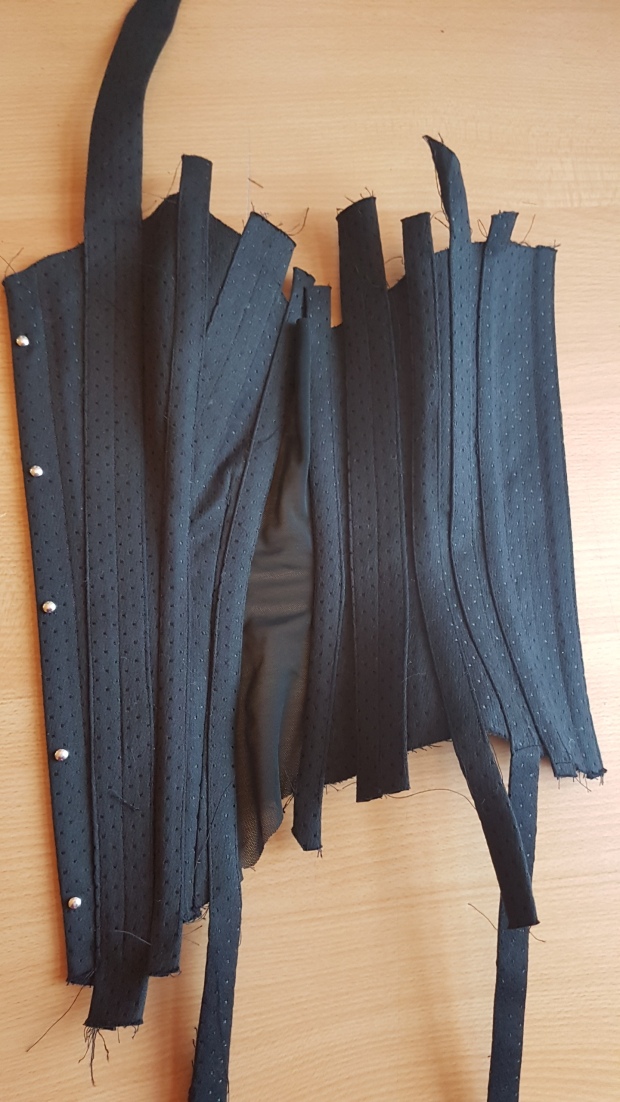
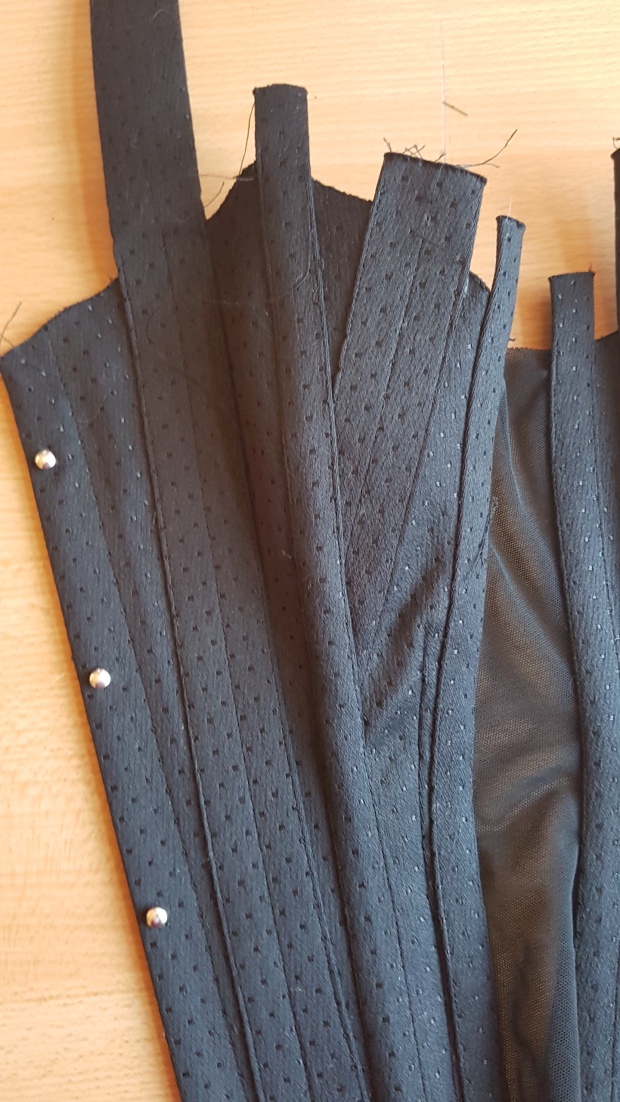
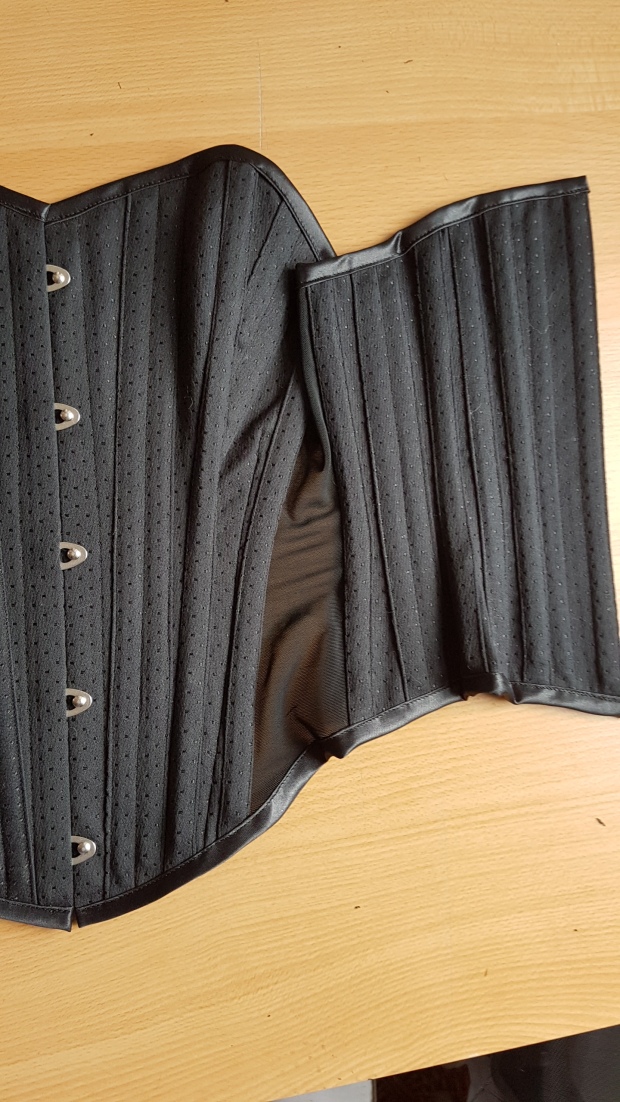
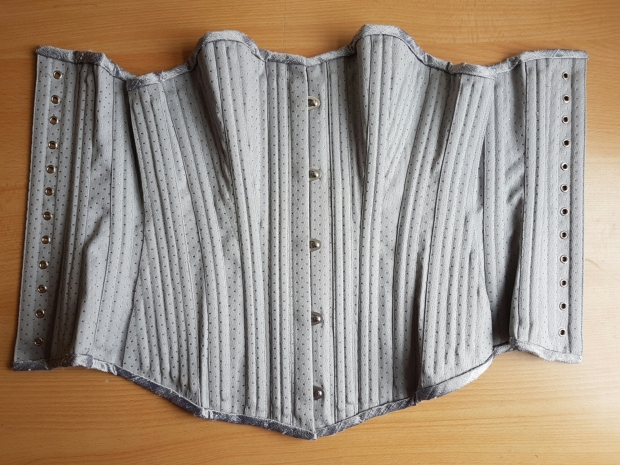
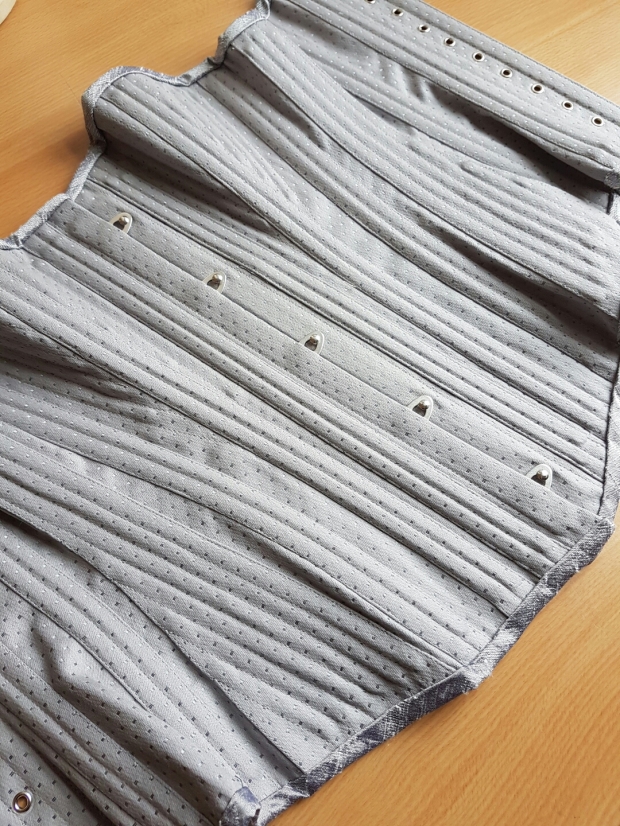
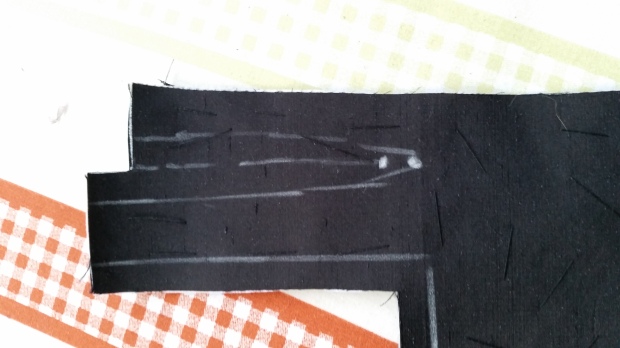
10. Applying the bone casings
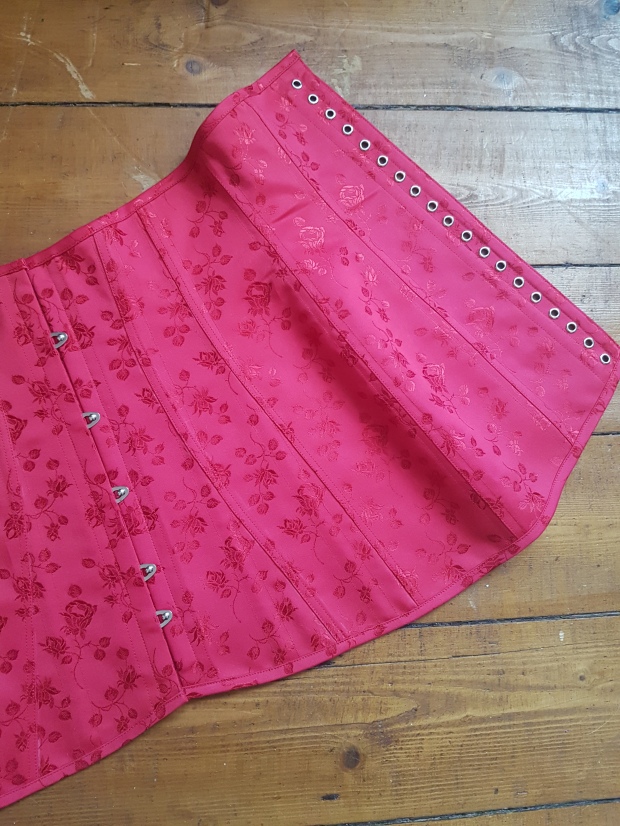
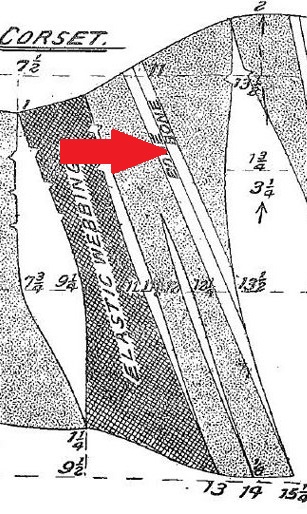
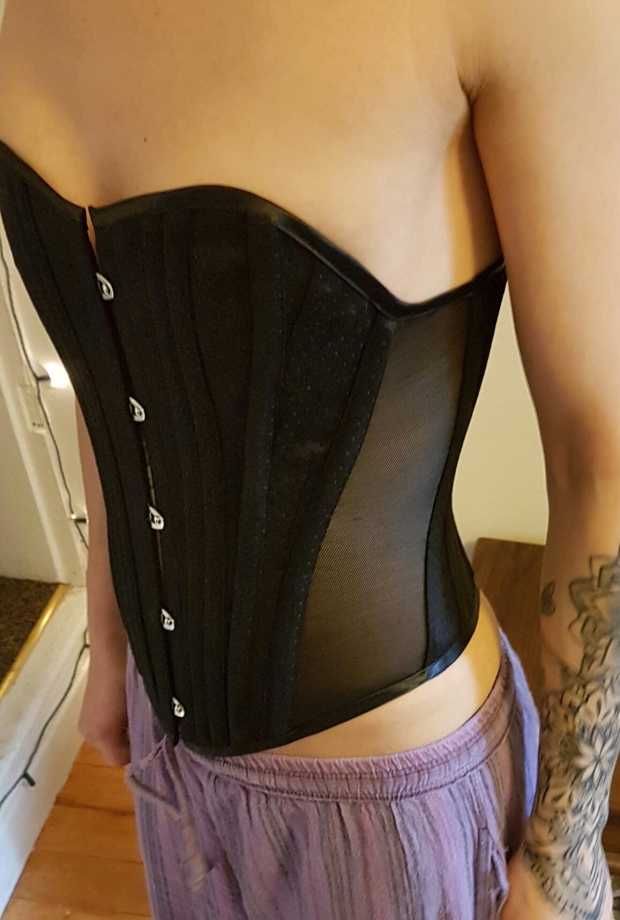
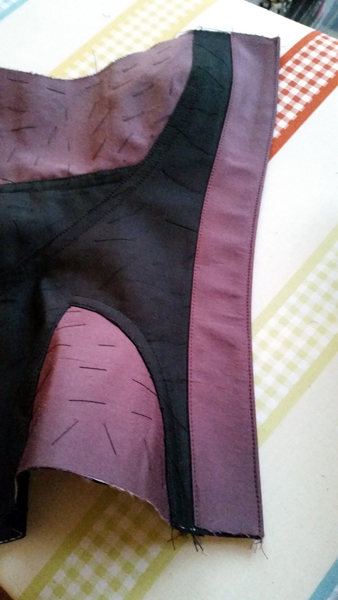
The corset patent demonstrated there were external bone pockets with the majority focused on the front. Counting the bones that appeared around the front I realised that due to my small frame I  wouldn’t be able to squeeze in as many as the patent illustrated. My large print out of the patent came came in handy where I highlighted the casings to make easier to see.
There were 11 12mm bone casings in total shown plus the larger side pocket that would 2


18

Original boning channel diagram

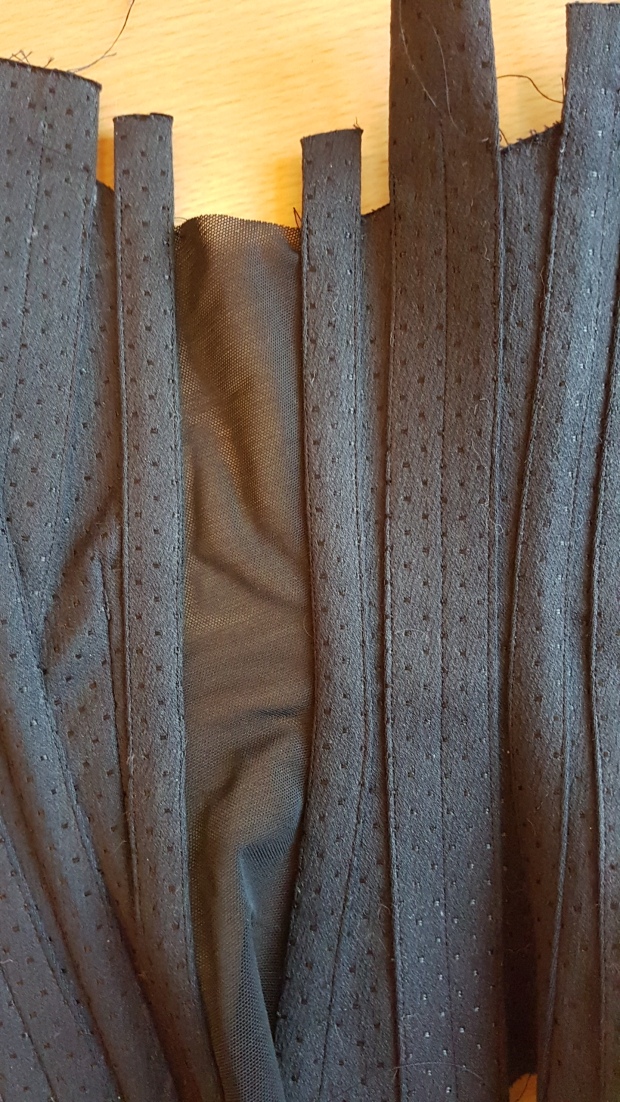
I started from the side where the wider bone pocket was placed.  This bone pockets were positioned relatively straight up and down the corset. The side bone pocket was positioned half over the front seam of the back hip gore.  I then worked my way from the front around to the side pinning the bone pockets into place. The front bust gore seams were hidden and a bone pocket also went thought the centre of the gore. A casing also covered the front seam of the back bust gore.
The front bones pockets tapered down to side by side at the waist position  and then spaced out evenly as I worked my way to the back. As I was pinning them on I began to feel that I was losing the colours covering with external casings and I wouldn’t be able to appreciate the panels of the finished corset. I Added an addition casing at the back (not featured on the patent) as aesthetically I felt the gap was a little out of proportion in comparison to the others. Presumably if I had a bigger frame all the other casings would be a little more evened out.

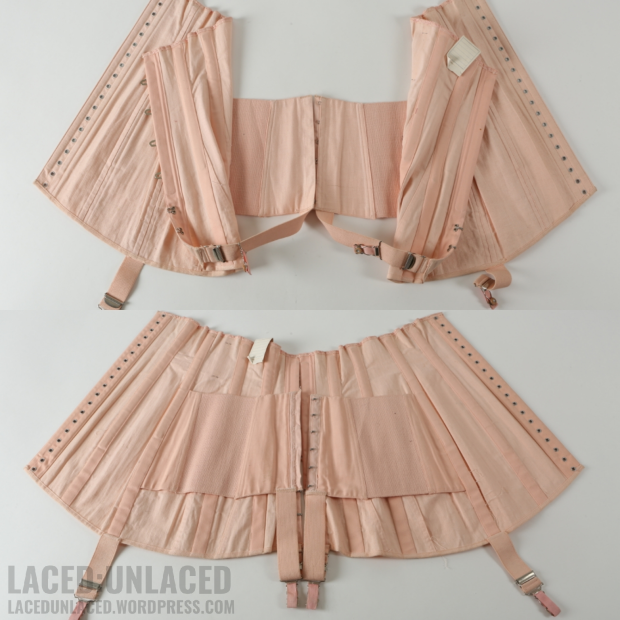
11. Make up lining layer.

Fabric seamed together right sides. The gores were inserted exactly the same as the outer layer, although I left out the double row of stitching. Attached right sides together to the facing of centre front and centre back. The corset could then be turned through.

21

All the bone channels sewn down

12 . Boning
Spiral steel bones cut and tipped to length s were inserted into all the seam pockets. Flat steels were used in the back. I was uncertain at first due to the curvature on the pattern and whether this would affect the choice of bone into the seam. I wondered whether the flat steel would fit the seam allowance or whether it would tear under pressure.
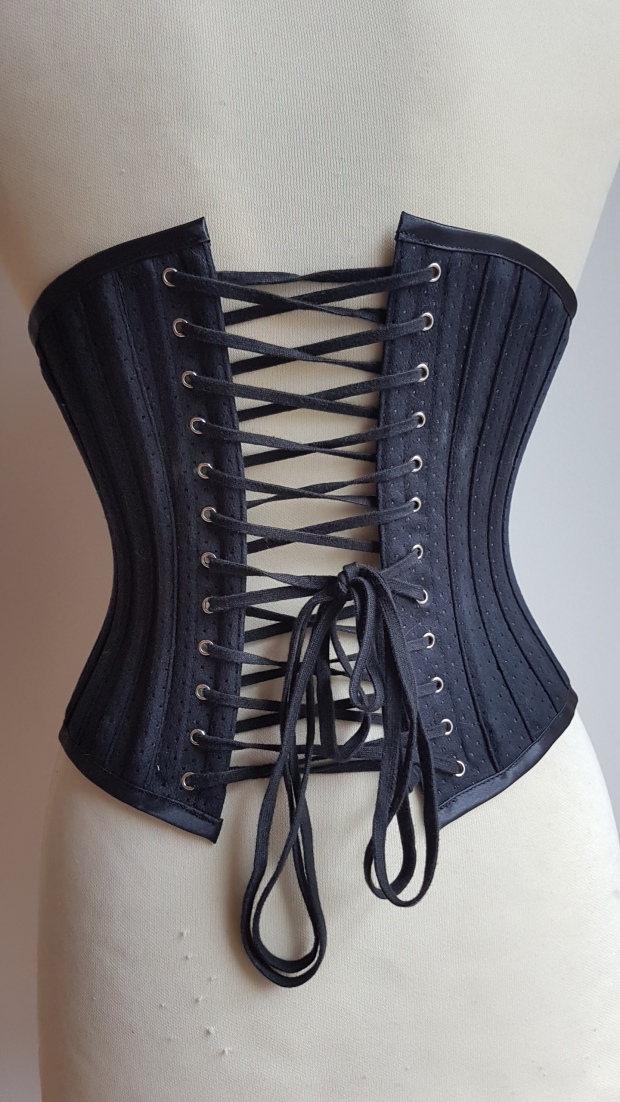
13. Binding
I must admit I cheated with the binding. Usually I would make it as I did the casings but I had some black Cotton pre made to hand. I first machine stitched it to the underside and then flipping it over and hand stitching.

14. Decoration

Like many of the corsets of the patents time I decided to decorate with a deep embellished  lace trim hand stitching the lace to the upper edge. Being as this corset would be worn as a fashion outerwear garment as opposed to lingerie I chose to place the lace scallop over the edge for a little style detail.

15. Finally the last stage was to apply the eyelets.
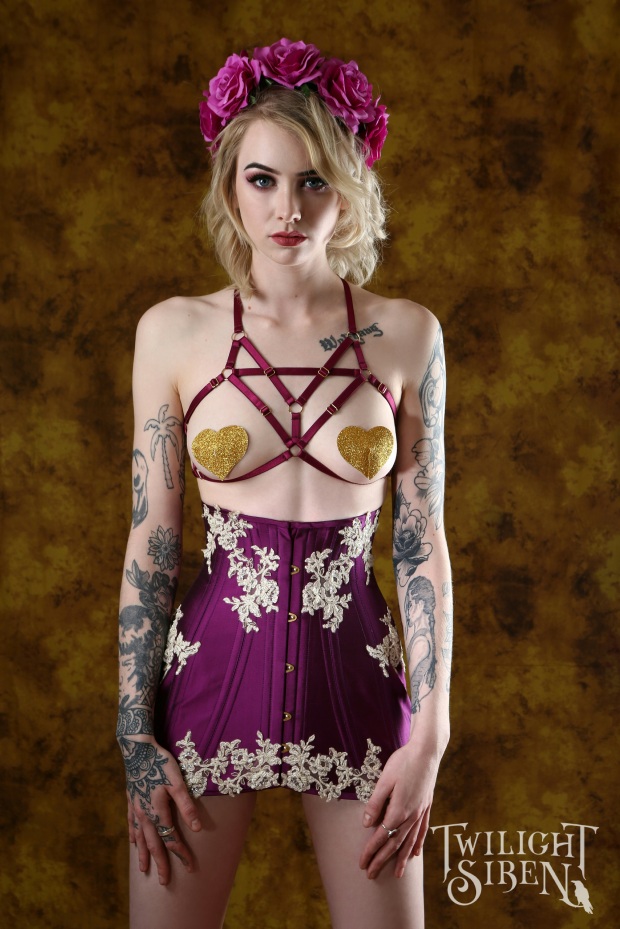
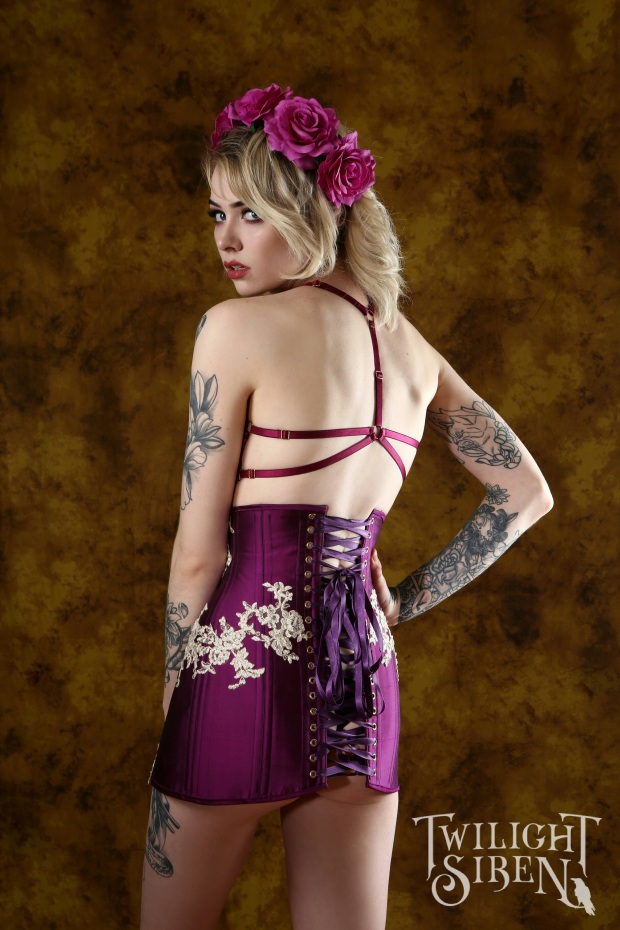
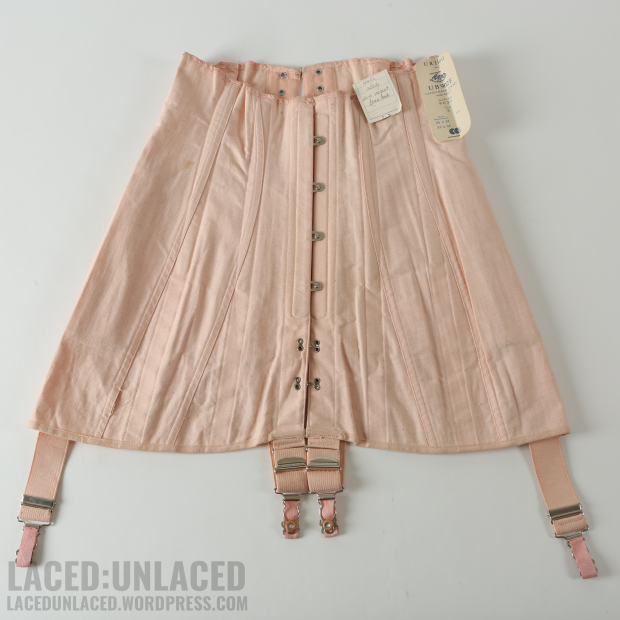
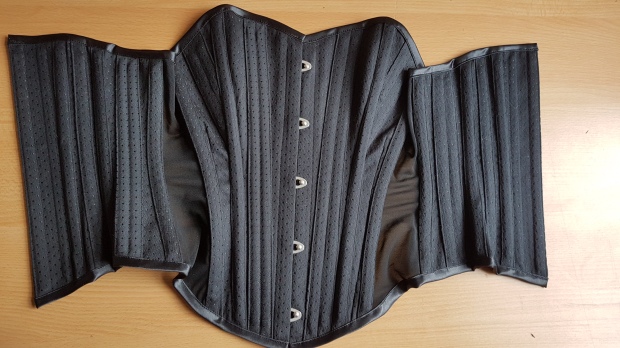
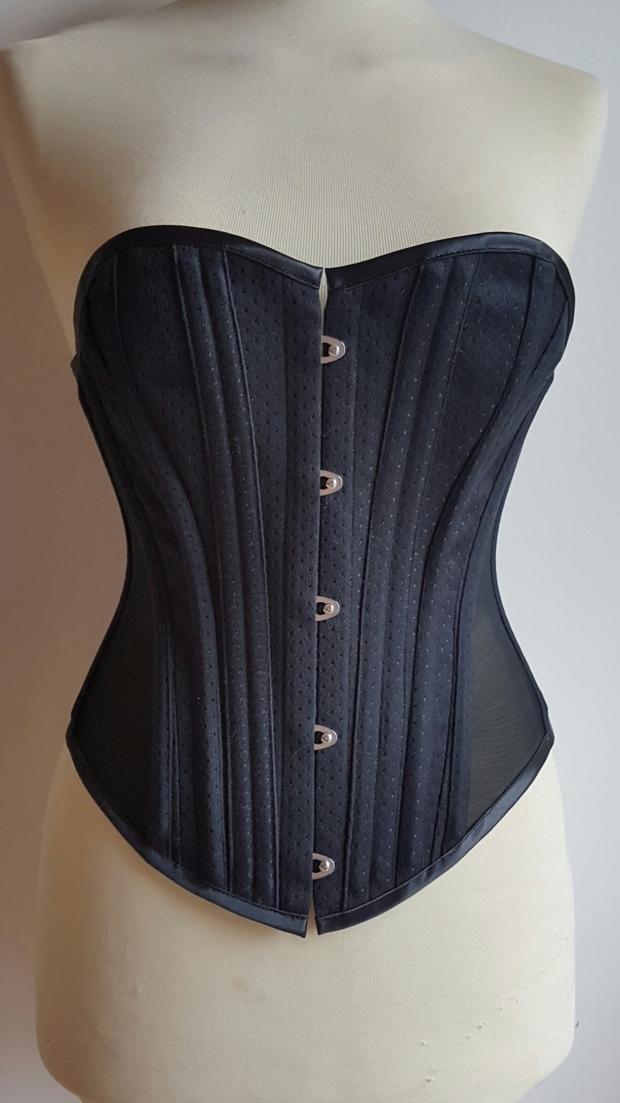
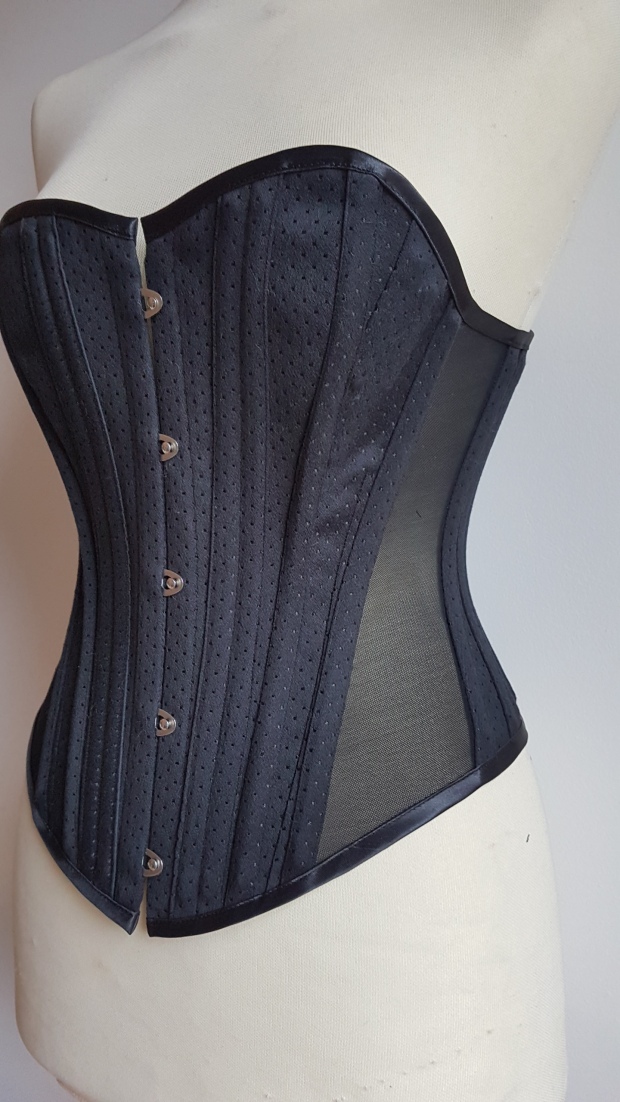
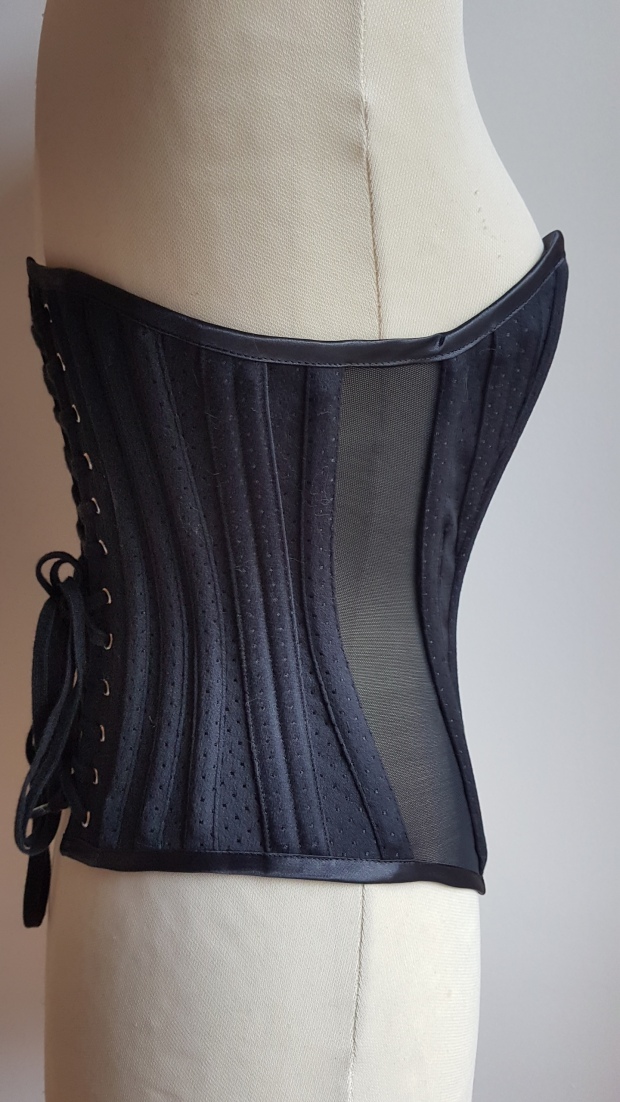
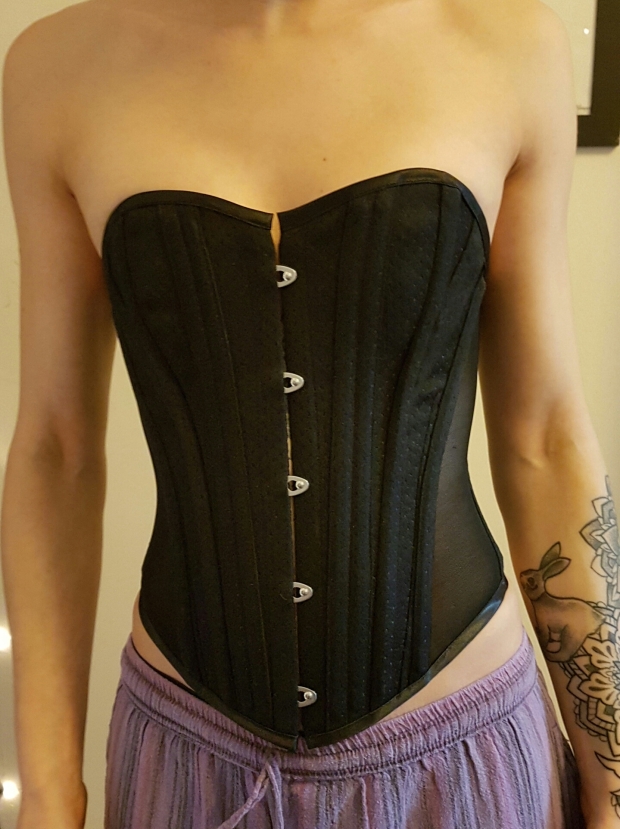
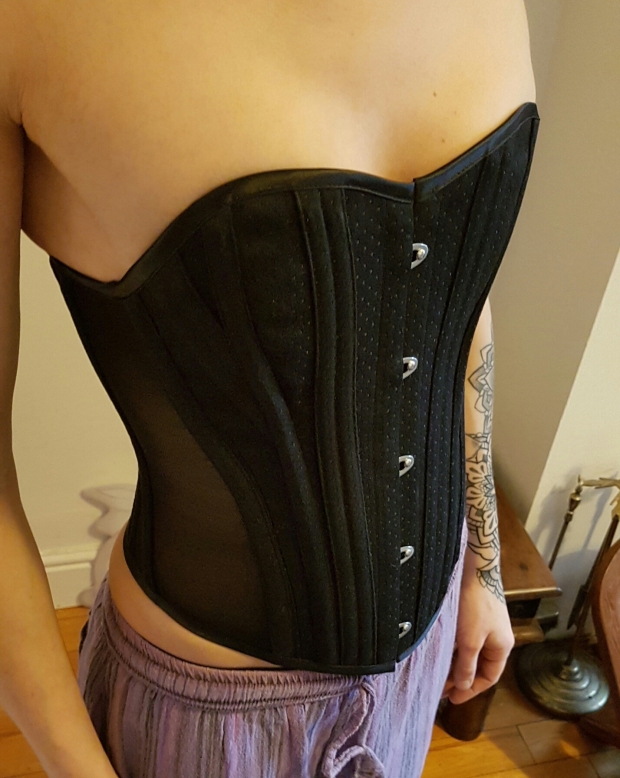
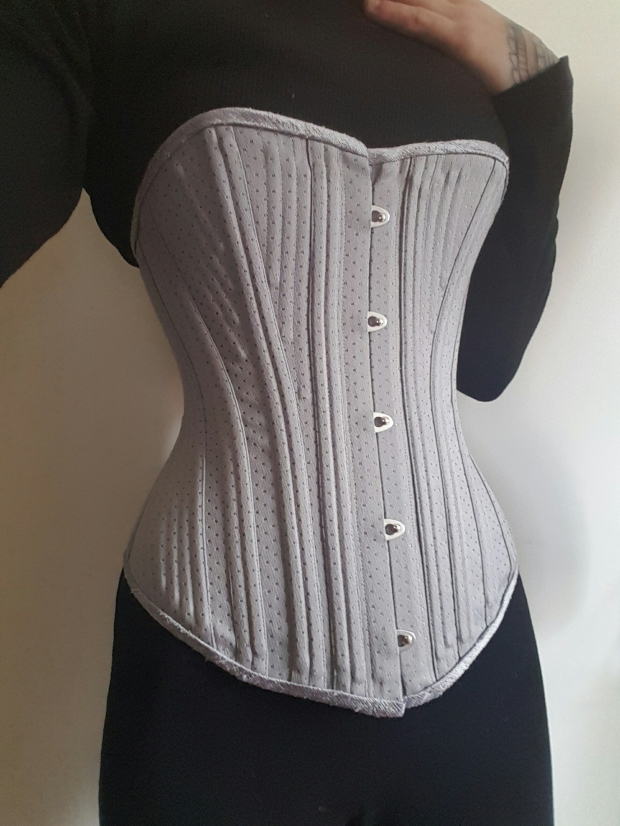
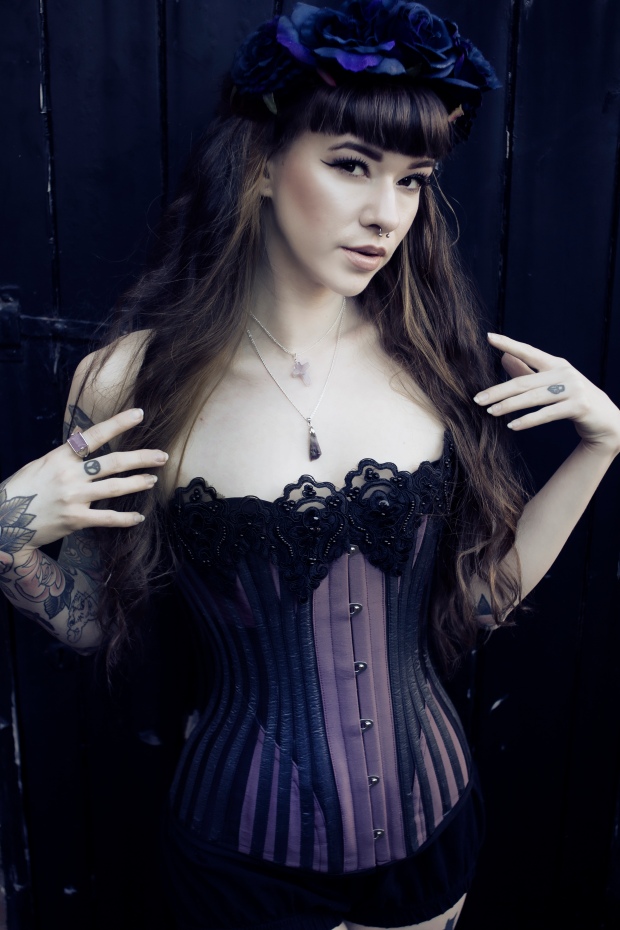
THE FINISHED CORSET

27

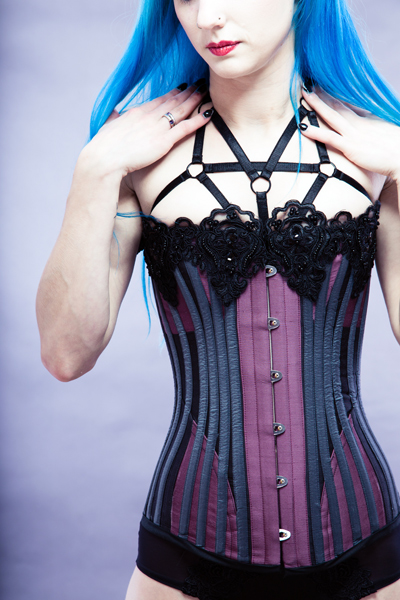
PHOTOGRAPHY: VAPOUR TRAIL PHOTOGRAPHY


_MG_3576 copy.jpg

MODEL: BEX FISHER, PHOTOGRAPHY: MONIAPHOTO


_MG_3584 copy.JPG

MODEL: BEX FISHER, PHOTOGRAPHY: MONIAPHOTO

 
CONCLUSION
Overall I love the finished corset, the colours and the applied lace finishing. I really enjoyed this challenge using gores as a way of adding capacity. I tried to be true to the patent sketch and for this corset did not adapt it too much. Obviously as this pattern was fitted for my small frame I feel it is a little swamped in casings to the outside. I think I’ll play around with this pattern and use a combination of casings applied to the external and internal of the garment so more of the colour blocking and gores can be seen. I really do like how effective using the coloured silks for the gores and casings were and placing emphasis on the different shaped pieces.

 
Fit

  • I found the corset to be fairly comfy to wear and wasn’t too restrictive so the patent worked to Baldwin’s intentions.
  • I was really pleased with the fit of the corset. I was slightly surprised that the gores did in fact work with my frame and I feel confident in using them again in future designs regardless of size. I really loved the curves the gores created probably helped with the choice of restriction applied to the waist being greater than that of the hip.  I actually like a little bit more waist reduction so maybe this is something I can also adapt the pattern to later on.
  • I think being as this is a fashion style corset I would also raise the centre front creating more of a sweetheart shape neckline and adding into the depth of the bust gore for a little more coverage.

Things I’ve learnt

  • PIN ROLLING… I think from now on every corset I make ill be applying this technique. So pleased with how effective (and surprisingly not very time consuming) this preparatory technique is in the overall finish.
  • INSERTING GORES…Now I have mastered the technique of inserting gores I am fairly confident that they will feature in many more of my own patterns in the future.

I really hope you’ve enjoyed these articles as I have found the journey of making a corset from a patent. Feel free to ask any questions with regard my techniques or processes.

<ahref=”http://www.bloglovin.com/blog/14331383/?claim=qjpg88ctuex”>Follow my blog with Bloglovin</a>