Patent

1878 H.S. STRAUSS PATENT 208049

Initially when I came across this patent found here, I liked the simplicity of the pattern pieces with the multiple rows of stitching and bone channels used in the bust area. I was most intrigued however by the unique shaped bone pocket (seen in figure  9) that would be applied to the exterior of the garment.

us208049-0us208049-1

PATENT OBSERVATIONS

PART 2: THE LETTERS

  • In the drawings, Figures 1, 2, 3, 4, 5, 6, 7 represent the several patterns of which the base of each half of the corset is composed. Fig. 8 represents one-half of the corset expanded, but without perspective shading, the dotted lines indicating the seams. Fig. 9 represents the hip-piece cl enlarged, and also a portion of the piece (1 broken away, showing the bones and the under seam.

CUTTING INSTRUCTIONS

  • Each half of the body of the corset is composed, first, of seven patterns, as shown in the drawings, numbered 1 2 3 4 5 6 7. In cutting these patterns, Nos. 1 and 7 may be doubled by folding the material on their outer straight edges. Nos. 2, 3, and 6 consist of two pieces each, cut to the same pattern, while No. 208,049, dated September 17, 1878 application filed June 26, 1878.
  • N 0s. 4 and 5 may be single or double, as de sired. The pattern Fig. lhas the usual hooks, and the pattern Fig. 7 has the usual eyelets.

CONSTRUCTION NOTES

  • When the pockets are formed in the several patterns 1 2 3 6 7 all the several patterns are sewedtogether. The best way of sewing them together is as follows: The edge of Fig. 2 (shown inthe drawingnearest to Fig.1) is sewed to Fig. 1 on the edge nearest to it. These pieces Figs. 1 and 2 are laid together sothatthe sides of said pieces which are on the inside of the corset when the corset is finished will face each other, and the edges of the parts are thus on the outside of the corset when the parts are expanded, and the inside of the corsetis smooth, the seams being what are called hidden seams. All the patterns are thus sewed together, the edge of the piece of each higher number (shown in the drawing nearest the lower number) being sewed to the edge of the lower number nearest to it. When all the The pockets formed in the 5 seven patterns Figs. 1, 2, 3, 4, 5, 6, and 7 have been thus sewed together, the shape of the whole forms one-half of a corset so shaped as to make the form desired.
  • The hip-piece d, Fig. 9, is a narrow strip, with its sides parallel about one-half its greatest length, with a gore-shaped or flaring lower part, having pockets for bones of decreasing length, as shown in Figs. 8 and 9. This piece at is sewed over the outer side of the corset, so that the seam connecting patterns Figs. 4 and 5 comes under it at or about the heavy dotted line shown in Figs. 8 and 9 by the letters 0 o. This piece, while giving shape to that portion of the corset, also serves as a protection or shield for the hips, upon which the outer garments may lie.

HISTORY

CORSETS OF 1878

1887

American corset found at the Metropolitan Musuem (USA) is dated at around 1878. The upper edge is cut flat across the bust and the front lower finishes over the hips slanting to a deep V shape. The corset similarly to the patent appears to feature multiple boning by rows of parallel stitching creating the channels. Bust gores give this corset extra shape.The decorative stitches (flossing) at the lower edge prevent the boning from forcing its way out of the channels. The corset is finished with a deep lace along the upper edge.

light blue silk corset with flossing 1870-1885

American corset dated 1870-1885 found at the Museum of Fine Arts, Boston USA (Accession number 201:616). Constructed from light blue silk the corset features a straight busk front with double gusset at the breast. Heavily boned all the way around the corset has multiple rows of stitching sandwiching whalebone between the layers of fabric. The gussets also appear to be corded providing additional shaping and support to the bust area.  Decorative flossing is used in white contrast thread to hold the bones at both upper and lower edges.

Pattern Draft:

My  first pattern draft based on my measurements. I enlarged the pattern pieces of the patent as a rough base for the piece shapes amending each piece accordingly. I renamed this pieces as follows from left to right CENTRE FRONT, FRONT, SIDE FRONT, SIDE, SIDE BACK, BACK, CENTRE BACK

I realised when I made up a toile of the pattern I needed to increase the body length of the entire corset pattern from the over bust to waist by 2cm. I extended the pattern from the waist and reshaped the pieces.

PRE CONSTRUCTION
Prior to commencing construction there were a few preparation stages (not photographed) beginning with the fabric cutting. I chose a dove grey spot broche coutil. I liked the sturdiness of the fabric which would be suitable for the single layed panels.

  • Cut a double layer of coutil for the CENTRE FRONT/ FRONT/ SIDE FRONT/CENTRE BACK  (2 pairs)
  • Cut a single layer of coutil for the SIDE/ SIDE BACK/ BACK (1 pair)
  • CUT a single layer of coutil for the additional bone pocket (1 pair)
  • I prepared all the bone casings. I cut strips of the coutil of approx 36mm wide (following the selvedge) I Used a tape maker to make 18mm bone casings. 5mm spiral steel boning would be used in the double channels

CONSTRUCTION

Inserting the busk: I decided to add a modesty panel behind the busk to stop any flesh showing through the gap of the fastenings. This was created by using a panel of folded coutil and inserting it into the studded side busk seam.

The seams were then joined wrong sides together of the CENTRE FRONT and FRONT panels (double layer together)  The seam was covered externally by the bone channels.  These were positioned centrally over the seam. I edge stitched on either side before using the edge of the foot as a guide to stitch down the centre of the casing to create a double channel.

I then machine stitched rows of channels approx 8mm wide as indicated on the pattern pieces.

The panels were joined in the following order. All the seams joined wrong sides together so seams appear on the garment outer

  • FRONT/SIDE FRONT (double layer of coutil). More rows of stitching creating bones channels following the pattern.
  • SIDE FRONT/SIDE
  • SIDE/SIDE BACK
  • SIDE BACK/BACK
  • BACK/CENTRE BACK

Close up where you can just see the rows of stitching for the bone channels in the front and side front pieces


Creating the bone pocket: The bone pocket (figure 9 in the patent) was an additional panel that would be placed over the top of the seam between the SIDE and SIDE back panels. This would strengthen the corset whilst maintaining lightness- using just the single layer of fabric for the SIDE/SIDE BACK/BACK pieces. I developed the pattern by drawing the shape on my initial toile, cutting and retracing  to get the shape.

Toile of the bone pocket. Channels stitched to figure out the number of bones to go in the pocket.

The seams were pressed under on either side before the panel was top stitched into place. Rows of stitching creating channels were made following the front of the pocket.

Rows of stitches were created in the pocket for the boning channels using the machine foot as a guide parallel to the front of the piece.

Boning: Spiral steel bones were cut to length and tipped before being inserted into all the channels. Flat steel bones were used either side of the eyelet channel to provide stability.

There are a total of 50 bones in this corset. A combination of spiral steel and flat steels at the centre back. Over 8 Metres of boning is used.

One half of the corset. A close up showing the boning inserted into the channels.

FINAL CONSTRUCTION STAGES

Binding: I chose a silver raw silk slub fabric binding for the upper and lower edges. The binding was made cutting the fabric on the bias grain and pressed using a 18mm tape maker.

Eyelets: Finally the corset was eyeletted using silver metal eyelets to match the busk. 12 pairs of eyelets were used in keeping with the patent illustration.

THE FINISHED CORSET 

wp-image-693320875jpg.jpgwp-image-1524345232jpg.jpg

wp-image-1216454230jpg.jpgwp-image-1036267013jpg.jpg

1887 B BALDWIN PATENT 358249: PART 2

NOTE *This article was originally published January 2015 for Foundations Revealed. The link can be found here.

This article is the second part of a 2 part series dedicated to a patent by B Baldwin of 1884. First part found here.

INSPIRATIONS
I spent quite a while deciding on what material choice I would make for the corset. One of my favourite corsets is by  R & W.H Symington of Market Harborough, a red and black sateen corset dated around 1900. Now although this would have come after the patent I love the colour play and decided to colour block the panels so the gore detail could be seen as well as the curved line from the back to the front an integral feature of the patent that represented Hogarth’s line of beauty.

If this patent was manufactured It would probably have be constructed using a single layer of coutil.  I decided that this corset would be made with a fashion layer backed with coutil and then lined so all the inside is neatly finished

The start of the article will look at the text provided with the patent which gives a small insight into its construction. For reference I decided to scale up the drawing and highlight the bone pockets that featured on the outside of the corset. The illustration made it clear where they should be placed  and how many.

2

• “11 denotes the bone pockets which are formed in the usual manner in this class of corsets- that is, by stitching independent strips outside of the sections of the corset during the process of manufacture”

• The bust gore seaming is hidden by the bone casing.
“It will be seen in Fig 1 that the seams joining the bust gore and the front body section, the seam joining the front of the underarm section to the front body section and the seam joining the front of the back hip gore to the back body section are wholly conceauled”
It can be seen in the illustration the double dotted line representing the visible curved line. It gave indication of the order which pieces joined together. I actually thought the double line of stitching g was a nice decorative feature too.

• “12 denotes a curved and recurved seam (Hogarth’s line of beauty,) which extends from the top of the corset at the back, following naturally the curves of the body from between the shoulder blades down across the waist and over the hip at the front.
• “Commencing at the bottom, this seam first joins the back edge of the front body section and the front edge of the front hip gore. After passing off from the rearwardly extending tongue 13 of the front body section, and joins that to the front of the back body section. It then passes off from tongue 13 and joins the back of the underarm section to the front of the back body section”

PRE CONSTRUCTION
Prior to commencing construction there were a few preparation stages I had to make which I haven’t included photographs off but are as following beginning with the fabric cutting.
• cut a single layer of coutil for Front, back, bust gore, back bust gore, front hip gore back hip gore
• Cut a double layer of coutil for the centre front, centre back
• Cut a single layer of silk for the front, back,  front and back hip gores and front and back bust gores . I decided I wanted to show off the curve so cut the front and back in black and the gores in aubergine
• Cut a single layer of cotton liner for the front, back,  and bust and hip gores
• All the silk pieces were fused with a medium weight woven fusing
• I prepared all the bone casings. I Fused the slate silk and the cut strips of approx 27mm wide (following the selvedge) I Used a tape maker to make 12mm bone casings. I also cut 2 strips of 5mm silk and made bone pockets with a 25mm tape maker. These would be for the sides.

CONSTRUCTION
Following the advice from some of the other articles on Foundations Revealed I pin rolled the silk pieces to the coutil layer so they could be treated as one.  In the past I have basted the layers together with a long running stitch around the edges but in many occasions still have the annoying rolls and creases appear.

20141122_121205

Demonstrating pin rolling to the back hip gores

1. Inserting the front bust gore into the front panel
To insert the bust gore I needed to spread open the slit in the front pattern. This would be hardest part of the makeup as it would be required that I stitch the straight edge to 2 convex edges whilst maintaining the sharp point at the bottom of the gore.
As the point was very tight I wouldn’t be able to manoeuvre the needle and foot and turn the work whilst stitching the panels right side together (I tried with little success in the toile).
I decided to overlap the seams and stitch directly on the top on the outside layer. I firstly drew on the seam allowance on the gore 10mm  around the point. The front was slightly different. I used 10mm at the top of the split (upper edge) and tapered it down to 5mm to the point. I pressed back the seam allowance on the front panel and slit around the edge making sure I slashed down to the apex of the gore.

20141122_132901

The seam allowance drawn on for the front bust gore

I then placed the front panel over the gore and top stitched around. The slashes enabled me to easily work the slit open and around the gore.

2014-11-22 13.27.23

The front bust gore inserted

2. Inserting the back hip gore into the back panel.
The same method of application would be applied inserting the back hip gore into the back as the front bust gore above. This was slightly easier as the corner was at more of a right angle so easier to manuveor the needle as opposed to the slit in the front panel I had to spread open. A second row of stitching was also applied to the curved  edge going back toward the CB.

3. Joining the back panel to the front hip gore.

Next I joined the front edge of the back panel to the front hip gore. I overlapped the seam so that the double row of top stitching was made on the back panel.

9

The back panel and front hip gore

20141122_131416

The back panel and front hip gore sewn together

4. Inserting the back bust gore into the front panel
The pieces were joined using the overlapping seam technique as applied to the other gore panels. It was important that the drill hole on the front tongue and the notches were carried over to the pieces to allow for the pattern to align correctly. A second row of stitching was applied to the lower edge.

11

The back bust gore and the front panel

12

The front panel with the back bust gore inserted

5. Joining the front and back sections and adding a double row of stitching going down.

Working with opposing seams it was important to add plenty of notches particularly where the front met the hipgore/back panel seam and the intersection of the back bust gore/back panel. At this point I really loved how playing around with colour for the panels drew attention to the panels and just how interesting this patent was.

13

The front and back panels pinned together and ready for sewing

6. Make up the centre back strip right sides together, seam the CB and topstitch.

Join to the back panel sticking only the top silk/coutil layers. The under layer would join to the liner.

7. Inserting the busk

8. Joining the front to the centre front outer
When joining the centre front panel I stitched only the top layer of silk/coutil. The under layer would join to the liner. I top stitched the centre front layer.

16

9. Further Construction
Using the edge of the foot stitched channel in the CB for the eyelets and bones either side. And also a channel in the centre front for an additional flat steel.

17

The lacing panel

10. Applying the bone casings
The corset patent demonstrated there were external bone pockets with the majority focused on the front. Counting the bones that appeared around the front I realised that due to my small frame I  wouldn’t be able to squeeze in as many as the patent illustrated. My large print out of the patent came came in handy where I highlighted the casings to make easier to see.
There were 11 12mm bone casings in total shown plus the larger side pocket that would 2


18

Original boning channel diagram

I started from the side where the wider bone pocket was placed.  This bone pockets were positioned relatively straight up and down the corset. The side bone pocket was positioned half over the front seam of the back hip gore.  I then worked my way from the front around to the side pinning the bone pockets into place. The front bust gore seams were hidden and a bone pocket also went thought the centre of the gore. A casing also covered the front seam of the back bust gore.
The front bones pockets tapered down to side by side at the waist position  and then spaced out evenly as I worked my way to the back. As I was pinning them on I began to feel that I was losing the colours covering with external casings and I wouldn’t be able to appreciate the panels of the finished corset. I Added an addition casing at the back (not featured on the patent) as aesthetically I felt the gap was a little out of proportion in comparison to the others. Presumably if I had a bigger frame all the other casings would be a little more evened out.

11. Make up lining layer.

Fabric seamed together right sides. The gores were inserted exactly the same as the outer layer, although I left out the double row of stitching. Attached right sides together to the facing of centre front and centre back. The corset could then be turned through.

21

All the bone channels sewn down

12 . Boning
Spiral steel bones cut and tipped to length s were inserted into all the seam pockets. Flat steels were used in the back. I was uncertain at first due to the curvature on the pattern and whether this would affect the choice of bone into the seam. I wondered whether the flat steel would fit the seam allowance or whether it would tear under pressure.

13. Binding
I must admit I cheated with the binding. Usually I would make it as I did the casings but I had some black Cotton pre made to hand. I first machine stitched it to the underside and then flipping it over and hand stitching.

14. Decoration

Like many of the corsets of the patents time I decided to decorate with a deep embellished  lace trim hand stitching the lace to the upper edge. Being as this corset would be worn as a fashion outerwear garment as opposed to lingerie I chose to place the lace scallop over the edge for a little style detail.

15. Finally the last stage was to apply the eyelets.

THE FINISHED CORSET

27

PHOTOGRAPHY: VAPOUR TRAIL PHOTOGRAPHY


_MG_3576 copy.jpg

MODEL: BEX FISHER, PHOTOGRAPHY: MONIAPHOTO


_MG_3584 copy.JPG

MODEL: BEX FISHER, PHOTOGRAPHY: MONIAPHOTO

 
CONCLUSION
Overall I love the finished corset, the colours and the applied lace finishing. I really enjoyed this challenge using gores as a way of adding capacity. I tried to be true to the patent sketch and for this corset did not adapt it too much. Obviously as this pattern was fitted for my small frame I feel it is a little swamped in casings to the outside. I think I’ll play around with this pattern and use a combination of casings applied to the external and internal of the garment so more of the colour blocking and gores can be seen. I really do like how effective using the coloured silks for the gores and casings were and placing emphasis on the different shaped pieces.

 
Fit

  • I found the corset to be fairly comfy to wear and wasn’t too restrictive so the patent worked to Baldwin’s intentions.
  • I was really pleased with the fit of the corset. I was slightly surprised that the gores did in fact work with my frame and I feel confident in using them again in future designs regardless of size. I really loved the curves the gores created probably helped with the choice of restriction applied to the waist being greater than that of the hip.  I actually like a little bit more waist reduction so maybe this is something I can also adapt the pattern to later on.
  • I think being as this is a fashion style corset I would also raise the centre front creating more of a sweetheart shape neckline and adding into the depth of the bust gore for a little more coverage.

Things I’ve learnt

  • PIN ROLLING… I think from now on every corset I make ill be applying this technique. So pleased with how effective (and surprisingly not very time consuming) this preparatory technique is in the overall finish.
  • INSERTING GORES…Now I have mastered the technique of inserting gores I am fairly confident that they will feature in many more of my own patterns in the future.

I really hope you’ve enjoyed these articles as I have found the journey of making a corset from a patent. Feel free to ask any questions with regard my techniques or processes.

<ahref=”http://www.bloglovin.com/blog/14331383/?claim=qjpg88ctuex”>Follow my blog with Bloglovin</a>

1887 B BALDWIN PATENT 358249: PART 1

NOTE  *This article was orginally published January 2015 for Foundations Revealed. The link can be found here*

1887 B Baldwin Patent: Corset and method of making the same

This is the first part of a two-part series discussing B Baldwin’s 1887 patent 358249. This article will discuss the patent, it’s pattern and how it was created whereas the second will focus on recreating the corset and my methods used in its construction.

When I first saw this patent I was immediately attracted to the unusual paneling and the wonderful shapes the lines created. Personally I love corsets which have a focus on the waist section, such as some of the ventilated styles as opposed to your typical Victorian style with their up and down straight panels. I thought I could have some fun playing with color when recreating the pattern for the final corset.

As I’ve not before incorporated gores/gussets within a corset pattern before I knew this would also be a personal challenge. As someone with a petite frame and from a pattern cutters point of view I’ve associated gores and gussets with adding capacity and support for the more curvier figure. From a construction angle I must admit so far I’ve always avoided them as I knew it would be challenging to insert, particularly sewing round the corner at the apex of the gore. This patent would definitely be a learning curve both pattern wise and testing my sewing ability.

The Patent

The patent is comprised of two main parts, the first illustrates the corset and it’s parts- drawings of the pieces and the second is the specification that forms the letters of the patent declaring the description of the invention. The patent can be found here.

Baldwin’ patent relates invention of new improvements in corsets. As stated in the letters, Baldwin’s patent relates to the manufacture of corsets and its general object to Simplify and improve their construction. This could be accomplished by ‘so shaping the pieces of which each half of the corset is composed’

Part A shows two figures as seen below:

1

FIGURE 1 shows a completed half corset with all the stitching detail demonstrating the contruction in line with the written description

2FIGURE 2 is a general view showing an outline of the pieces of which the half corset is composed.

Patent Observations

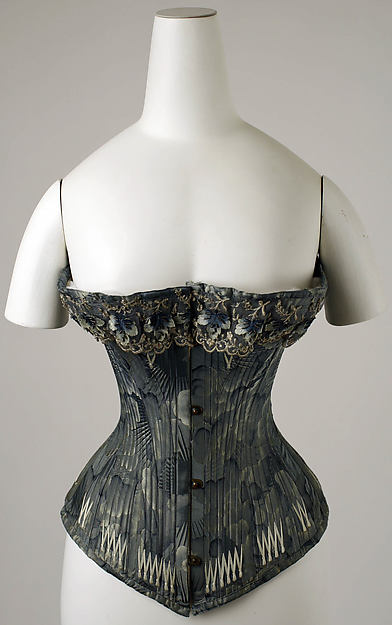
  • The pattern was made up of 16 pieces (8 per half) it featured both hip and bust gores.
  • Straight front busk used. No indication of depth of centre front given so length would be determined later on.
  • The main body of the corset was made up of 4 pieces. I’ll rename the pieces as follows for the remainder of the article which will make it easier to distinguish than the numbers of the pieces in the patent (which in my opinion) were oddly marked Centre front (1), – – Front (3), Back (7), Centre back (2).
  • The gores would also be referred to as Front bust gore (5) back bust gore (6) front hip gore (10) back hip gore (9).

Centre Front- The centre front was a straight strip piece to which the front was joined. The front seam of the FRONT Panel was curved which would give some curve to the corset over the abdomen region.

Front- As indicated on the drawing Point 4 denotes a slit cut into the pattern which would be opened out to insert the FRONT BUST GORE. The BACK BUST gore would also be partially joined.

Back- Would feature a cut away section which would be opened out slightly when inserting the BACK HIP GORE. This piece would also join to the FRONT HIP GORE creating that S bend curve.

Centre Back The centre back was a curved piece which would help curve the corset inward following the curvature of the spine. I did initially wonder at this point how the seam would be boned.

Object of the Patent

Relates to the manufacture of corsets, and has for its general object to simplify and improve their construction’ this would be achieved by the patent pattern lessening the number of seams in the garment.The essential principle being that the front and back body-sections are joined by a single curved and recurved seam, which follows naturally the curves of the body from between the shoulder blades at the back of the corset down across the waist and around the front of the hip to the bottom of the corset at the front. In doing so the corset will closely naturally to the figureThe corset will conform to the curves of the figure without the necessity of pressing or forming it into shape.There being no special pressure or tightness at any of the seams or at any portion of the corset.Baldwin also states in his letters that completed corset when drawn tightly around the figure ‘bring an embodiment both of Hogarth’s ‘Line of Beauty’ and the Grecian line of Grace. This would be achieved via the corsets construction and Baldwin’s principle of the front and back sections being joined by a single curve. I decided to do a little bit of research.

Hogarth’s Line of Beauty

3

The line of Beauty is a theory in art or aesthetics used to describe an S-shaped curved line (a serpentine line) within an object.

The theory originates with William Hogarth and is an essential part of his theory of aesthetics as described in his Analysis of Beauty from 1753. According to his theory it is to be observed that straight lines vary only in length and therefore are left ornamental. Curved shaped curved lines signify liveliness and can vary in their degree of curvature as well as length.

This theory can be seen with the curved and recurved seam taken from Baldwin’s notes commencing from the bottom the seam first joins the back edge of the front body section and the front edge of the front hip gore. This seam passes along the rearwardly extending tongue of the front body section and joins that to the front of the back body section. It then passes of from the tongue and joins the back of the underarm section to the front of the back body section.

Initial Thoughts

When I first looked at the drawing of the corset I found it a little intimidating to envisage how the pieces would come together for the finished garments especially with the external bone casings providing the structure. I wanted to be clear on its construction and how it was intended to fit the body before I adapted the pattern to my own measurements

I therefore decided to do some further research into some of the history of the time. Moreover look at some of the corsets from this time and the assignor to Thomson, Langdon & CO.

History

The patent was assigned by Thomson – presumably Thomson, Langdon & Co. (American, founded 1865) was probably most known for his glove fitting style corsets. The illustrations below are actually of a later date so maybe this corset patent of 1887 as a fore runner to the later styles. The Foundations Revealed article by Marion McNealy provided a lovely timeline of the styles.

4

5

Corsets of 1887

I also used The Metropolitan Museum in New York online site for some visual sources of actual corsets from this period for inspiration on fit, colour and fabric. For anyone that is not familiar it’s well worth a look. Admittedly I did spend quite a while looking up corsets from this period but will just include a couple for the sake of the article.

CI46.27.6_F

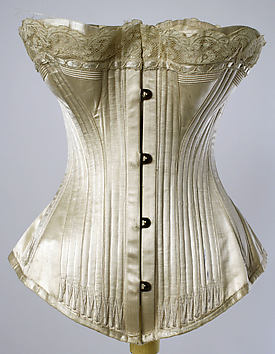
Ivory Silk Corset dated 1887 – Made of ivory silk the corset featured a front bust gusset. (Laura Loft has a useful article discussing gores and gussets). The article describes as a piece inserted between 2 panels and a gore being a panel inserted into a slit which was opened out during manufacture. The corset has a straight upper edge with a deep lace trim. The external bone casing were positioned close together at the centre front providing lots of support to the abdomen.

50.105.41_front_CP4

American corset dated between 1885-1887. Another corset featuring a gusset instead of a gore. I wondered whether this technique was used often. Gores would certainly be harder to insert pivoting the apex around the slit. The corsets of this time seemed to be cut quite low and straight over the bust perhaps keeping level with the overbust line. I also noticed that the corset lower edge sits high up on hip and featured a smooth dipping curve to the CF.

Planning Stages

My body frame is quite small so I was interested in whether the hip and bust gores would really work for me. Typically they provide capacity in these areas but being quite petite I wondered whether they would be too much and I would have to reduce them right down. Was there any point in making this corset for me? Or should I find someone of a more curvier figure. While I’m probably not the right figure for this style, never the less it would be interesting to see how this style of pattern would fit a small frame.

Things to consider – The sketches of the patents pieces would not be accurate scaled versions of the final corset. I would work with them loosely but would provide a good starting point for piecing together and seeing how the corset fitted together.

Observation – I would probably add some height into the bust gores as they came under the over bust line to make it more wearable for the modern day wearer me who wouldn’t be wearing it as an outer corset as opposed to undergarment

Measurements

Usually I work to a 2 inch reduction throughout my corset patterns for bust, waist and hips. However as the patent stated ‘The corset will conform to the curves of the figure without the necessity  of pressing or forming it into shape’. I Decided on a 5cm/ 2″ reduction of the waist with less on the upper body and none on the lower body. I would still have some defintition of the waist without the corset being too constrictive.

Measurements

  • Overbust: 76.5cm
  • Underbust: 69cm
  • Waist: 64cm
  • Top hip: 79.5cm
  • Full hip: 86 cm
  • Over bust to underbust: 6.5cm
  • Underbust to waist: 12cm
  • Point of bust (POB to POB) 18cm
  • Waist to top hip: 10cm
  • Waist to full hip: 20cm

I then made a table to work out my corseted measurements:

Screenshot_2016-02-21-19-07-49-1

Approach to the pattern

Baring in mind the patent was only an indication of the pattern pieces and not actually a pattern itself to adapt, I decided before working to any measurements to piece together the patent to get a 3rd visual idea of the pattern. This would help determine grain lines of the pieces as well.

As a commercial pattern cutter (my day job) I was fortunate enough for the purpose of this challenge to have access to a large scale plotter. Yay- this would save the time of lots of cutting and sticking.

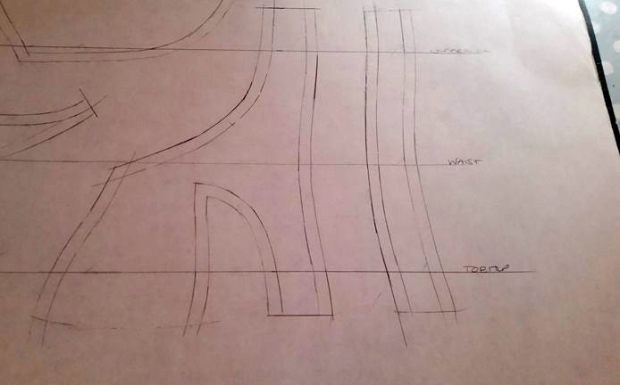
I enlarged the patent to 600% a rough guess of the scale as a starting point. (on a side note the diagram was also printed out and proved most useful as a visual aid for how the panels were joined shown later on and for the bone placement.

I cut out and carefully pinned together the pieces of the patent in order to get a 3D impression of how the corset would shape to the body. The hip and bust gores gave a lot of shape and curve emphasis as noted by Baldwin in his patent. I found that the centre front and front panels gave the corset quite a curve over the abdomen demonstrate which could be seen on some of the images previously mentioned above. The curve was quite flattering and worn would smooth over the stomach area.

NOTE: I compared the 600% scaled version to my measurements and found they were way out. I repeated the exercise printing out the pieces to 500%. I intended on working with something slightly closer to my corseted measurements as a starting point.

Drafting the pattern

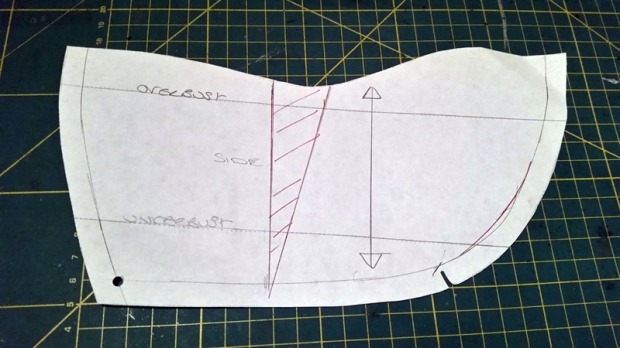
First, I used spot and cross paper (on the reverse), a method I use at work. I’m able to still see the faint markings from the reverse as a guide but don’t find it so distracting when working with small increments in the adjustment stage.

14

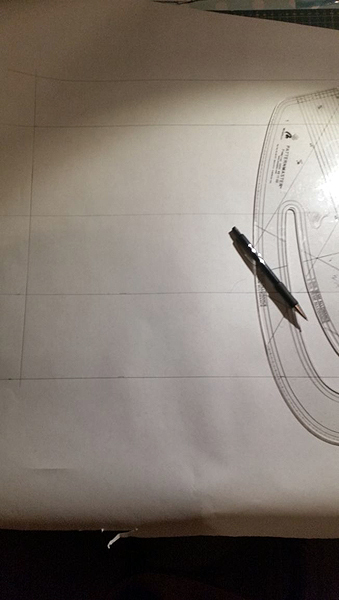
My first aim was to ensure the lines representing the overbust, underbust, waist, top hip and full hip were spaced according to my measurements. I lined up the waist on the scaled up patent pieces which I had gauged when it was placed on the mannequin on the main pieces now renamed CF, FRONT, BACK and CB and drew around.

15

I realised straight away that the position for the bust gore was in totally the wrong place in comparison to what my measurements said. This could be due to a couple of reasons. The main and probably most likely was the scale at which the pieces were enlarged by. Realistically to get a truer size the patent probably should have been enlarged somewhere between the 500 and 600 %. Also quickly comparing my measurement to that of my mannequin I realised that the length of my body between the underbust line and waist was greater. I decided that the next step would be extending the pattern at the waist so all the pieces lined up with the critical horizontal measurements axis.

1617

At this point I realised I most likely would make a couple of toiles. Working from a patent I wanted to get a feel for the corsets construction and it’s intended look. It was crucial that the pattern maintained the S bend curve through from the front and back. As I would be cutting right through the waist to extend the upper section of the pattern I would have to reshape the curved line.

At this point I decided I would ignore all the other measurements around the body and work first on the depth adding a total of 6.5 throughout the garment. I determined from piecing together the patent that the seam allowance included was roughly around 10mm. This was marked in to to avoid confusion. I carefully traced around the pattern ensuring that I marked in all the horizontal lines which would help repository the pieces. After some consideration I decided that I would add 5cm depth between the underbust and waist. Looking at where the hip gore started I decided also to drop from the waist to the top hip by 1.5cm

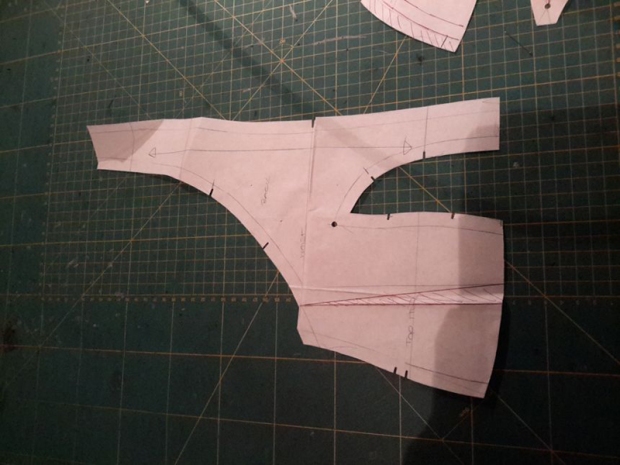
On the CF, FRONT, BACK, CB pieces I cut along the waist line

1819-1

On a fresh sheet I marked in the waist position, I faintly marked lines 5cm above and 1.5cm below which would be my guide for repositioning the flat pieces. I drew around the pieces aligning them vertically. The centre front and centre back I simply filled in the gaps.

20-121-1

The front and back sections were more difficult and it took a couple of attempts to get the right shape curves. At this point I had to use the front hip gore to check my seam measurements were correct for the main curve that joined the front and back. This was probably the hardest part as the seam ran through so many pieces.

22-123-1

At this stage I also ensured that all the other seams aligned correctly before making my first toile.

Toile 1

Observations

  • Hip gores start too low
  • Too much bulge over abdomen
  • Excess fabric over hip
  • Excess fabric over bust

Toile amendments (work on the half)

  1. Raise waist line up by 1cm on all pieces ( which would lift up the hip gussets)
  2. Bust gore: pinch out 1cm24
  3. Side bust gusset: panel pinch out 3 cm. Reshape upper edge. Reshape curve toward back to flatten it. Initially I was going to take the 3 cm from the centre of the piece but realised I would have too much of an angle at the centre point. Instead I took out 3 x 1cm equally spaced throughout the piece.25
  4. Front hip gusset:. pinch out 1cm from centre lower edge to 0 at upper edge . Then reduce lower edge by 1cm reshaping main S bend curve.26-127-1
  5. Front: Pivot pattern piece from waist down to move the seam over by 1cm this will eliminate some of the bulging over the abdomen. Pinch out 0.5m from main A bend curve at waist.28-1
  6. Back: Pinch out 1.5cm from lower edge over hip.29-1
  7.  Back hip gore: Pinch out 2.5cm from lower edge

Toile 2

For the second toile I considered construction methods and tested out how the final corset would be pieced together, this time also including the double stitching line and bone pockets.

For the boning I used a combination of spiral and flat steel bones. The flat steels were only used in the centre back panels to provide support either side of the eyelets. The Flexible steel was inserted into external Bone casings. This adds support but also allows for flexibility

Observation: This toile also allowed me to determine their placement. As I had taken out a fair amount of room over the hips I may not be able to use as many channels as were illustrated in the patent sketch.

Busk: I had determined that I would use a 14″ busk for the final corset. However for the sake of this toile I used something slightly shorter as my supplies were yet to arrive.